Created with the Personal Edition of HelpNDoc: Full-featured multi-format Help generator
Introduction
The MMG E-Konsulta (YAKAP) System
Introduction
The MMG E-Konsulta (YAKAP) System is a secure and integrated application designed to streamline the preparation, validation, and submission of PhilHealth claims for healthcare facilities. The system provides an efficient platform for managing patient records, clinical assessments, laboratory services, prescriptions, and claim documentation in compliance with PhilHealth standards and requirements.
By centralizing claim-related workflows, the system minimizes manual processes, reduces errors, and improves overall operational efficiency. It enables healthcare facilities to accurately process First Tranche and Second Tranche claims, generate required documents such as E-KAS and E-PRES, and monitor claim status through activity logs and historical records.
The system is built to support healthcare providers in delivering timely and accurate claims, ensuring data integrity, proper validation, and seamless coordination between clinical and administrative users. Through structured workflows and verification checkpoints, the system helps prevent Return-to-Hospital (RTH) cases, rejected submissions, and failed claims.
Vision
To be a reliable and efficient PhilHealth claims management system that empowers healthcare facilities to achieve error-free, compliant, and timely claim submissions, ultimately improving healthcare service delivery and patient outcomes.
Mission
Our mission is to provide a user-friendly, secure, and compliant system that:
- Simplifies the end-to-end PhilHealth claims process
- Ensures accurate data capture and validation at every stage
- Reduces RTH, rejected, and failed claims through built-in checks and confirmations
- Supports healthcare facilities in meeting PhilHealth requirements efficiently
- Enhances productivity and accountability among healthcare and administrative users
Key Features
- Master List - Retrieves patient record from the Philhealth masterlist database.
- Claims Processing - Automates the handling and submission of claims.
- Claims Data Validation - Ensures accuracy and completeness of claim information
- Detailed Reporting - Generates comprehensive and customizable reports.
- E-Prescription - Enable digital prescription creation.
- Billing - Handles the computation including payment status.
- User Activity Logs - Monitors and records system user activities for transparency.
- User Restriction - Control access levels and permission to ensure system security and data privacy.
- Claims Monitoring -Tracks claims statuses and progress in real time.
- Tranche Monitoring Dashboard - Provides a visual dashboard to manage and track tranche release efficiently.
- Data Migration - Supports secure transfer of existing records into the system.
- 2nd Tranche Payment Monitoring - Monitors and validates second tranche payments.
Created with the Personal Edition of HelpNDoc: Experience the power of a responsive website for your documentation
Welcome
 Medical Mission Group Hospitals and Health Services Cooperative of the Philippines Federation
MMG E-Konsulta (YAKAP) System
@2026 MMGHHSCP FEDERATION - FEDCIS 20231223.002
Created with the Personal Edition of HelpNDoc: Elevate Your Help Documentation with a Help Authoring Tool
Getting Started
Created with the Personal Edition of HelpNDoc: Transform your help documentation into a stunning website
System requirements
MMG E-Konsulta (YAKAP) System Requirements
System Requirements
Hardware Requirements
1. Workstations
- Minimum Intel Core i3 processor (or equivalent)
- Minimum 8 GB RAM
- Minimum 256 GB storage
2. Networking
- Reliable LAN/WAN infrastructure with high-speed internet access
- Wireless access points for mobile device connectivity
- Network security appliances such as firewalls and intrusion detection/prevention systems
Software Requirements
1. Operating System
- Windows 10 or later
Created with the Personal Edition of HelpNDoc: Write eBooks for the Kindle
The MMG E-Konsulta System
Created with the Personal Edition of HelpNDoc: Streamline Your Documentation Creation with a Help Authoring Tool
Login Interface
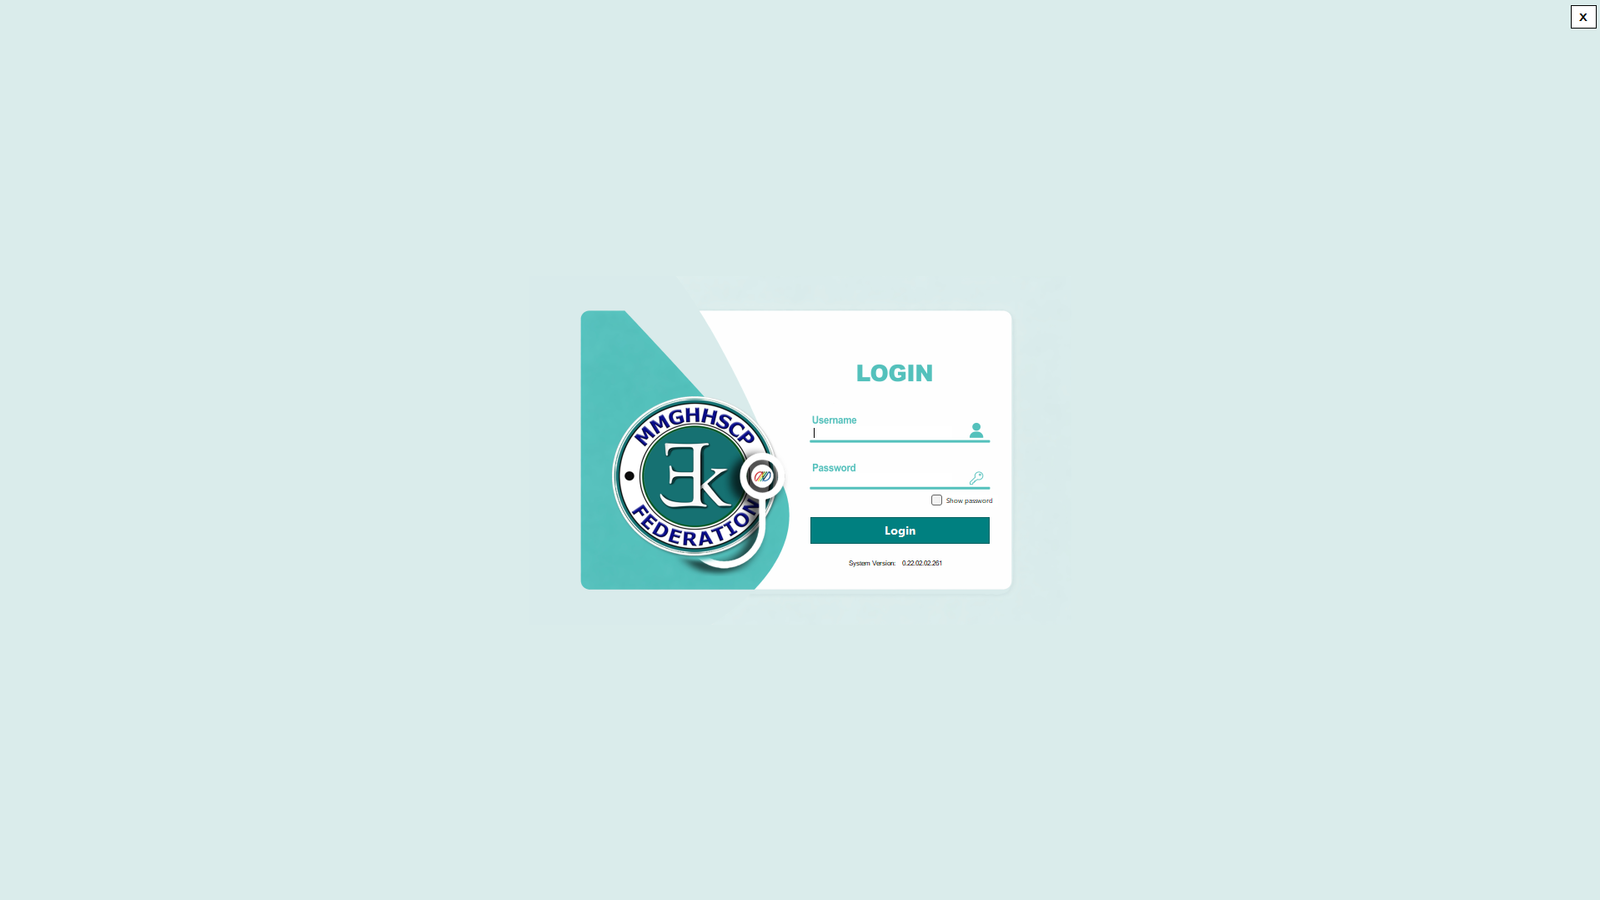
MMG E-Konsulta Login Interface
(MMG E-Konsulta Image 1 Login)
MMG E-Konsulta Login Interface
After the setting up server configuration and successfully connected on the server click the shortcut icon for E-Konsulta to open the E-Konsulta Login user interface.
- Open the MMG E-Konsulta System by clicking the E-Konsulta application.
- Fill the requirement field for Username and Password. Note:
- For Login, only use the credentials provided by Administrator/System Provider.
- If the given Username and Password doesn’t work, please contact the Administrator/System Provider.
- After inserting Username and Password click Login or press ENTER. The system will direct you on the E-Konsulta Dashboard
Created with the Personal Edition of HelpNDoc: Create help files for the Qt Help Framework
Dashboard
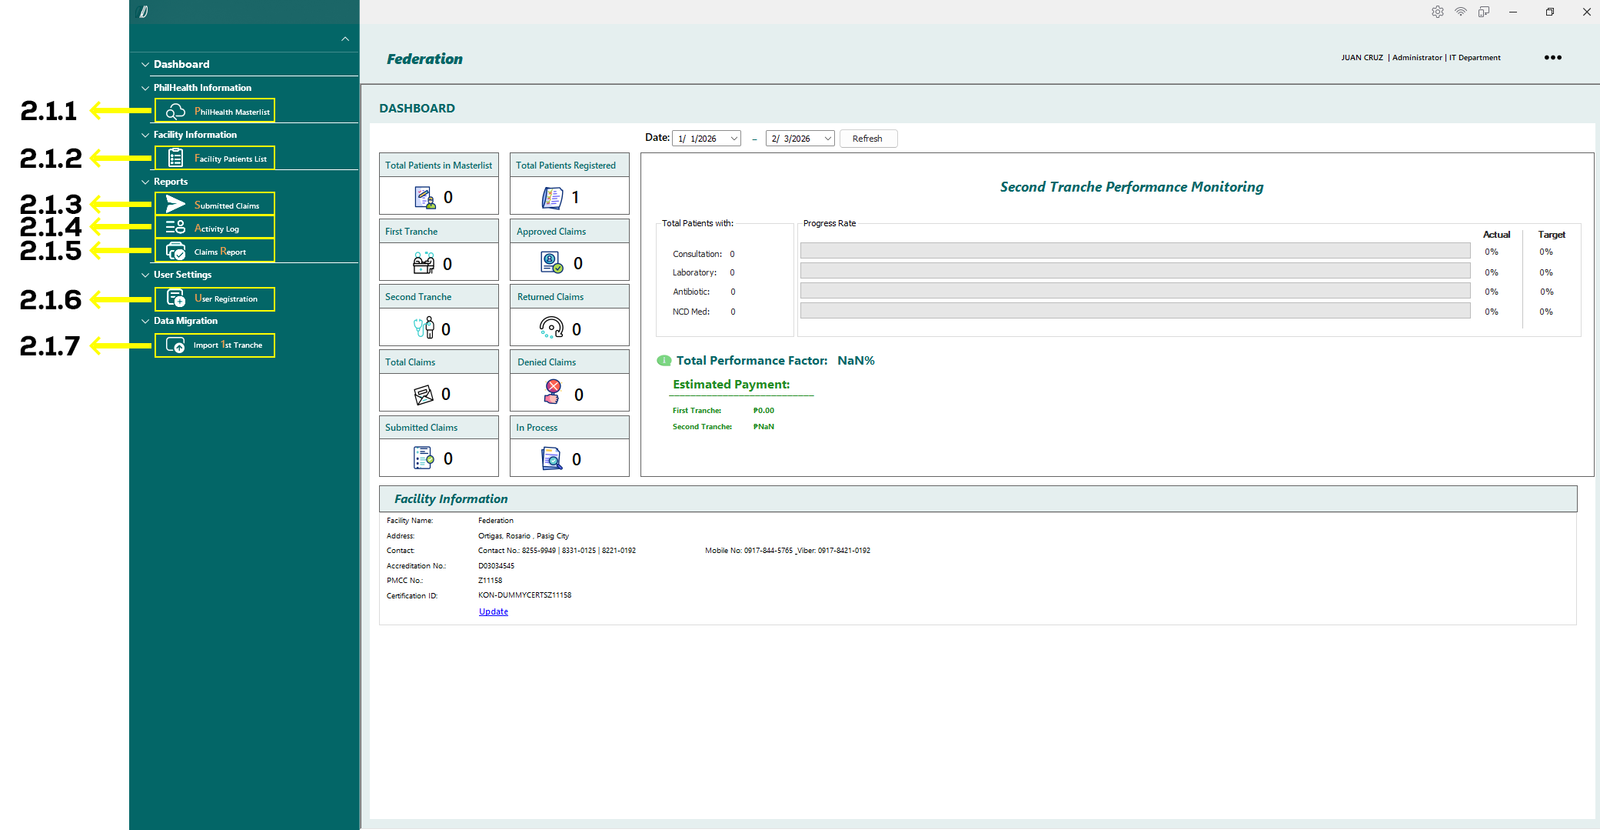
2. E-Konsulta Main Dashboard
(E-Konsulta-Image 2.1 Dashboard)
2.1 Navigation Menu
On the left side of the dashboard, the navigation menu provides access to the system’s main modules. All highlighted items are clickable buttons that redirect users to their corresponding pages.
- 2.1.1 PhilHealth Masterlist – Opens the master list of patients retrieved from the PhilHealth database.
- 2.1.2 Facility Patients List – Displays the list of patients recorded and transacted within the facility.
- 2.1.3 Submitted Claims – Shows all claims that have been submitted for processing.
- 2.1.4 Activity Log – Displays a detailed history of user actions and claim-related activities.
- 2.1.5 Claims Report – Generates reports related to processed claims.
- 2.1.6 User Registration – Allows adding or updating user accounts for facility staff.
- 2.1.7 Import 1st Tranche – Used to upload all data related to first and second tranche claims.
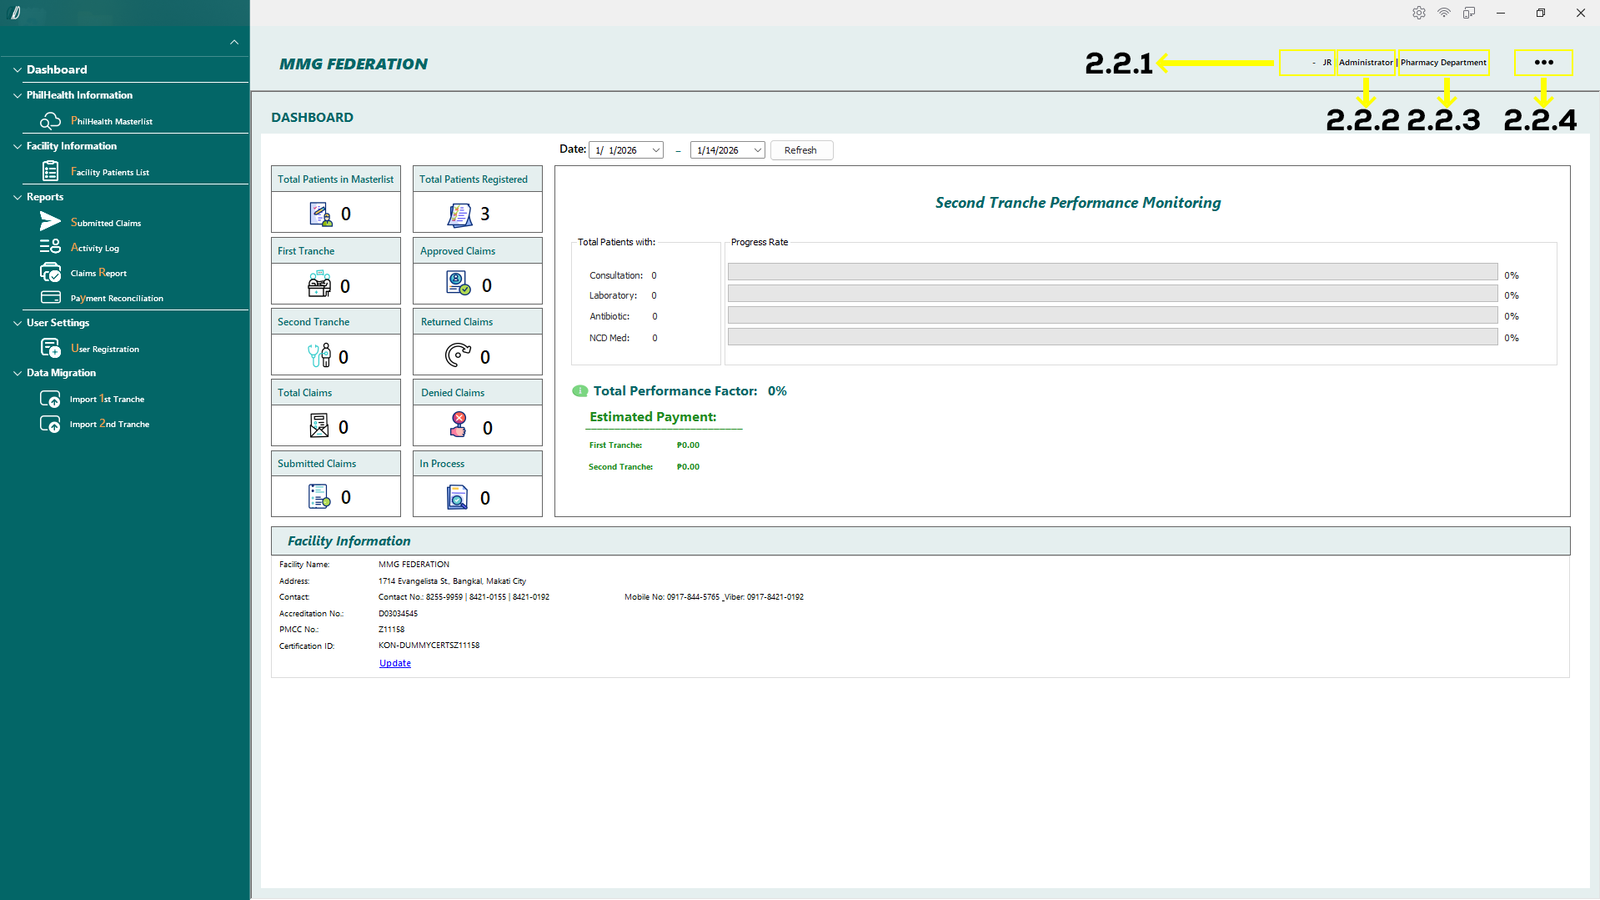
(E-Konsulta-Image 2.2 Dashboard)
2.2 User info
On the top right side, this displays the users info.
- 2.2.1. Displays current users Full name.
- 2.2.2. Displays current users role.
- 2.2.3. Displays current users department.
- 2.2.4. Three dot button to display more current user details.
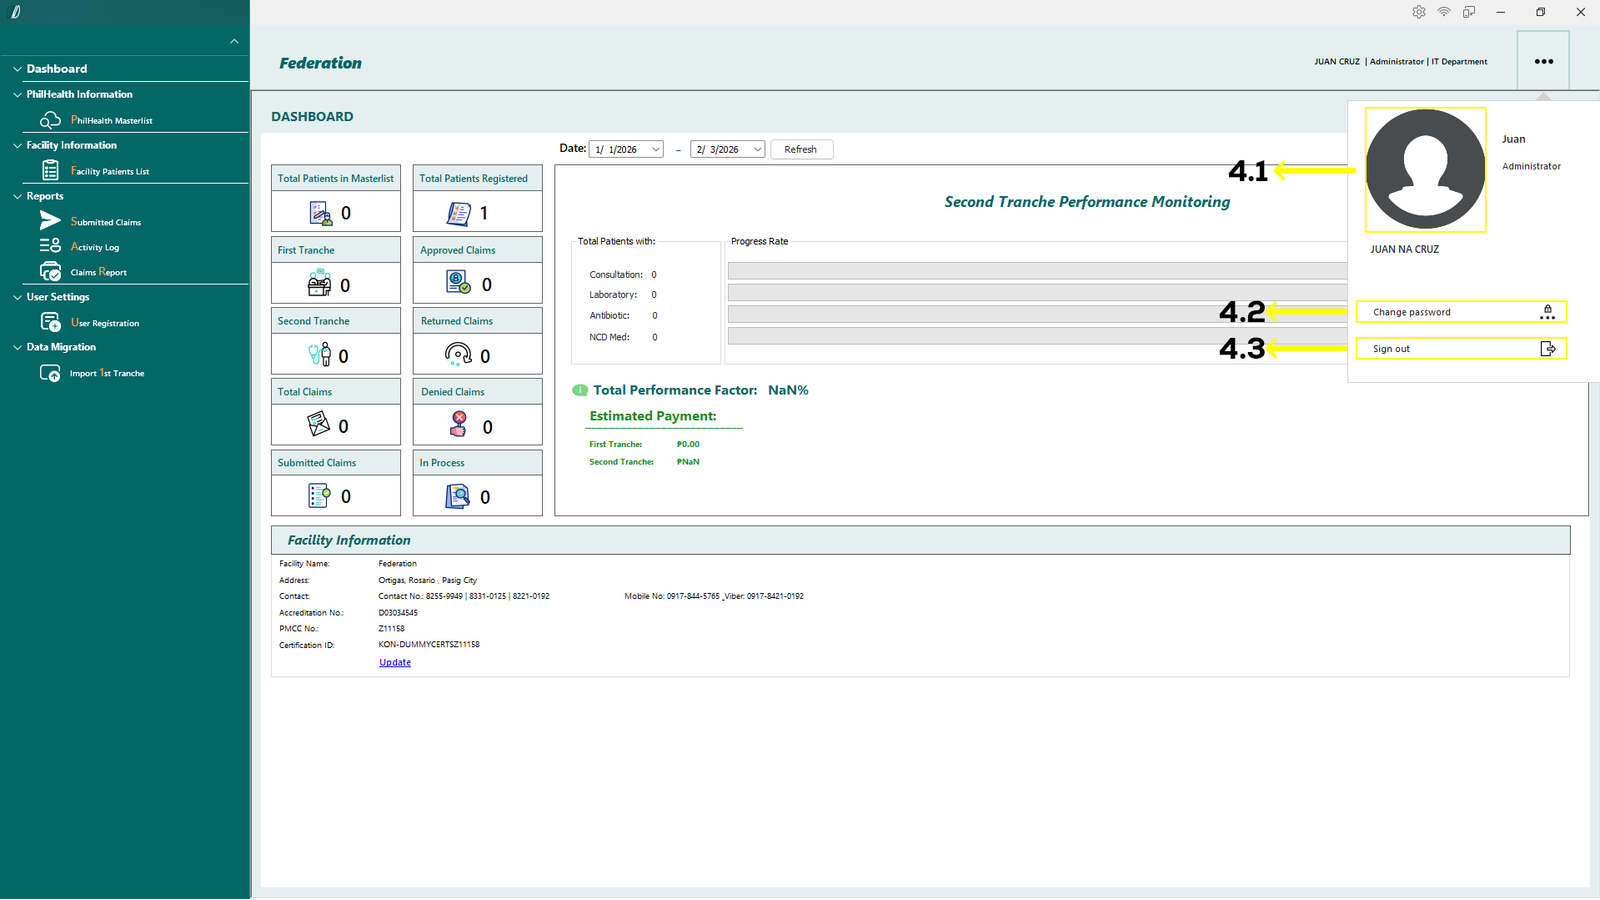
(E-Konsulta-Image 2.3 Dashboard)
By clicking the three dot (shown in 2.2.4), another use
- 2.3.1. Display current user image.
- 2.3.2. Button to change current user password.
- 2.3.3. Button to sign out the user from the system.
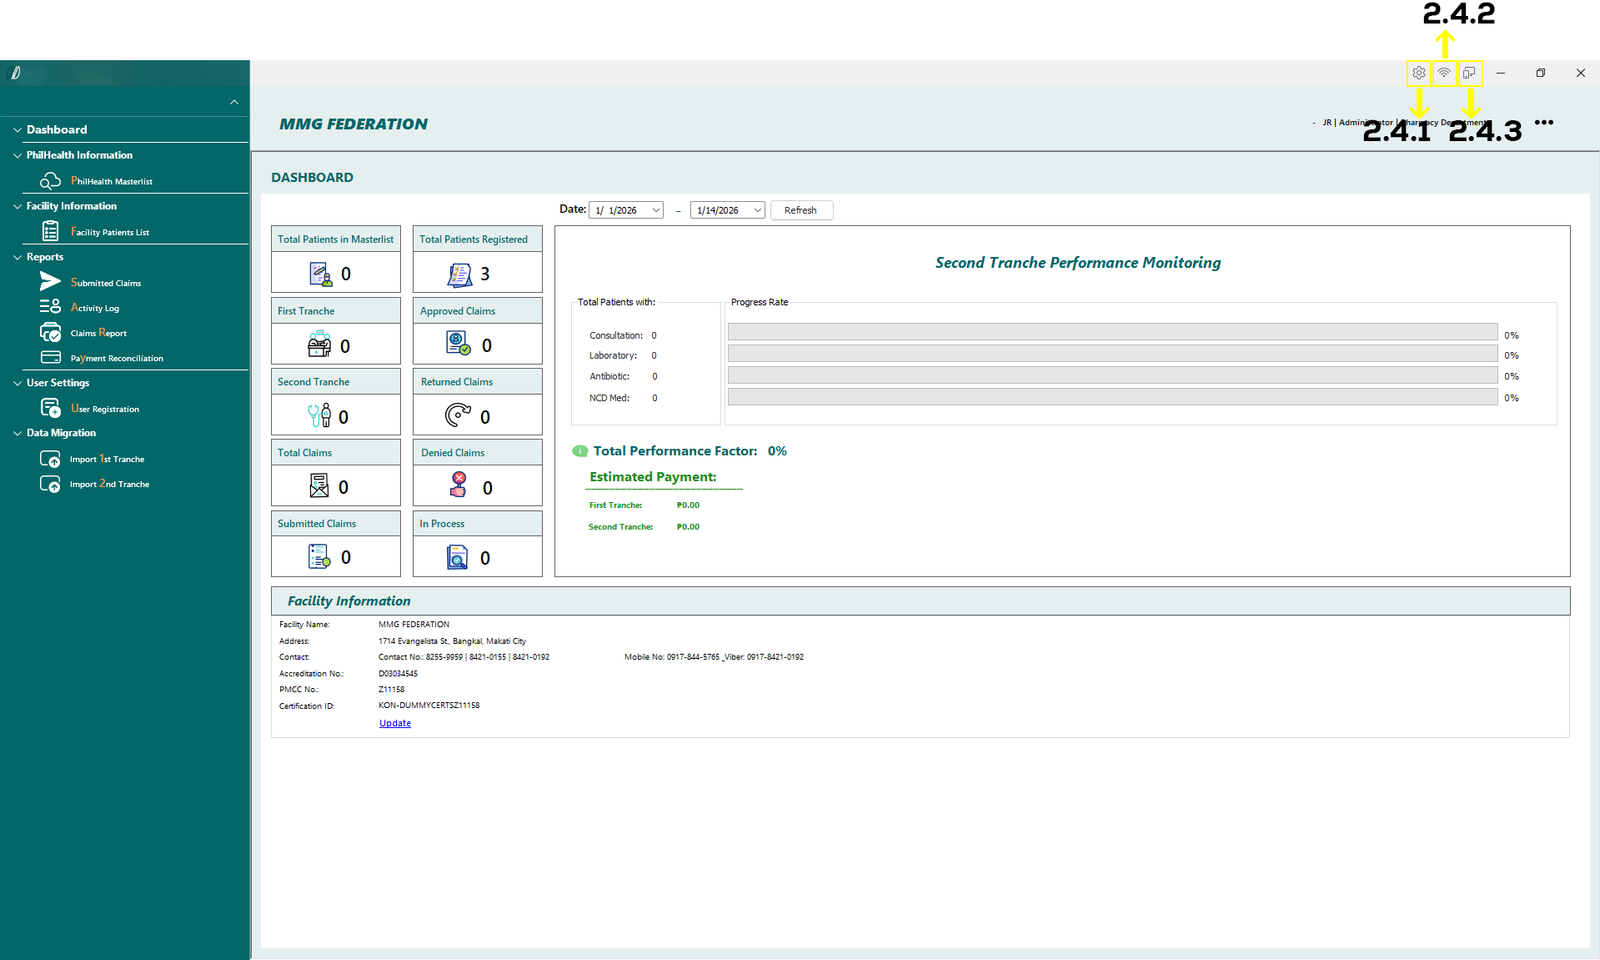
(E-Konsulta-Image 2.4 Dashboard)
2.4 System Status & Quick Access Icons (Top-Right Corner)
The top-right corner of the system screen contains quick status indicators and shortcuts that help users check system connectivity and access essential controls.On very top right, there is some button with
- 2.4.1. Allows the user to access system-related options and configurations.
- 2.4.2. Show if you are connected to Philhealth database.
- 2.4.3. Show if you are connected to local database.
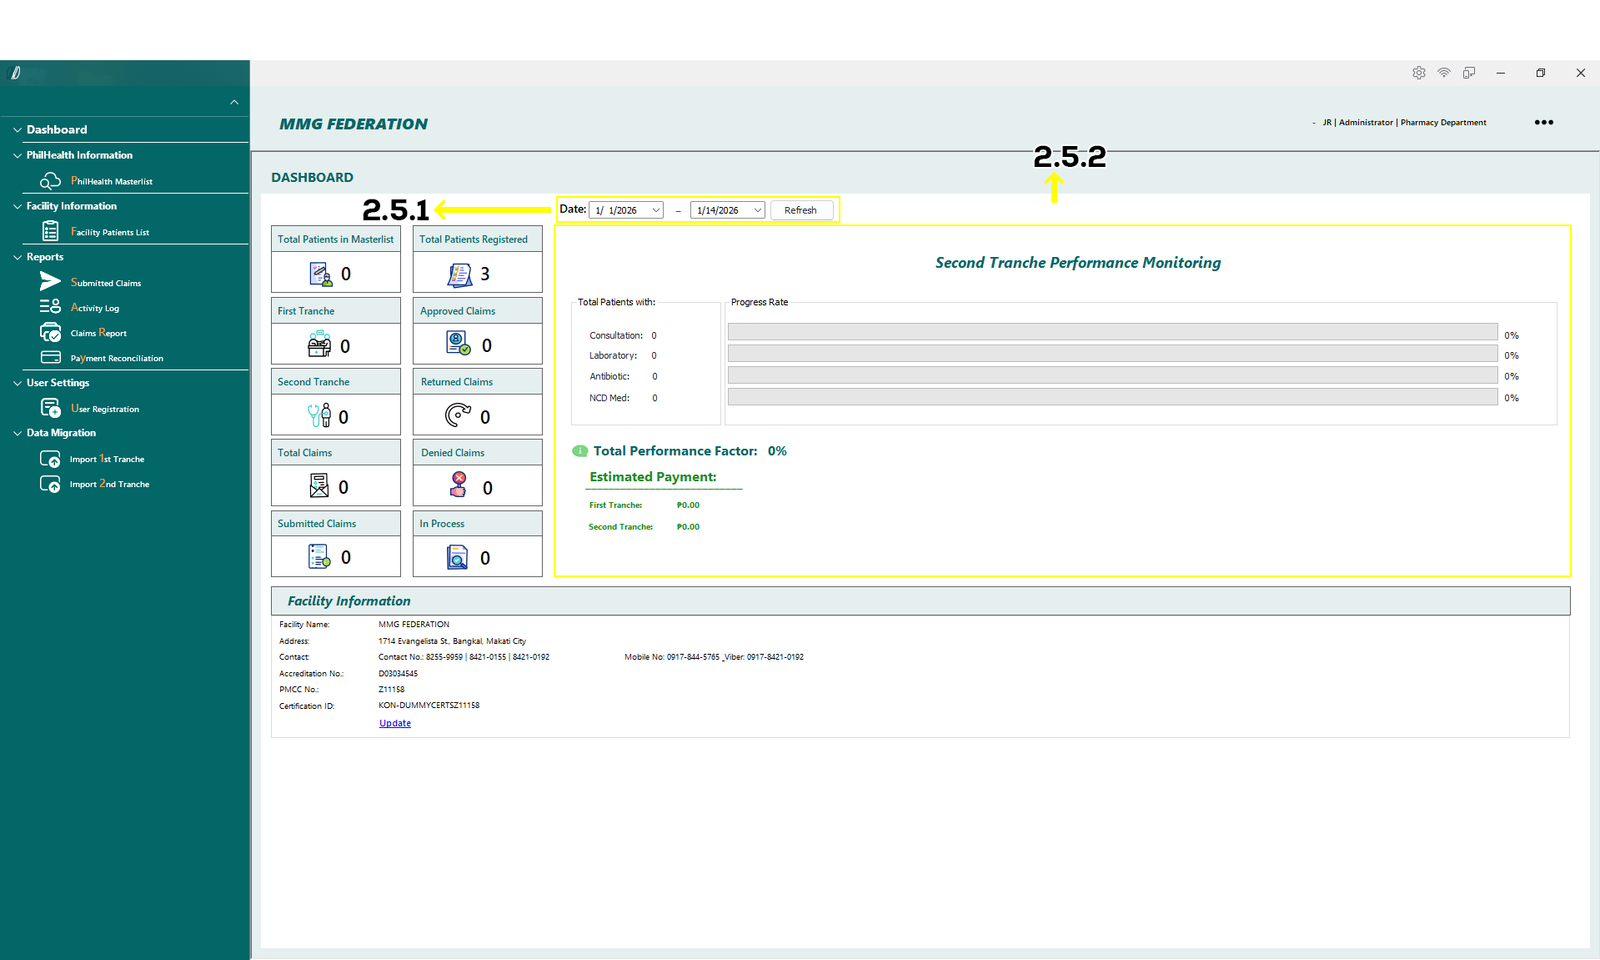
(E-Konsulta-Image 2.5 Dashboard)
- 2.5.2. Second Tranche Performance Monitoring
This screen is used to view performance monitoring data for the selected period. Users may choose a start date and end date (shown at 2.5.1.), then click the Refresh button to display updated results below. The section shows the total number of patients by service type, progress rates, overall performance factor, and the estimated payment for both the first and second tranches.
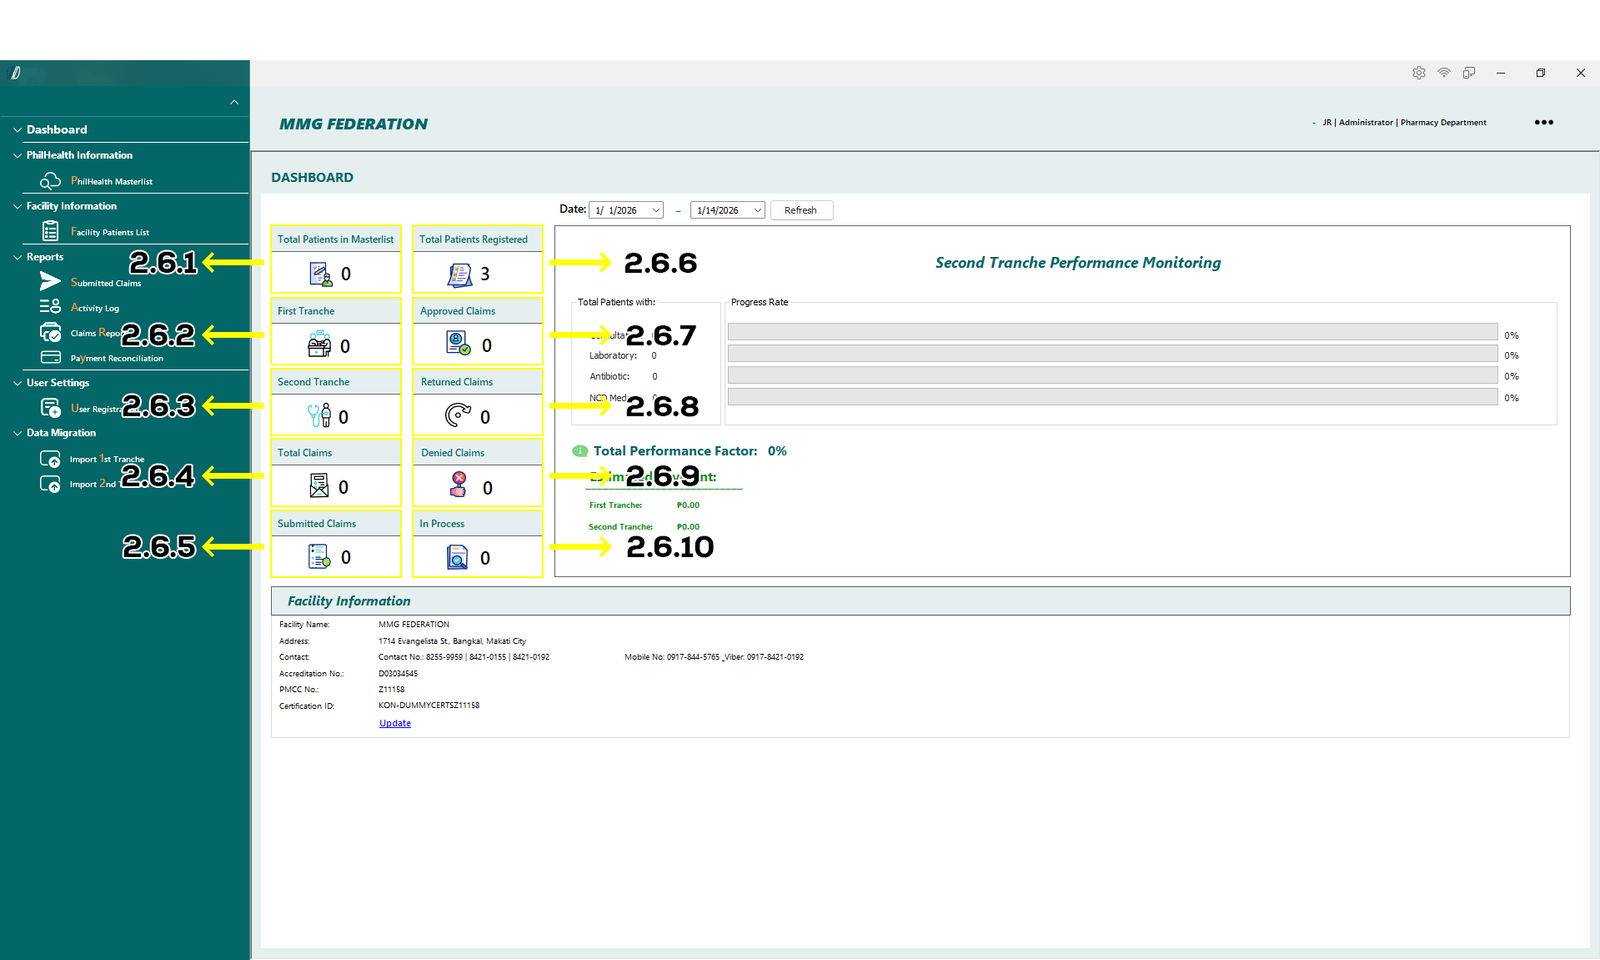
(E-Konsulta-Image 2.6 Dashboard)
2.6 Dashboard Overview
The Dashboard provides a summary view of patient records, claim status, and tranche performance. Data displayed on this screen updates based on the selected date range.
Dashboard Summary Cards
- 2.6.1 Total Patients in Masterlist
Displays the total number of patients retrieved from the PhilHealth masterlist. - 2.6.2 Total Patients Registered
Shows the number of patients registered in the facility system. - 2.6.3 First Tranche
Indicates the total number of patients included under the first tranche. - 2.6.4 Second Tranche
Displays the total number of patients included under the second tranche. - 2.6.5 Total Claims
Shows the total number of claims recorded in the system. - 2.6.6 Submitted Claims
Displays the number of claims that have been submitted for processing. - 2.6.7 Approved Claims
Shows the total number of claims that have been approved. - 2.6.8 Returned Claims
Displays claims that were returned for correction or additional information. - 2.6.9 Denied Claims
Shows the number of claims that were denied. - 2.6.10 In Process
Displays claims that are currently under review or processing.
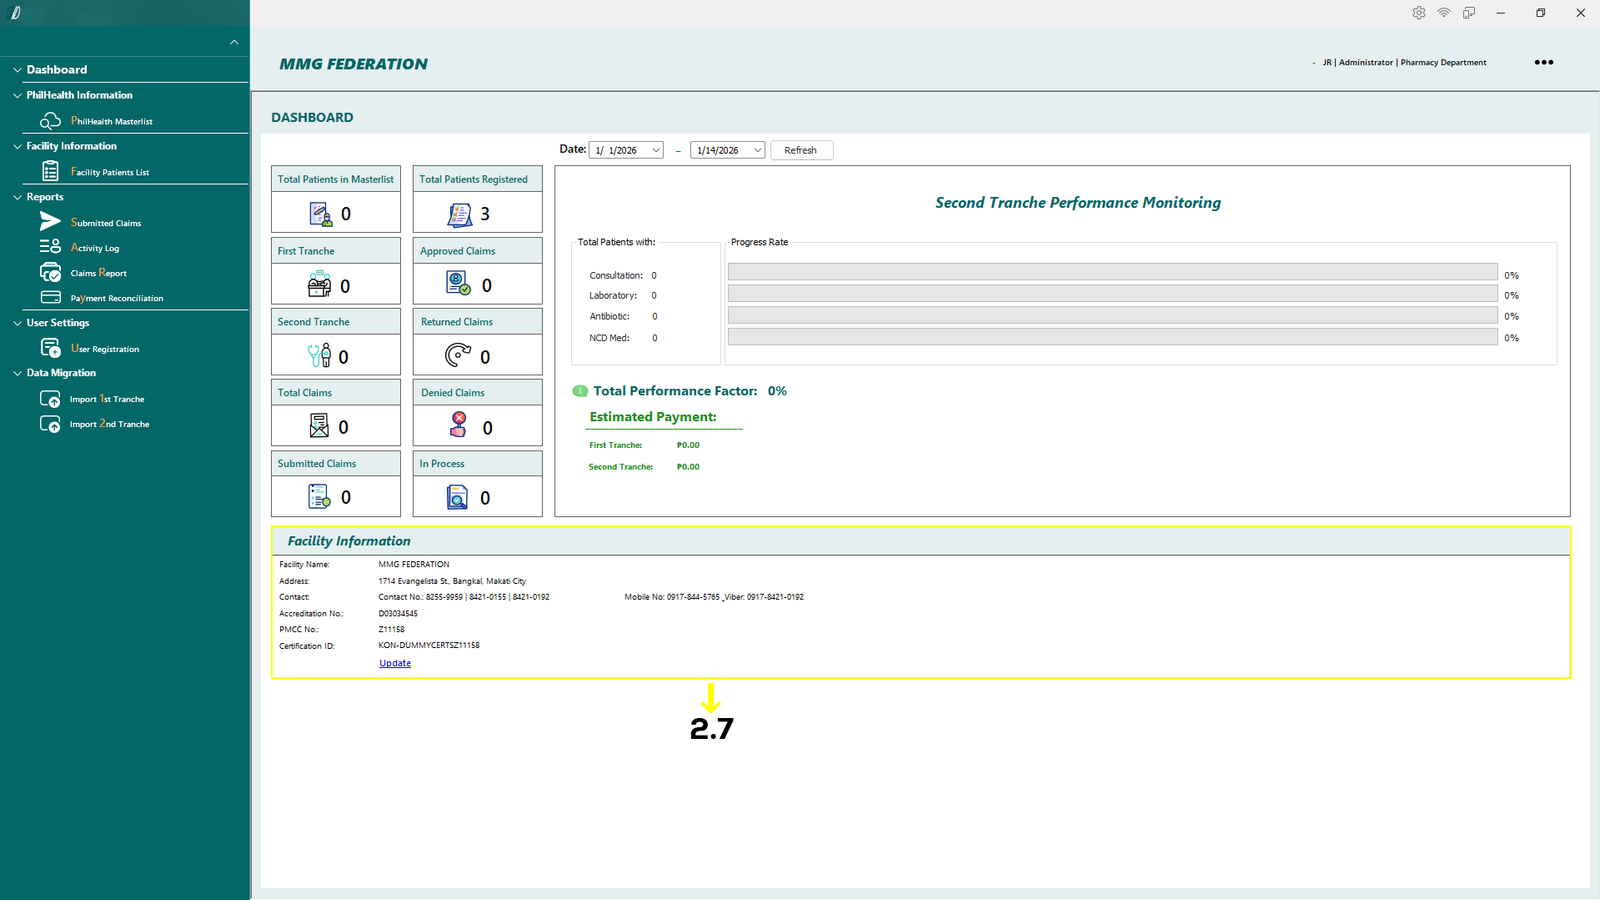
(E-Konsulta-Image 2.7 Dashboard)
2.7 Facility Information
Displays the registered details of the health facility.
Update option:
- Click Update to modify facility details (access may be limited to authorized users only).
Created with the Personal Edition of HelpNDoc: Transform your help documentation into a stunning website
Settings
3. Settings

(E-Konsulta-Image 3.1 Settings)
By clicking the button 2.4.1. shown above, this will open the Module Settings.
(E-Konsulta-Image 3.2 Settings)
In the Module Settings, their will be 4 tab:
- Philhealth URL: Used to configure the PhilHealth system link required for data submission and validation.
- 2ndTranche Formula: Defines the calculation formula used for Second Tranche performance and payment computation.
- Lab & Medicine: Allows mapping of laboratory services and medicines to their corresponding prices for accurate billing and claims.
- Server Account: Manages server login credentials used by the system for secure data transmission and processing.
Created with the Personal Edition of HelpNDoc: Effortlessly Support Your Windows Applications with HelpNDoc's CHM Generation
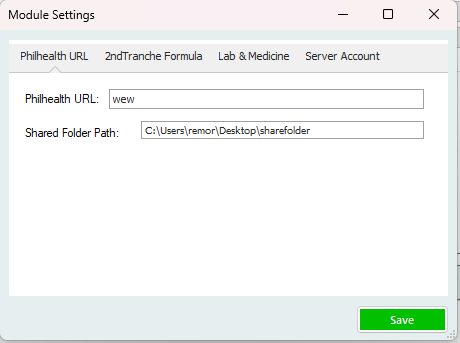
Philhealth URL
(E-Konsulta-Image 3.3 Settings)
PhilHealth URL:
Specifies the official PhilHealth system link used by the application for data submission and verification.
Shared Folder Path:
Defines the network folder location where system files and data exchanges are stored and accessed.
Created with the Personal Edition of HelpNDoc: Revolutionize Your Documentation Review with HelpNDoc's Project Analyzer
Setting 2nd Tranche Formula
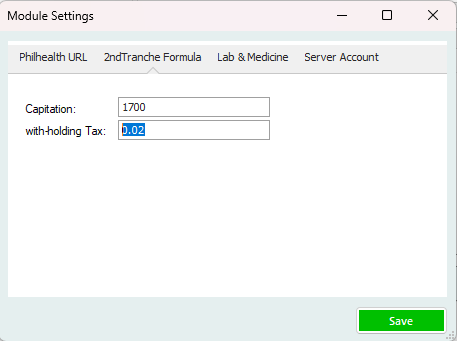
(E-Konsulta-Image 3.4 Settings)
Capitation:
Represents the total capitation amount used as the basis for calculating the Second Tranche payment.
Tax:
Specifies the tax percentage deducted from the calculated Second Tranche amount.
Created with the Personal Edition of HelpNDoc: Streamline Your Documentation Process with HelpNDoc's Project Analyzer
Mapping & Lab Prices
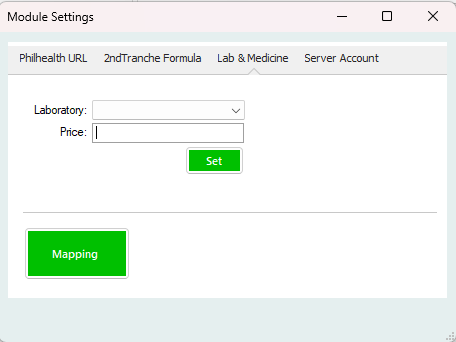
(E-Konsulta-Image 3.5 Settings)
Laboratory Price Setup
Select a Laboratory Test from the drop-down menu.
Enter the corresponding price in the text box, then click Set to save the value.
Mapping
For mapping medicine click the "Mapping" button to open up the Medicine List for mapping
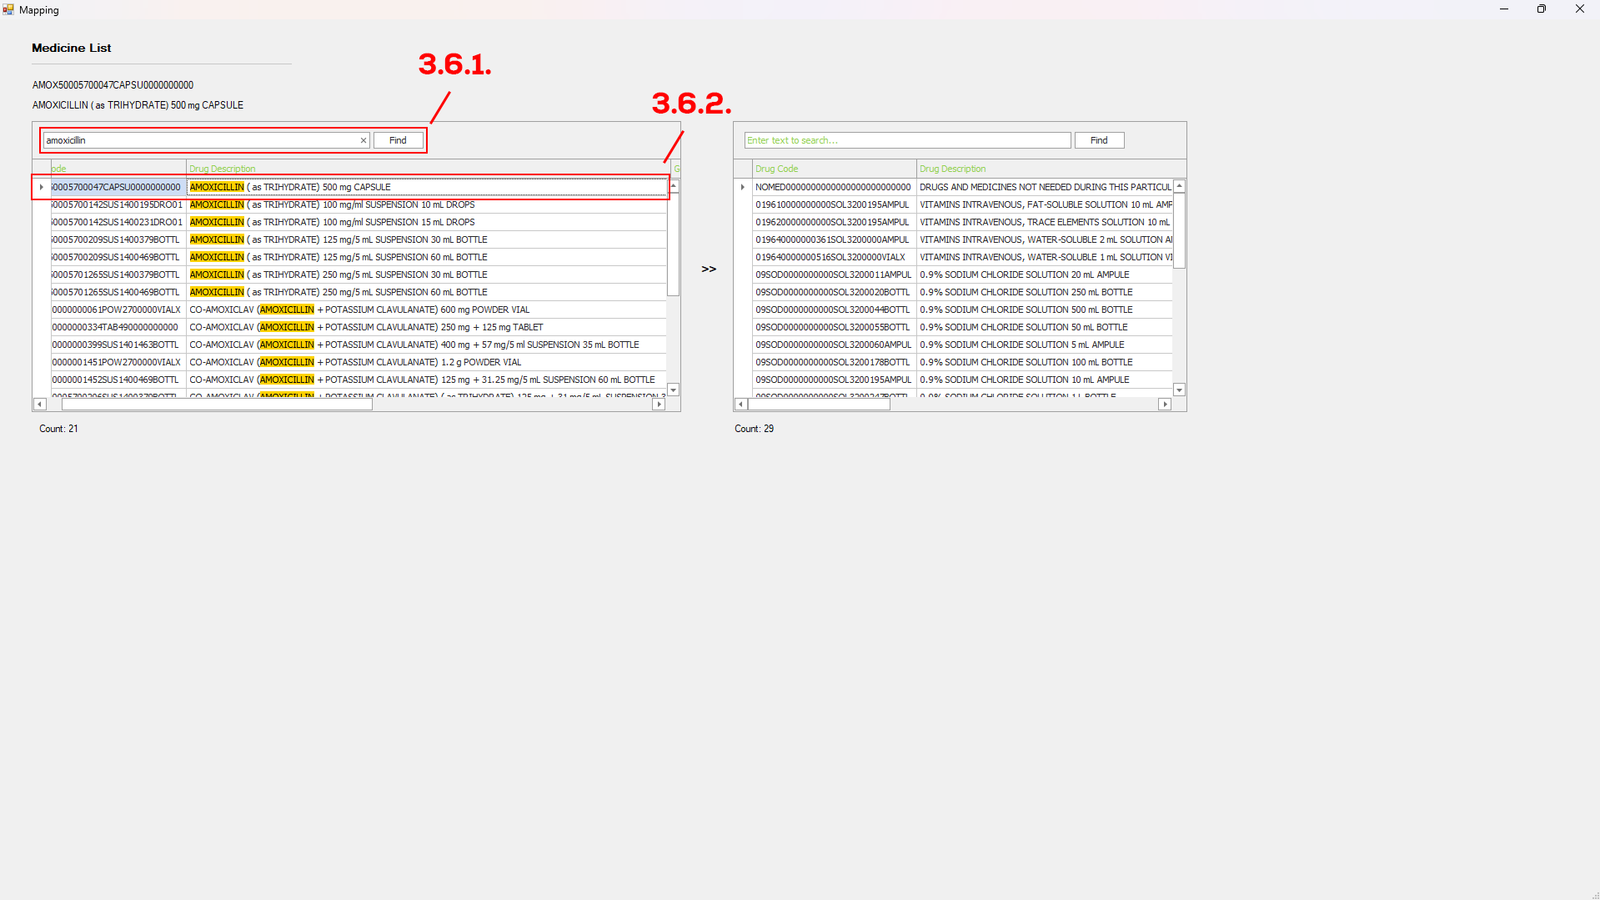
(E-Konsulta-Image 3.6 Settings)
Medicine Mapping Module
On the left side, you will see a table listing all medicines recognized by PhilHealth. Use the search bar (see 3.6.1.) to quickly find the medicine you need. To add a medicine to your table on the right side, simply double-click the selected medicine (see 3.6.2.). A new tab will appear below, showing the details of the selected medicine.
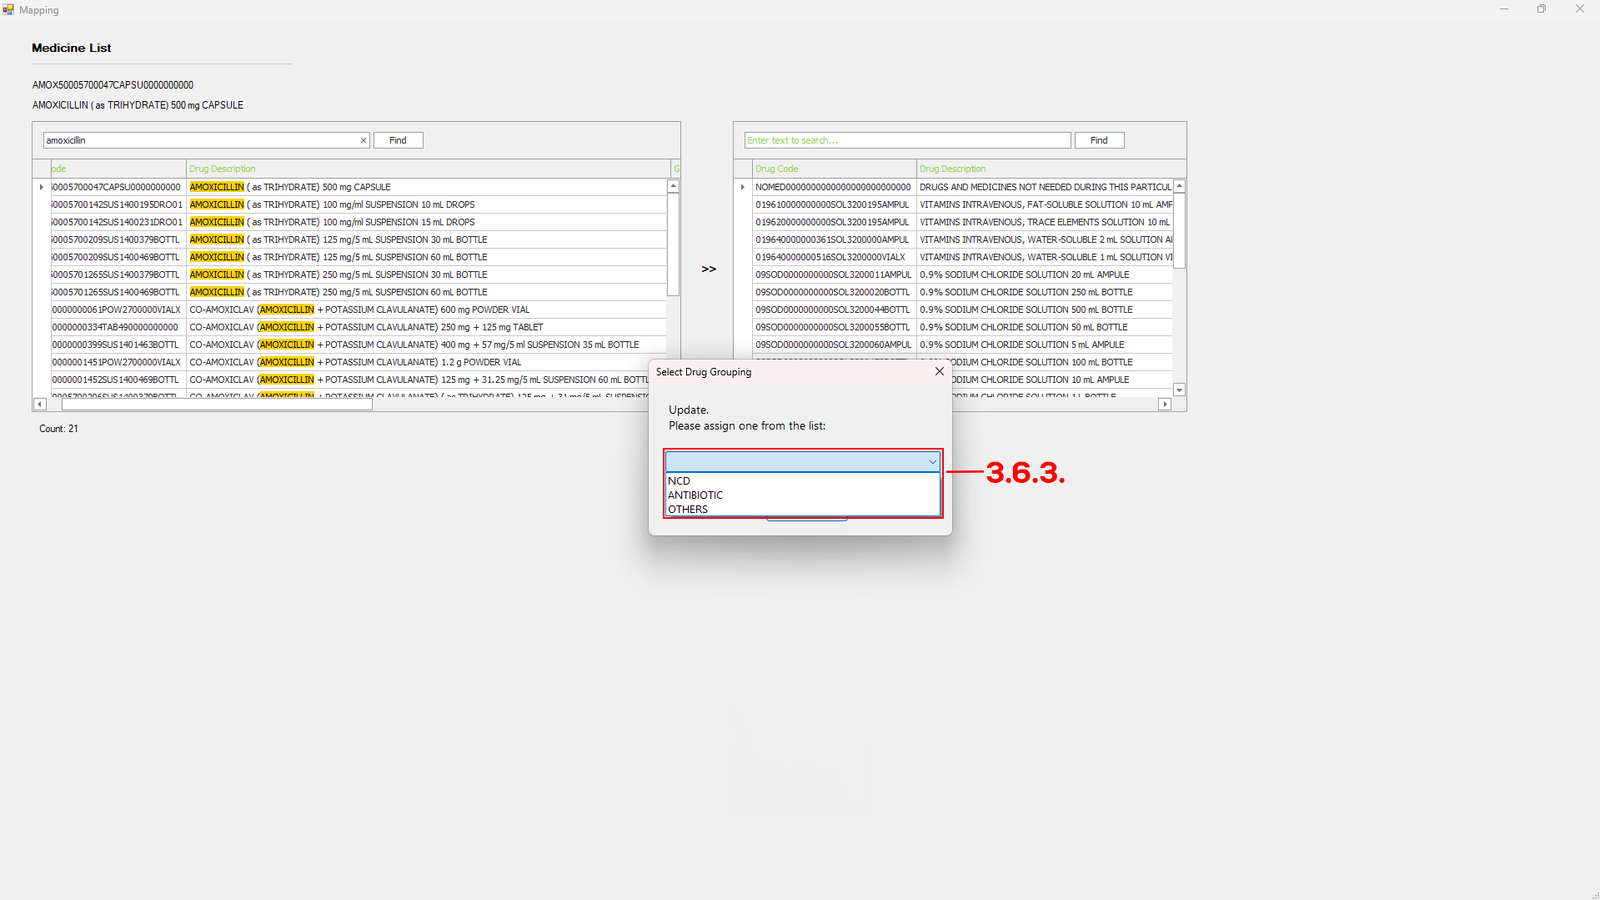
(E-Konsulta-Image 3.7 Settings)
Select Drug Grouping
After double-click a medicine, the Drug Grouping tab will appear. Here, use the dropdown menu (see 3.6.3.) to select the appropriate medicine group, then click the OK button to add it to your table.
Created with the Personal Edition of HelpNDoc: Elevate your documentation to new heights with HelpNDoc's built-in SEO
Server Settings
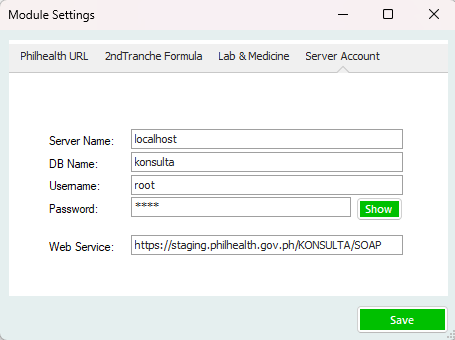
(E-Konsulta-Image 3.8 Settings)
Server Account Settings
In this tab, the IT staff or system provider can configure the server details, including Server Name, Database Name, Username, Password, and Web Service.
Created with the Personal Edition of HelpNDoc: Import and export Markdown documents
How to:
Created with the Personal Edition of HelpNDoc: Streamline Your Documentation Creation with a Help Authoring Tool
Register User
To register user simply click the User Registration.
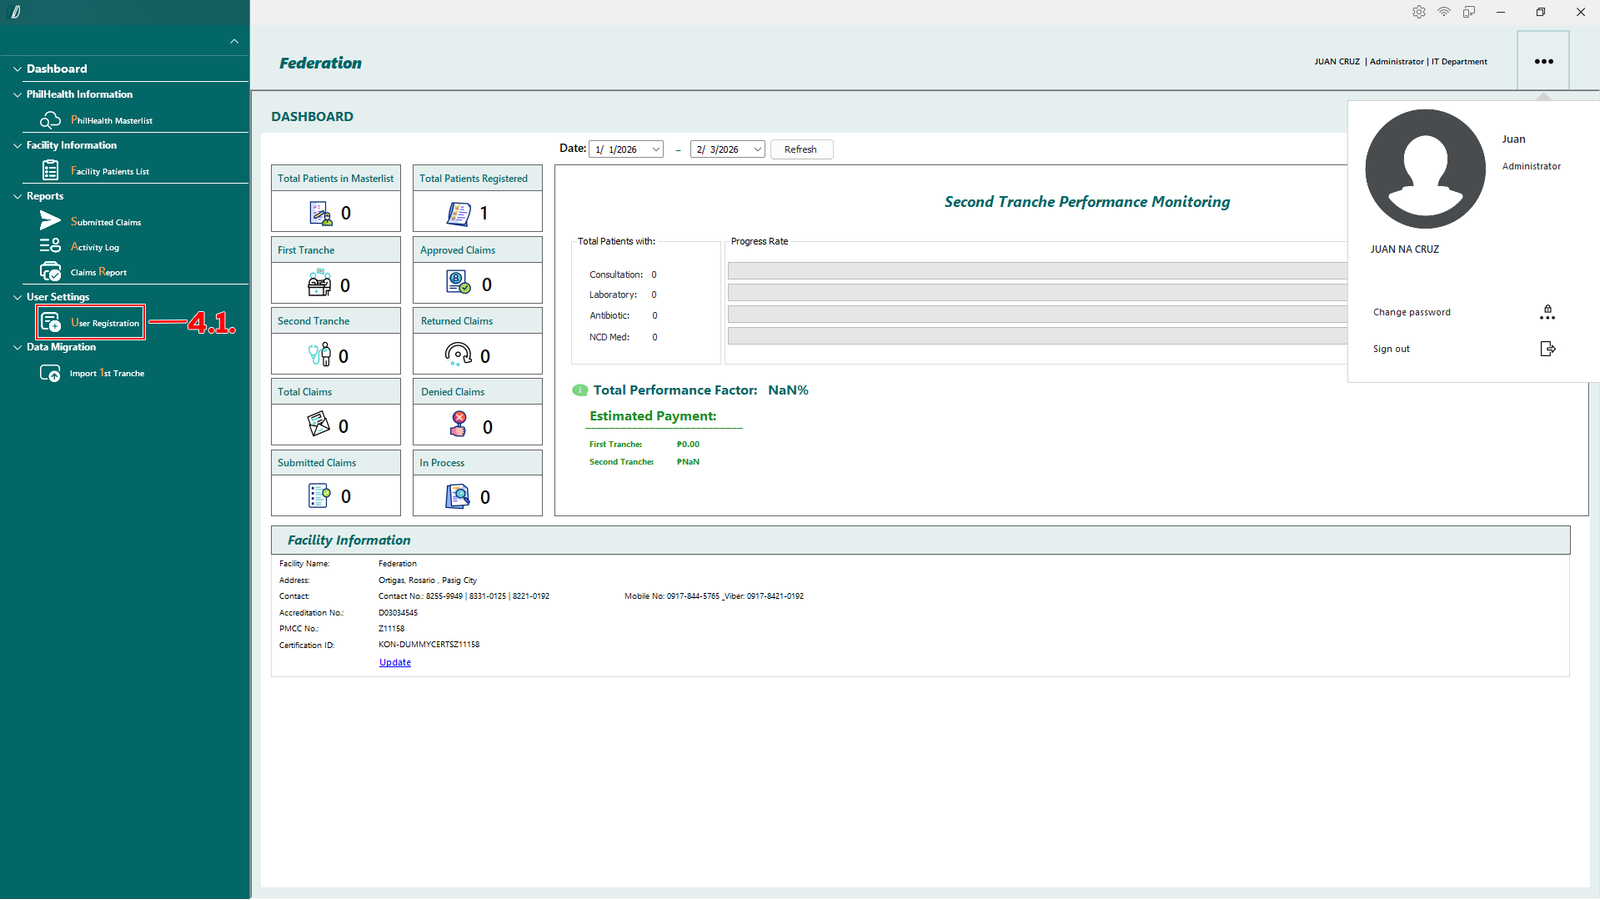
(E-Konsulta-Image 4.1.1 Register)
Select User Registration (see 4.1) to open the user registration module.
(E-Konsulta-Image 4.1.2 Register)
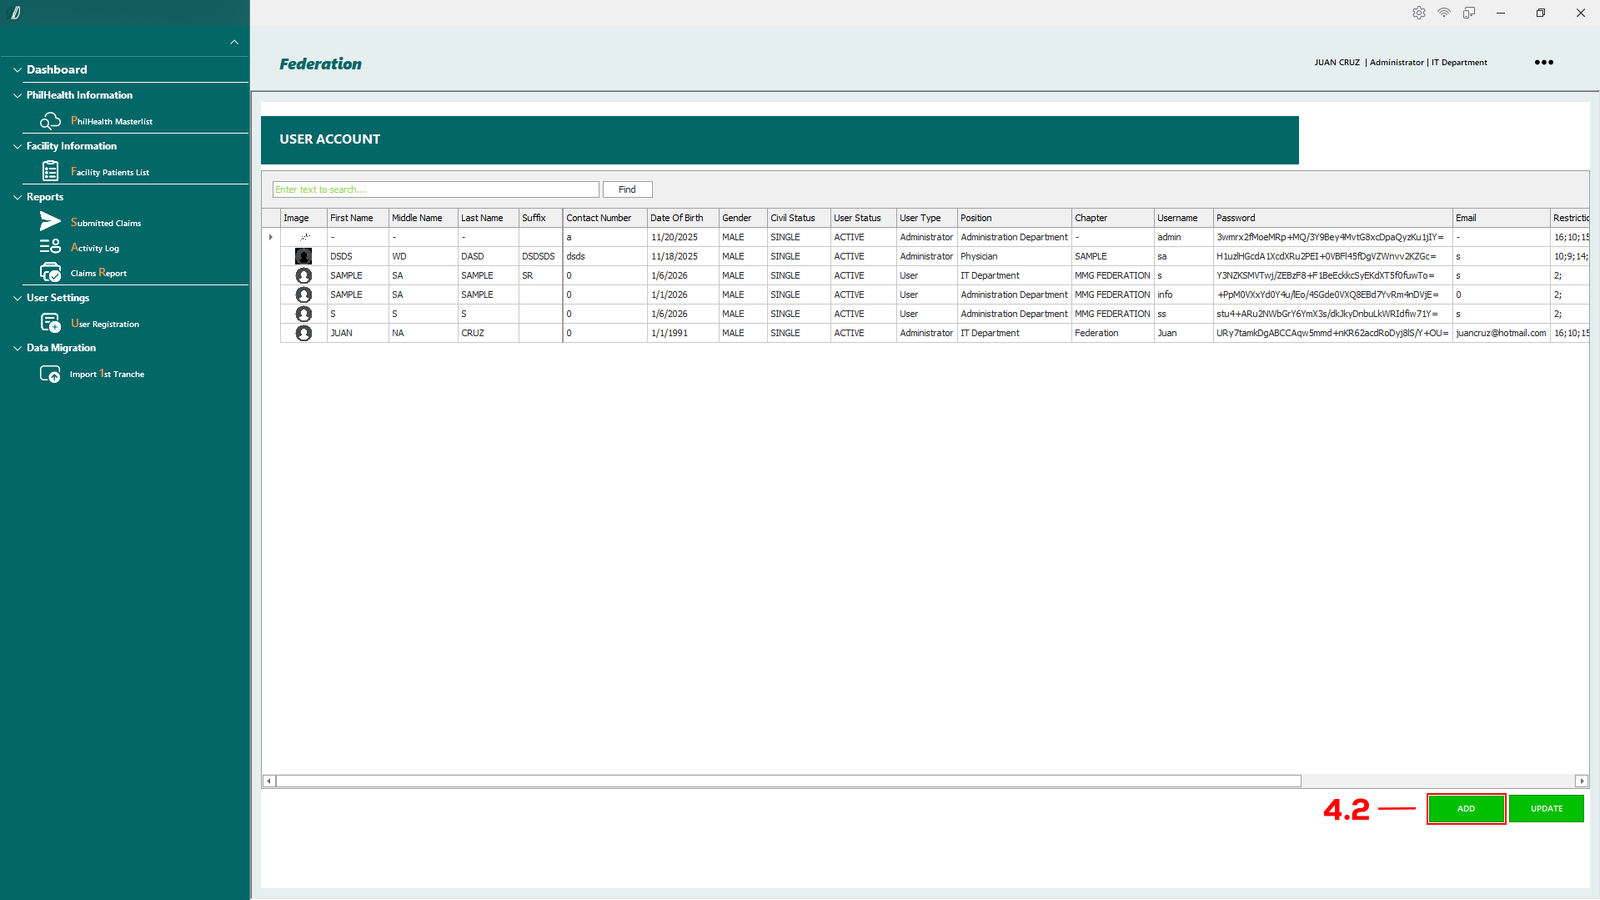
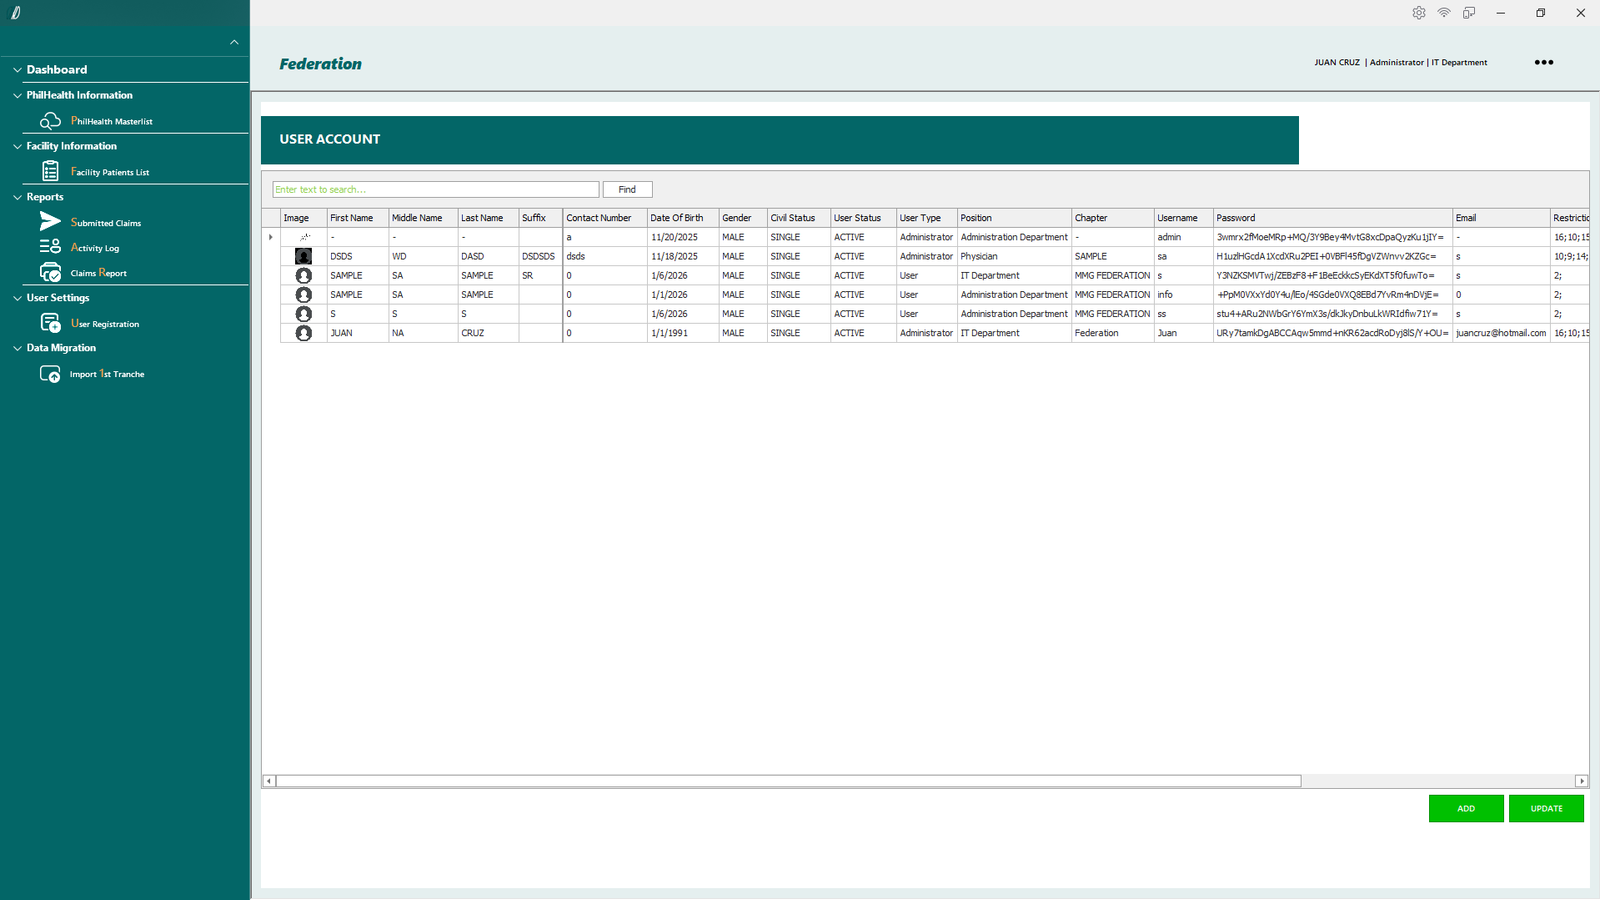
In this module, there is a table that will show complete details of a user that has been registered in the system.
Add New User
To add new user, simply click the add button (see 4.2) and the Personal Information Module will appear as shown below.
(E-Konsulta-Image 4.1.3 Register)
Fill in all the required information in the fields provided. On the right side, under the User Access column, select the areas this user will have access to.
Note: Fields marked with an * are mandatory and must be completed.
Created with the Personal Edition of HelpNDoc: Bring your WinHelp HLP help files into the present with HelpNDoc's easy CHM conversion
Register Doctor
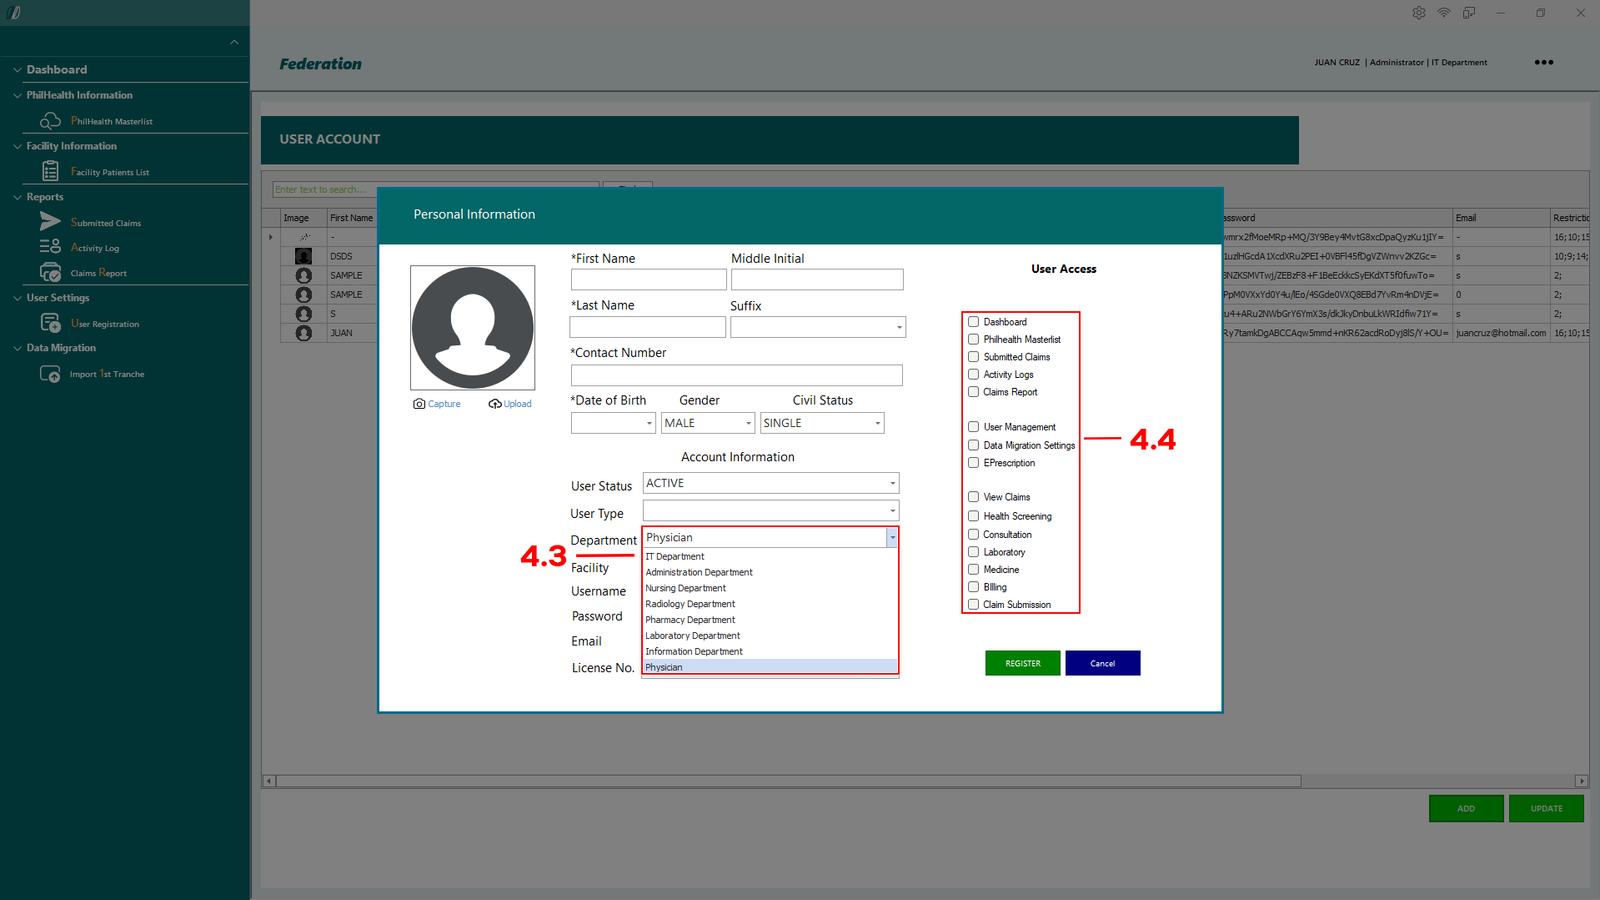
(E-Konsulta-Image 4.1.4 Register Doctor)
To register a doctor, follow the same process as registering a new user.
Ensure that the Department is set to Physician (see 4.3), then select the required modules for the doctor under User Access (see 4.4).
Created with the Personal Edition of HelpNDoc: HelpNDoc's Project Analyzer: Incredible documentation assistant
Update User Information
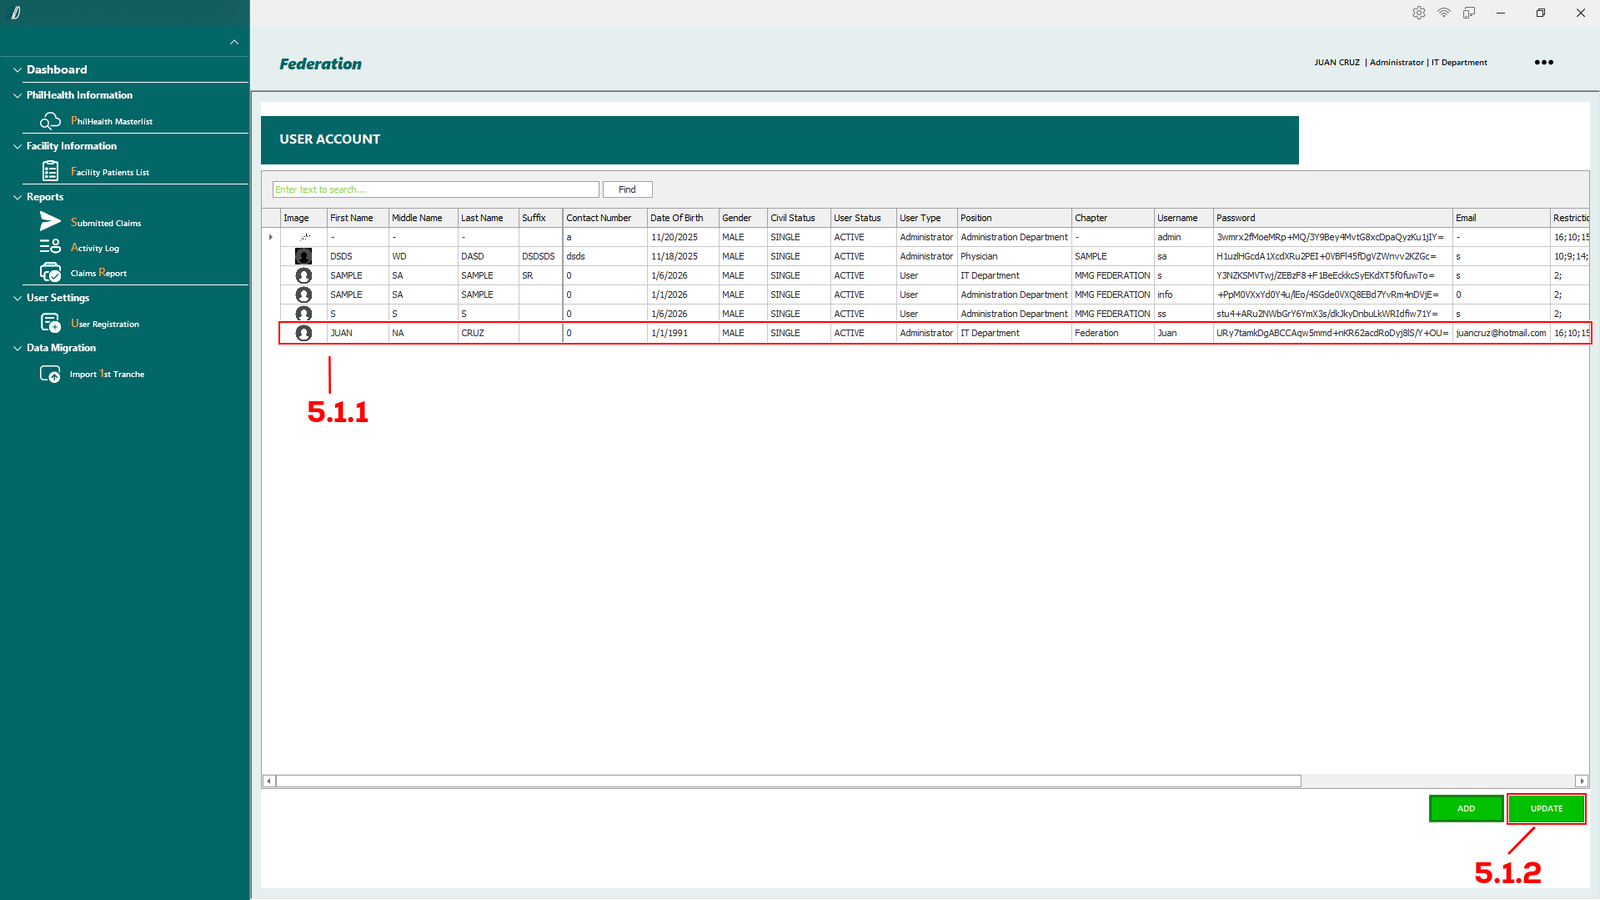
Here you can update the user information, password, image and etc.
(E-Konsulta-Image 5.1 Update Information)
Updating User Information
To update a user’s information, search for and left-click the desired user from the table (see in 5.1.1), then click the Update button (see 5.1.2). The Personal Information Module will appear, where you can make any necessary adjustments.
Created with the Personal Edition of HelpNDoc: Free Web Help generator
Update Facility Information
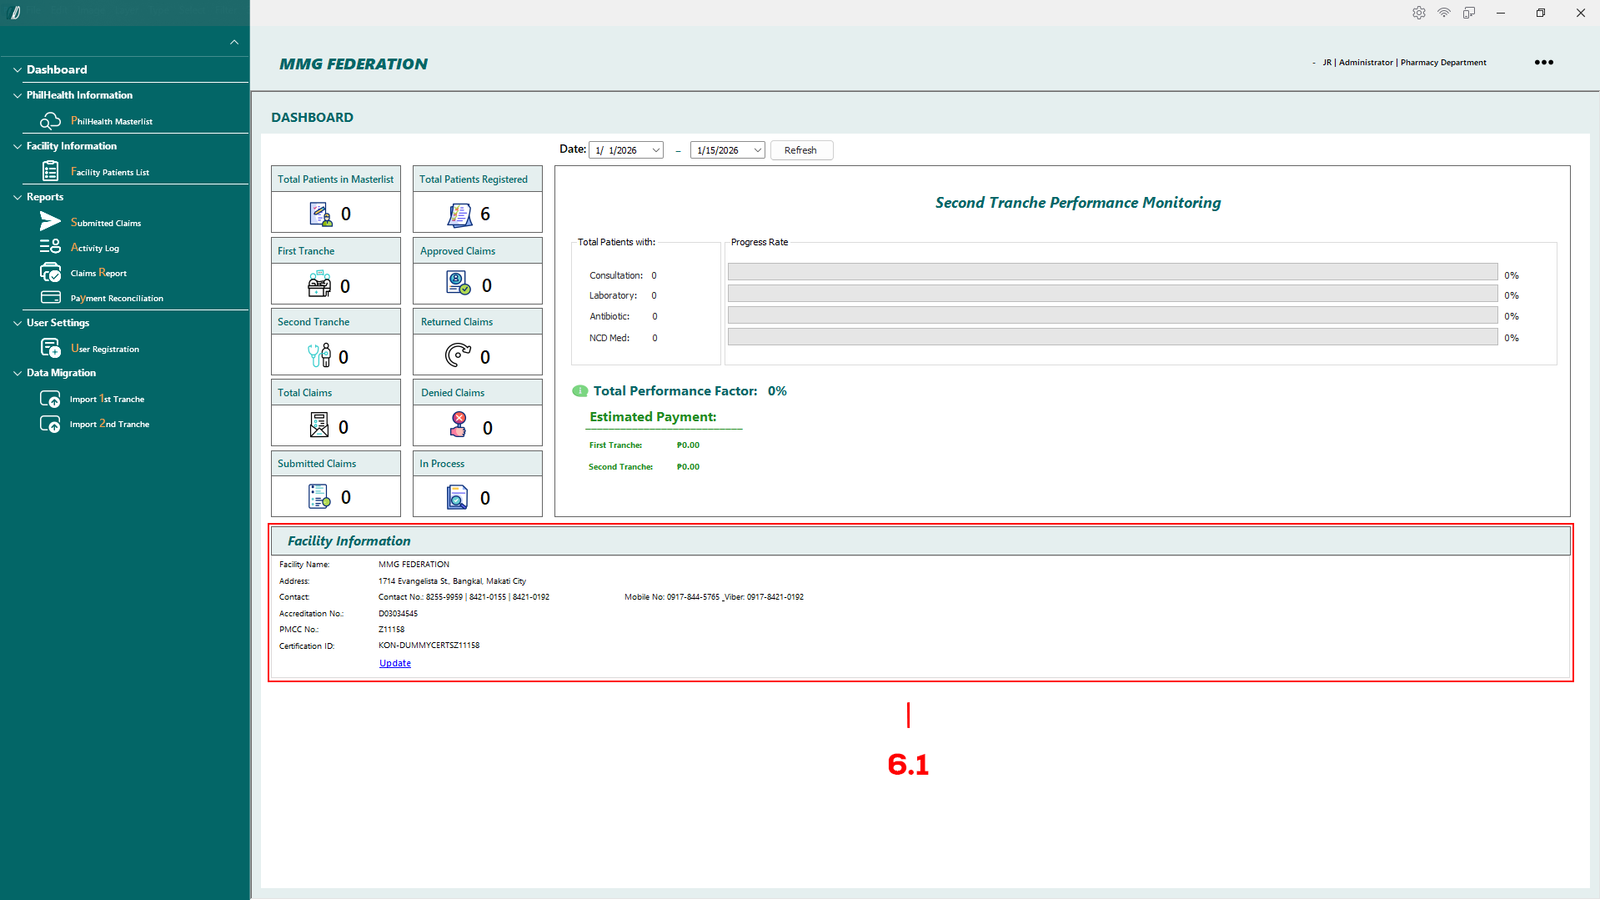
(E-Konsulta-Image 6.1.1 Update Information)
Updating Facility Information
To update your facility information, navigate to the Facility Information Overview (see 6.1), then click the Update button to make changes.

(E-Konsulta-Image 6.1.2 Update Information)
Clicking Update opens a module where you can edit the facility’s details.
To save any changes, you must enter your Username and Password for verification before clicking Save.
Created with the Personal Edition of HelpNDoc: Easily create iPhone documentation
Migrate Data from Old System
To import 1st Tranche and 2nd Tranche from old system, navigate your self to the left side of the dashboard and click either "Import 1st Tranche"(shown below 7.1) or "Import 2nd Tranche"(shown below 7.2).
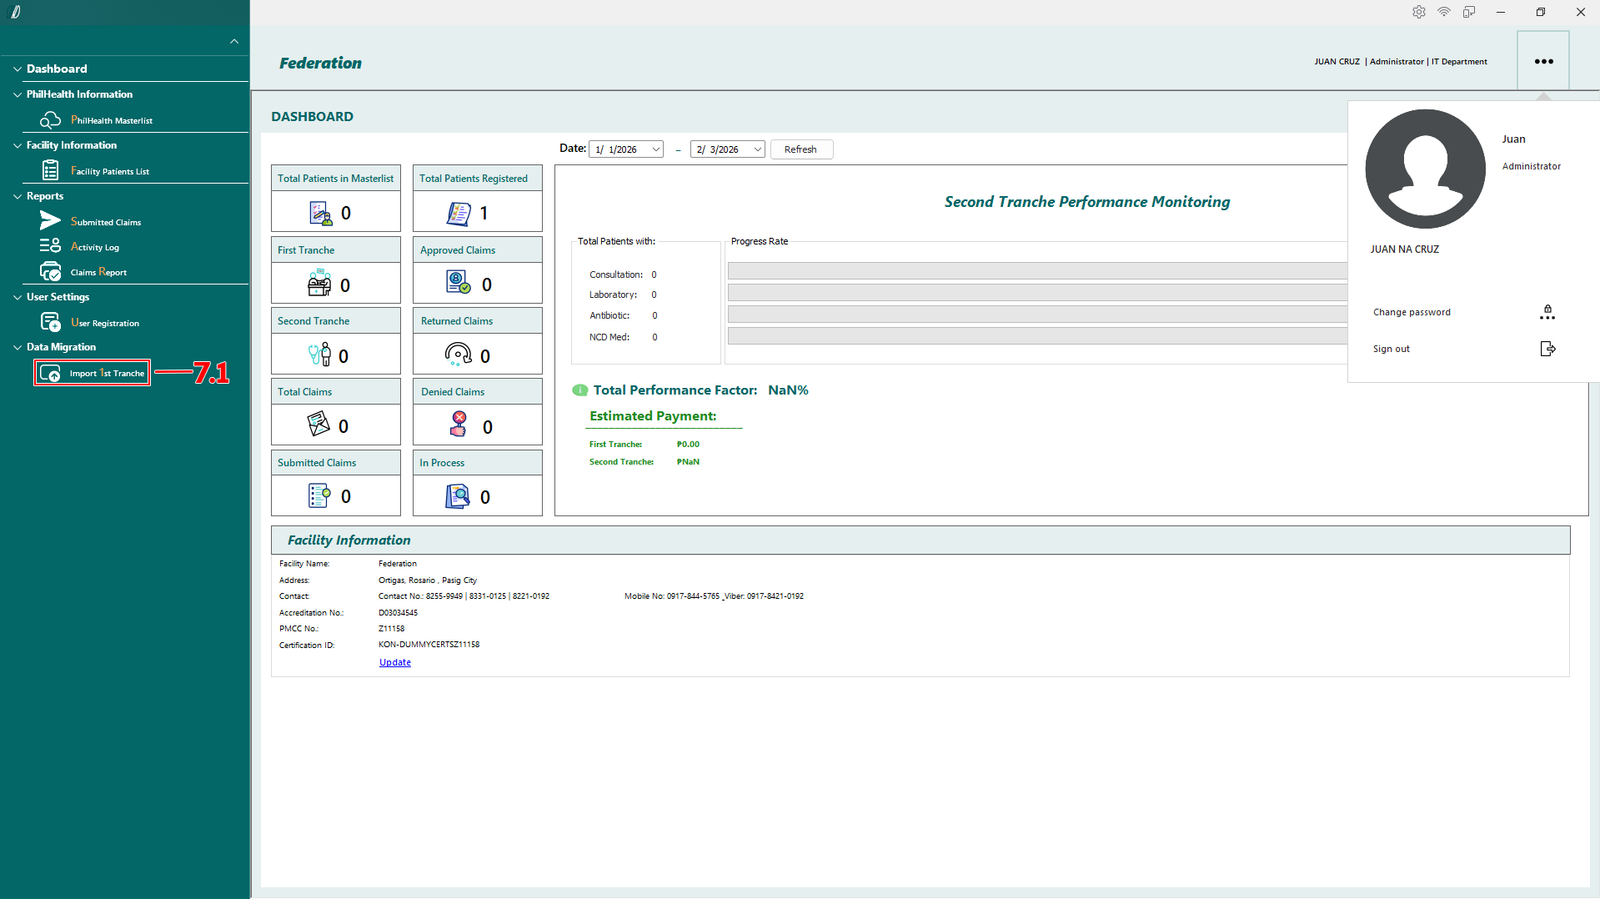
(E-Konsulta-Image 7.1.1 Migrate Data)
Select Import 1st Tranche (see 7.1), depending on your requirement you can Import both 1st and 2nd Tranche.
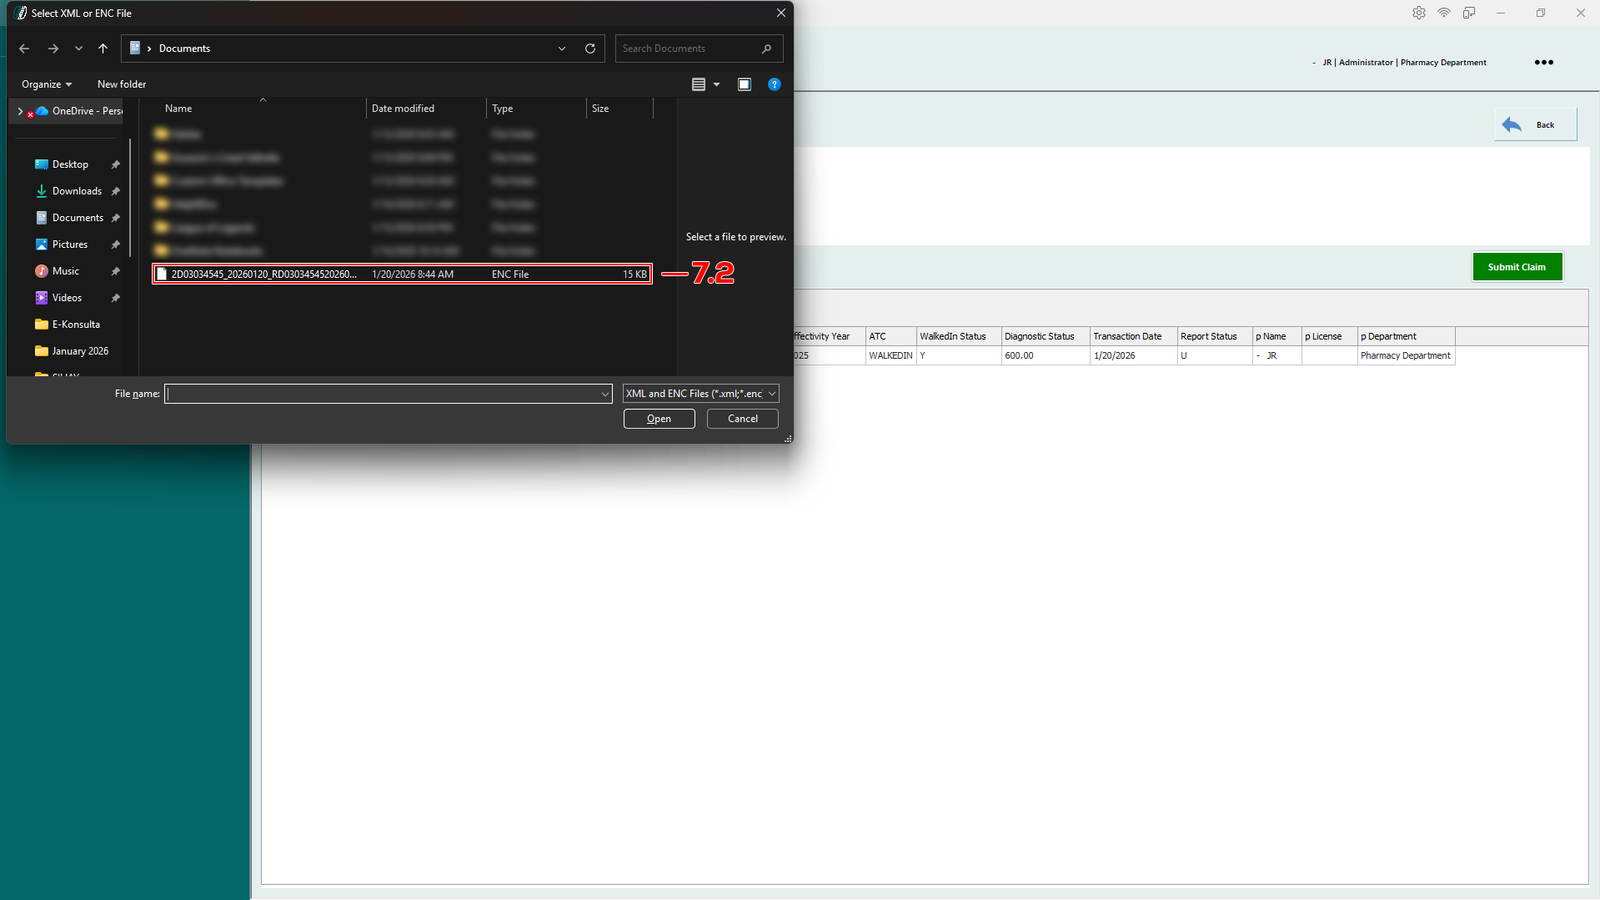
(E-Konsulta-Image 7.1.2 Migrate Data)
A window will appear allowing you to locate and select the .XML or .ENC file (see 7.2) from your device.
Click Open to import the file. The system will automatically process the file once imported.
Created with the Personal Edition of HelpNDoc: Easily create Help documents
Fetching Data from Master List

(E-Konsulta-Image 8.1.1 Fetching)
To fetch patient data from Philhealth Masterlist incase the patients name does not appear, go to Philhealth Masterlist tab (see 8.1). Then change the date from and to (see 8.3) you wanted and select update. The patient should appear at the table (see 8.2) and you can search the patients name.
Created with the Personal Edition of HelpNDoc: Create iPhone web-based documentation
Process First Tranche
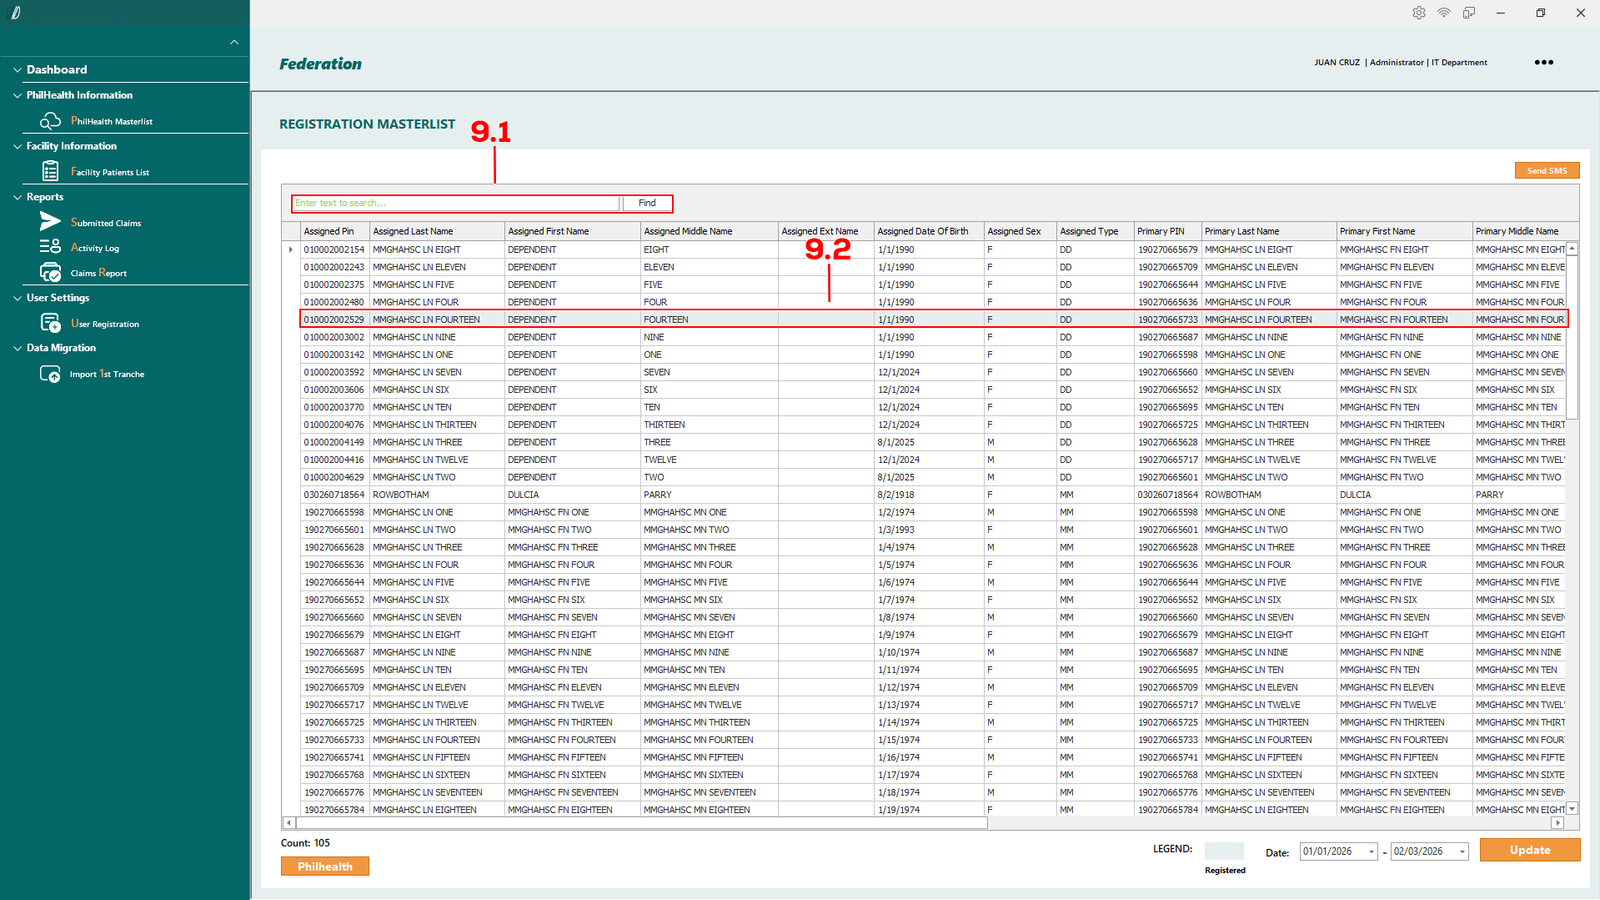
(E-Konsulta-Image 9.1.1 Create Claims)
First search the patient details on the search bar (see 9.1), select the patient with left-click (see 9.2).
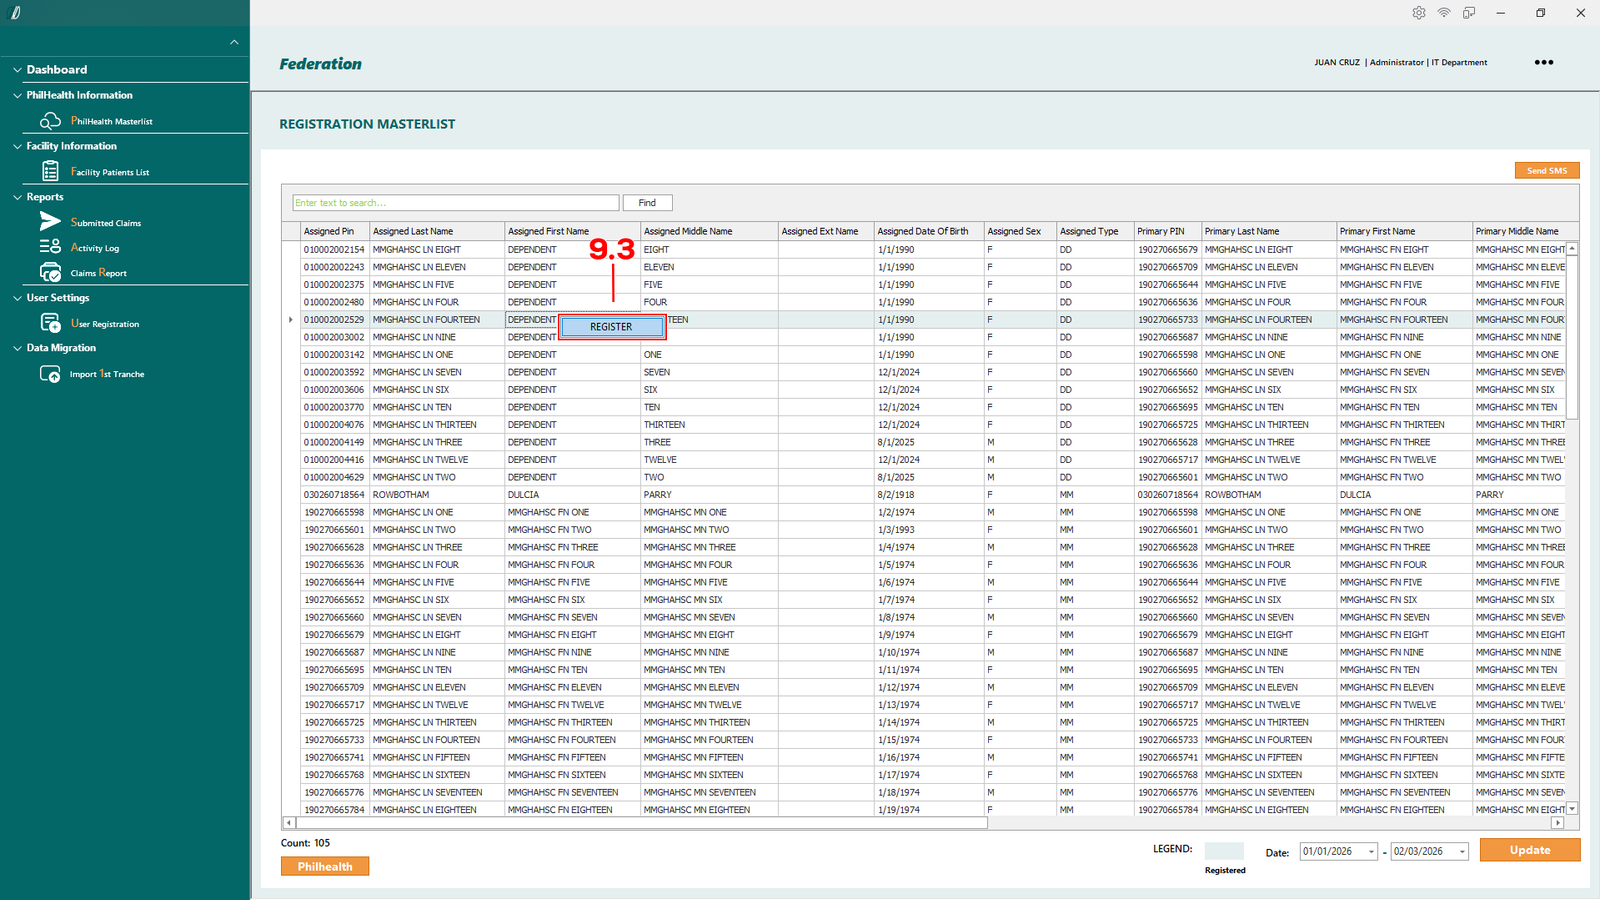
(E-Konsulta-Image 9.1.2 Create Claims)
The click right click so the register button will appear (see 9.3).
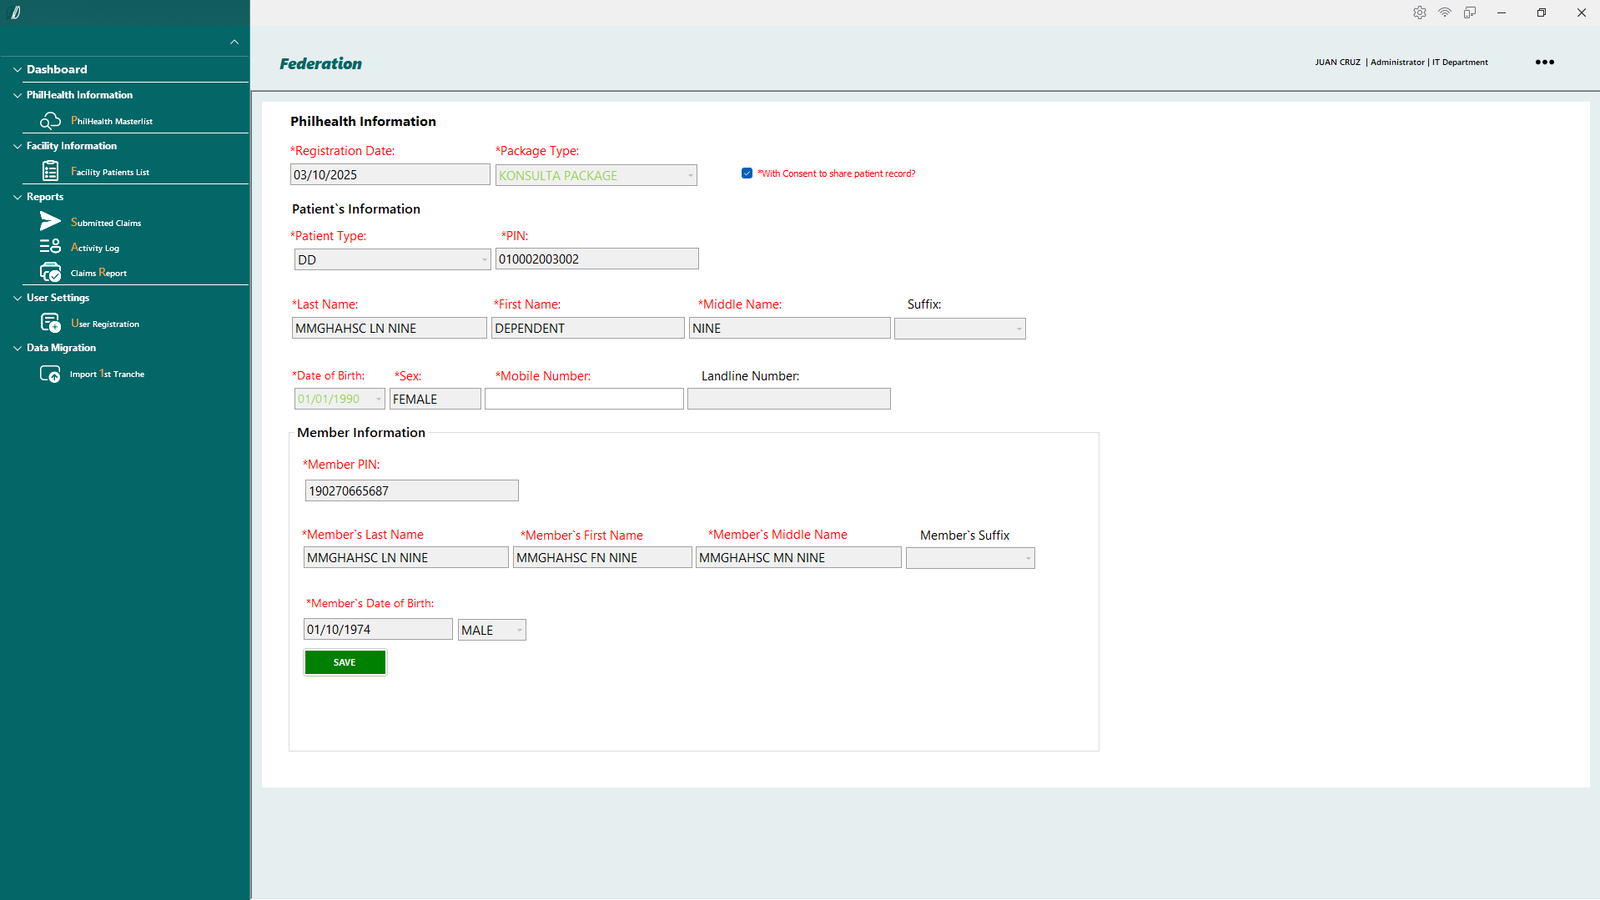
(E-Konsulta-Image 9.1.3 Create Claims)
You will be redirected to the Patient PhilHealth Information page.
Please review all details for accuracy, enter the patient’s mobile number, then click Save.
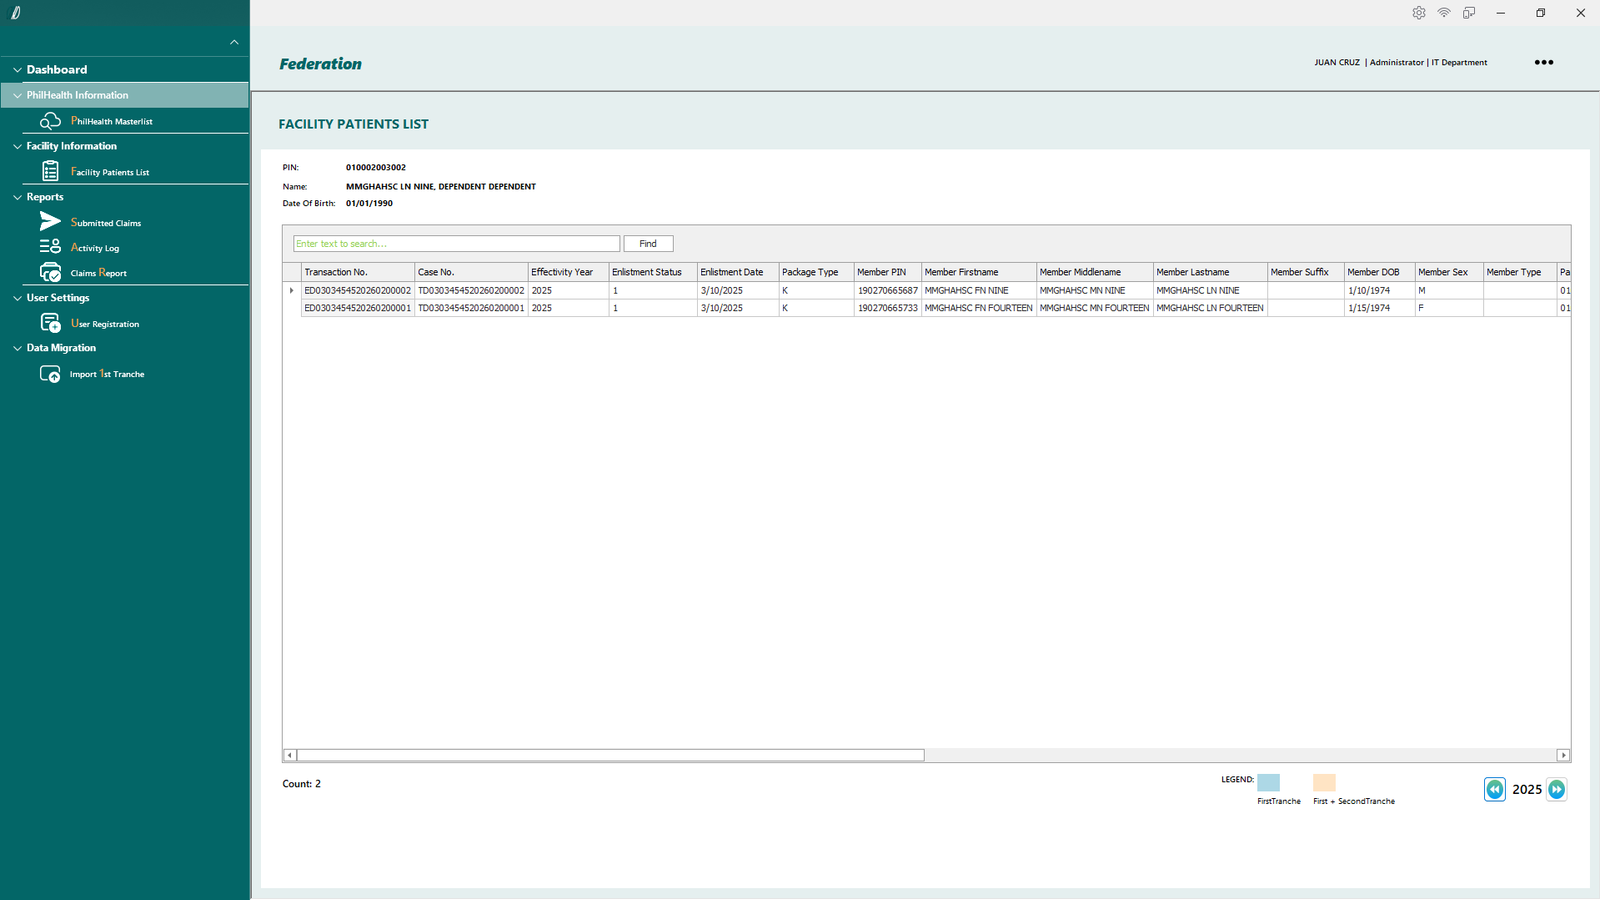
(E-Konsulta-Image 9.1.4 Create Claims)
You will be redirect to the Facility Patients List.
(E-Konsulta-Image 9.1.5 Create Claims)
Locate and select the patient you registered earlier.
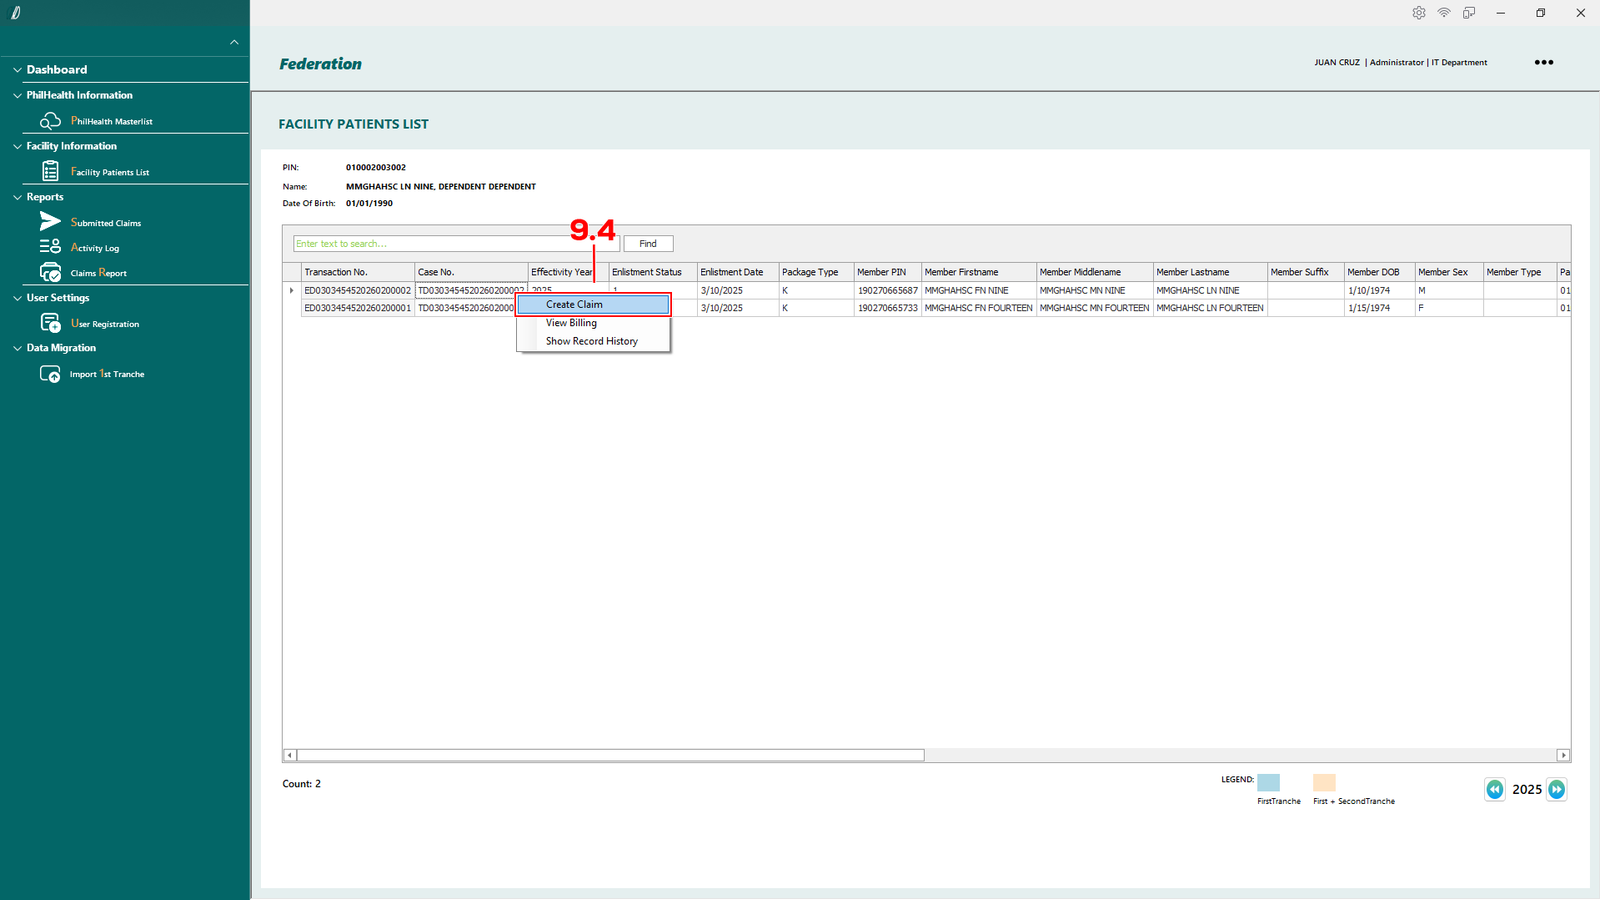
Left-click to highlight the record, then right-click to open the Create Claim context menu and select Create Claim (see 9.4).
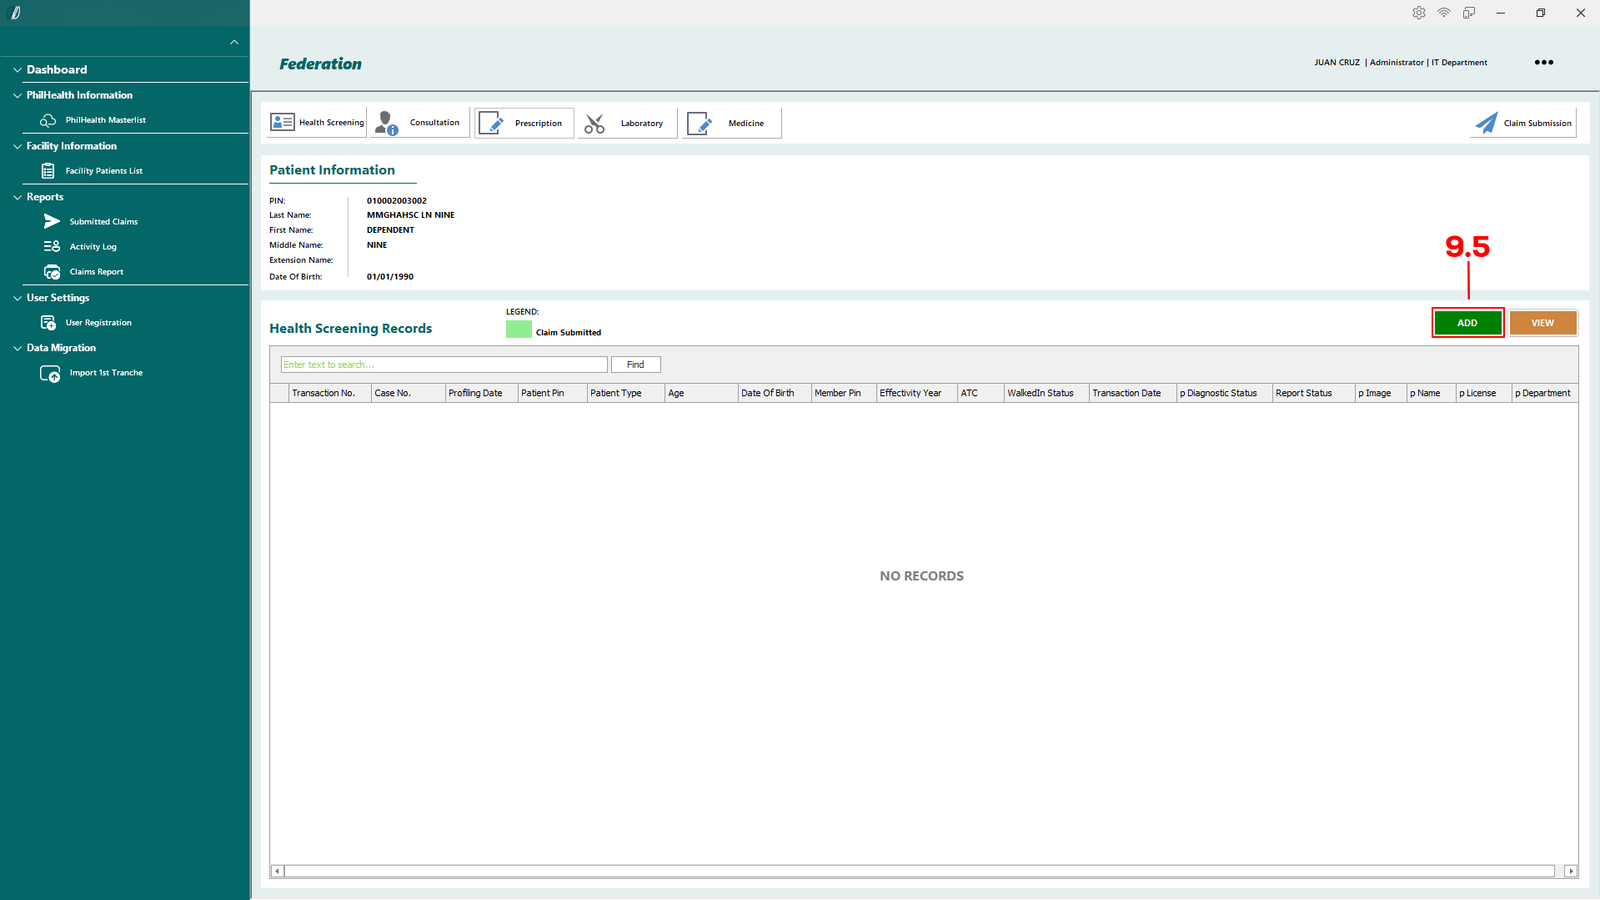
(E-Konsulta-Image 9.1.6 Create Claims)
You will be redirect to this module, click the Add (see 9.5) to start processing the claims.
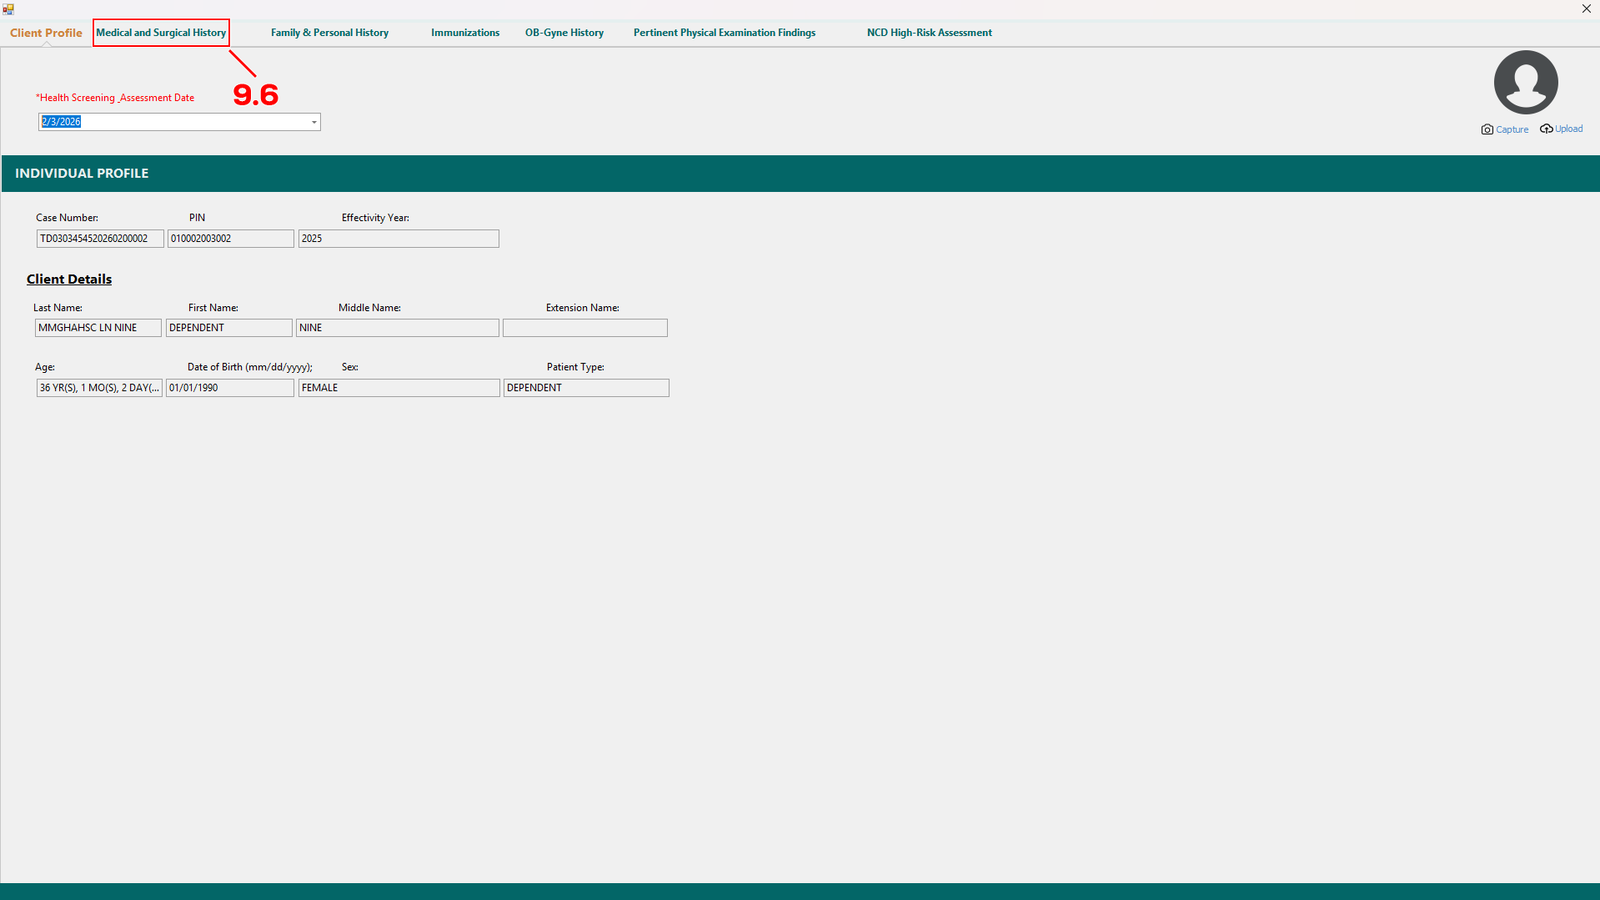
(E-Konsulta-Image 9.1.7 Create Claims)
Another window will appear, check the information of the patient, if everything is correct proceed to Medical and Surgical History tab (see 9.6).
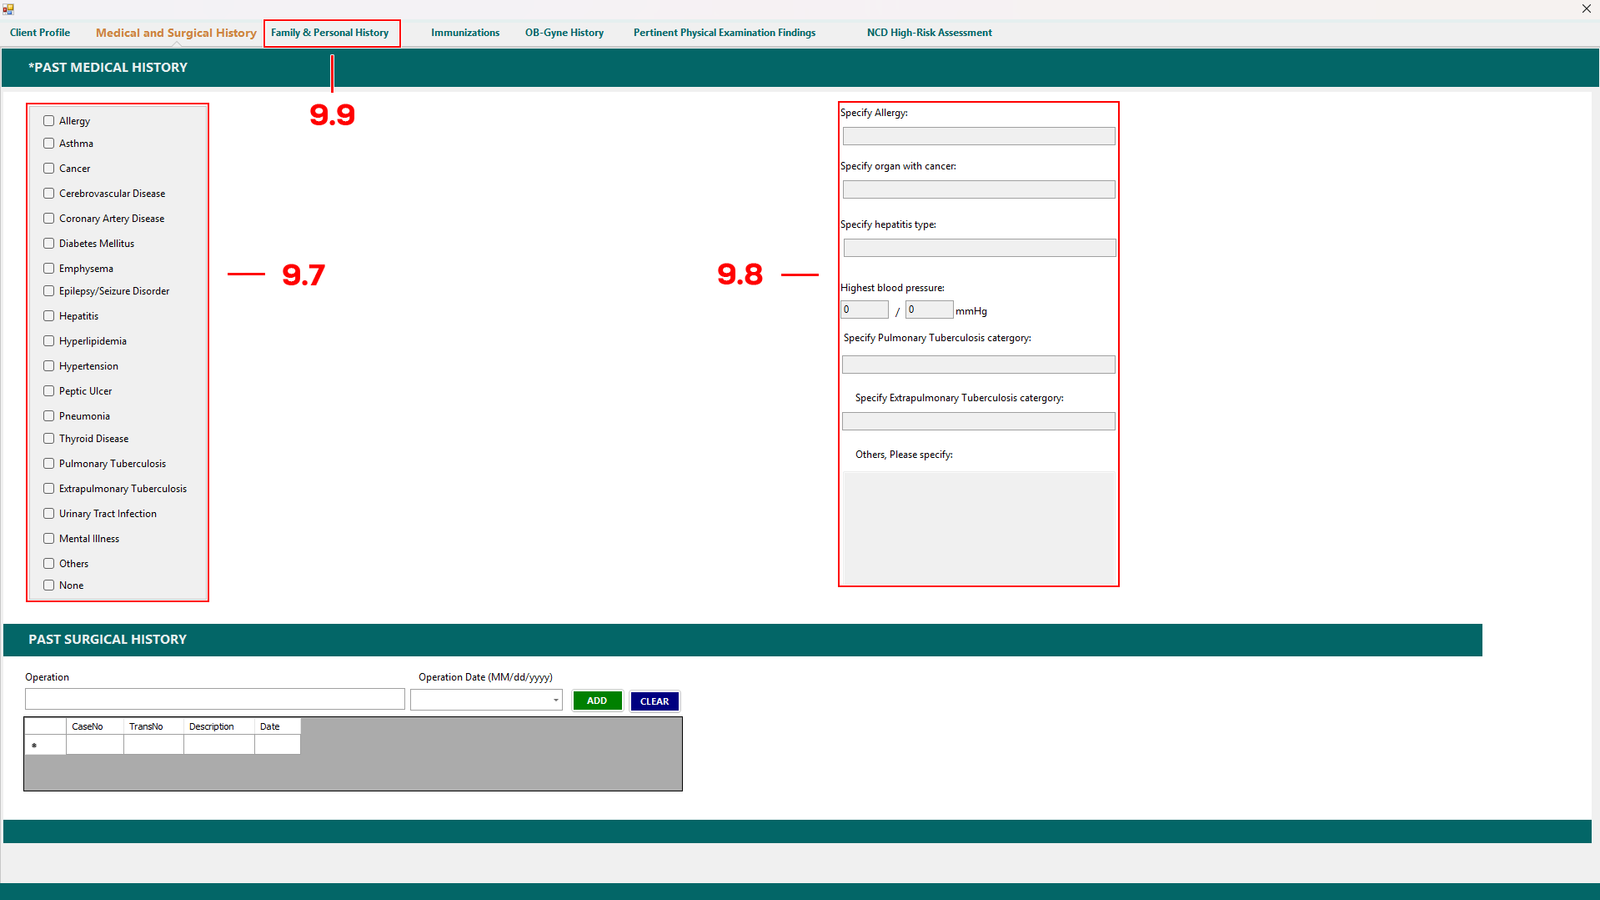
(E-Konsulta-Image 9.1.8 Create Claims)
In the Medical and Surgical History tab, select one or more from the box (see 9.7).
Some diagnosis enquire you to fill up the text box in (see 9.8). If the patient has past surgical history you can add it at the bottom table.
Proceed to Family & Personal History (see 9.9) if everthing is complete.
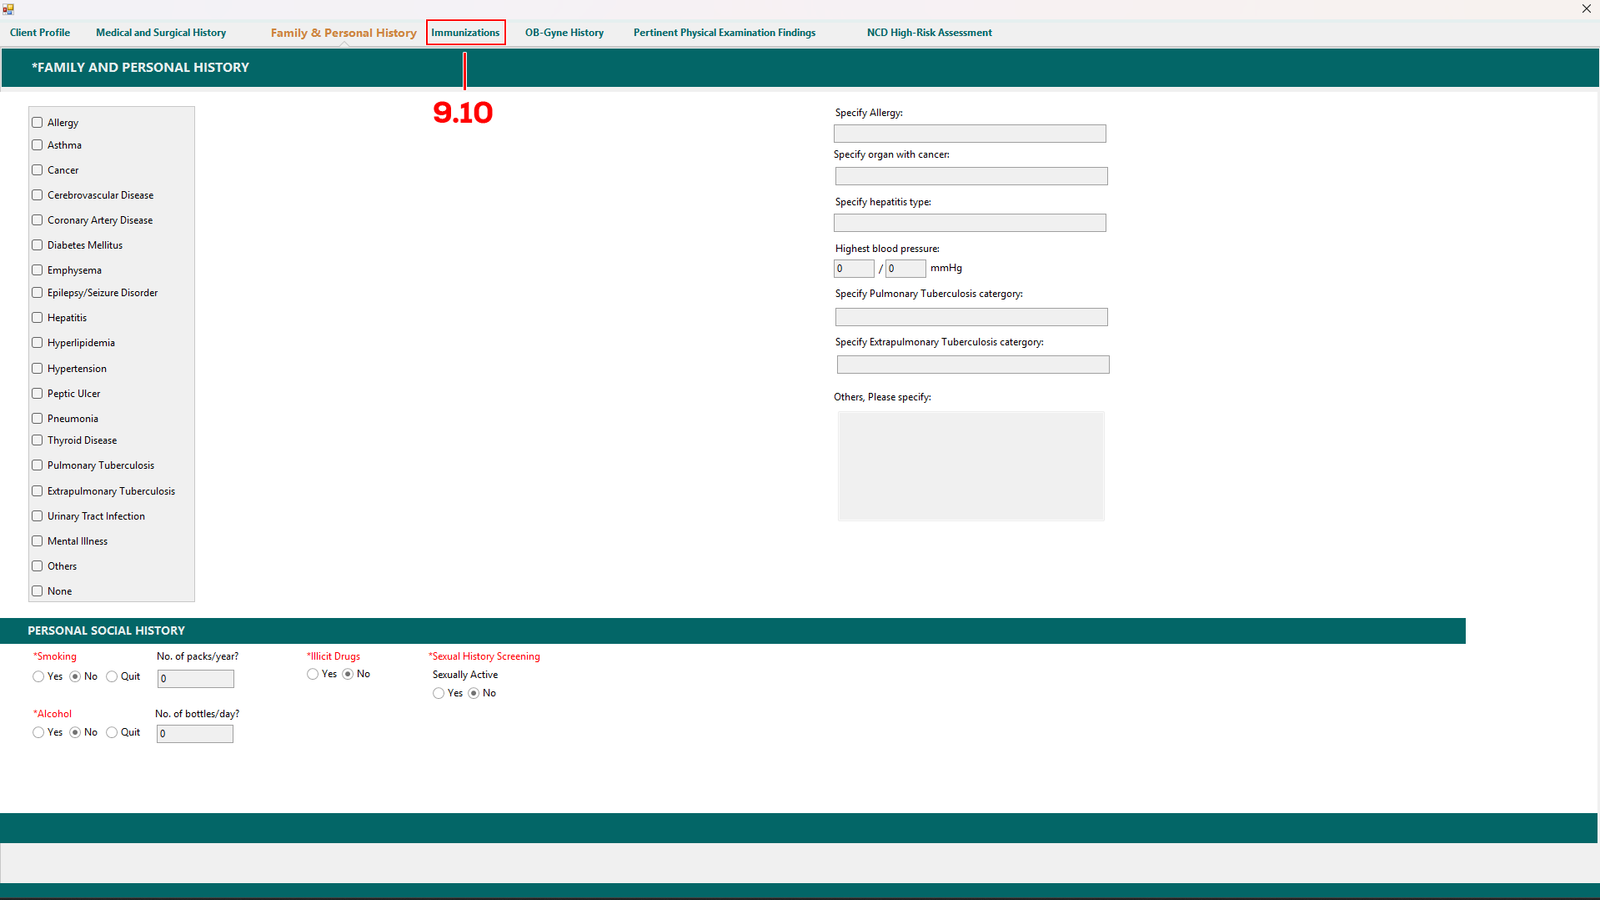
(E-Konsulta-Image 9.1.9 Create Claims)
Same goes in the Family & Personal History tab, fill up the patients family and diagnosis history and select what is needed and proceed to Immunizations (see 9.10).
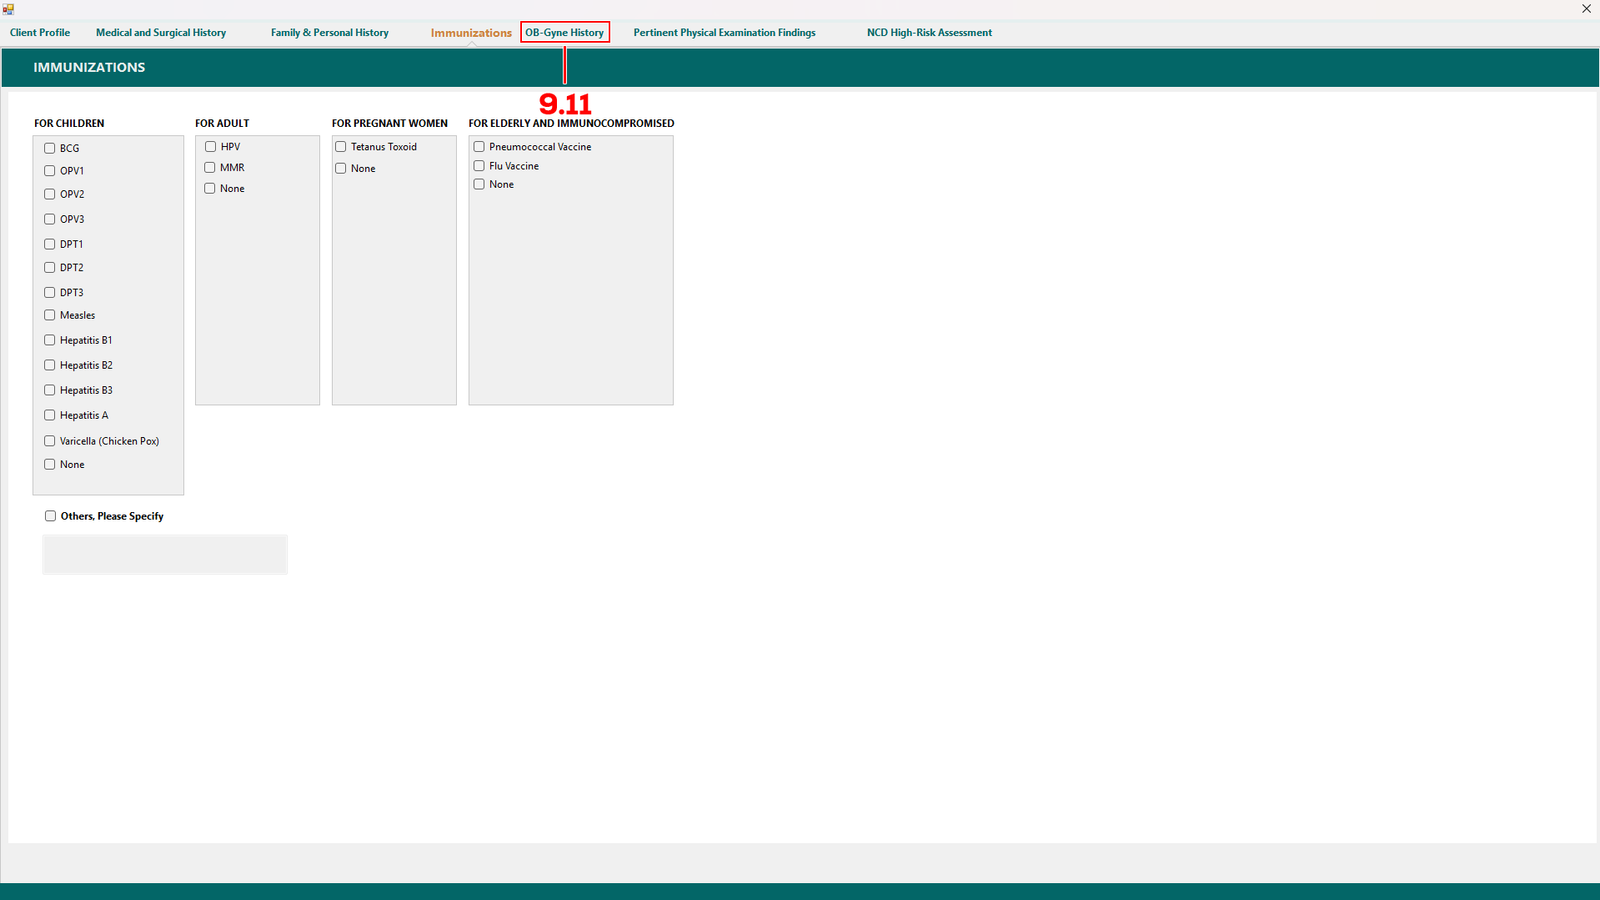
(E-Konsulta-Image 9.1.10 Create Claims)
In Immunizations tab, select one for each box in For Children, For Adult, For Pregnant Women, For Elderly and Immunocompromised column.
Then proceed to OB-Gyne History (see 9.11).
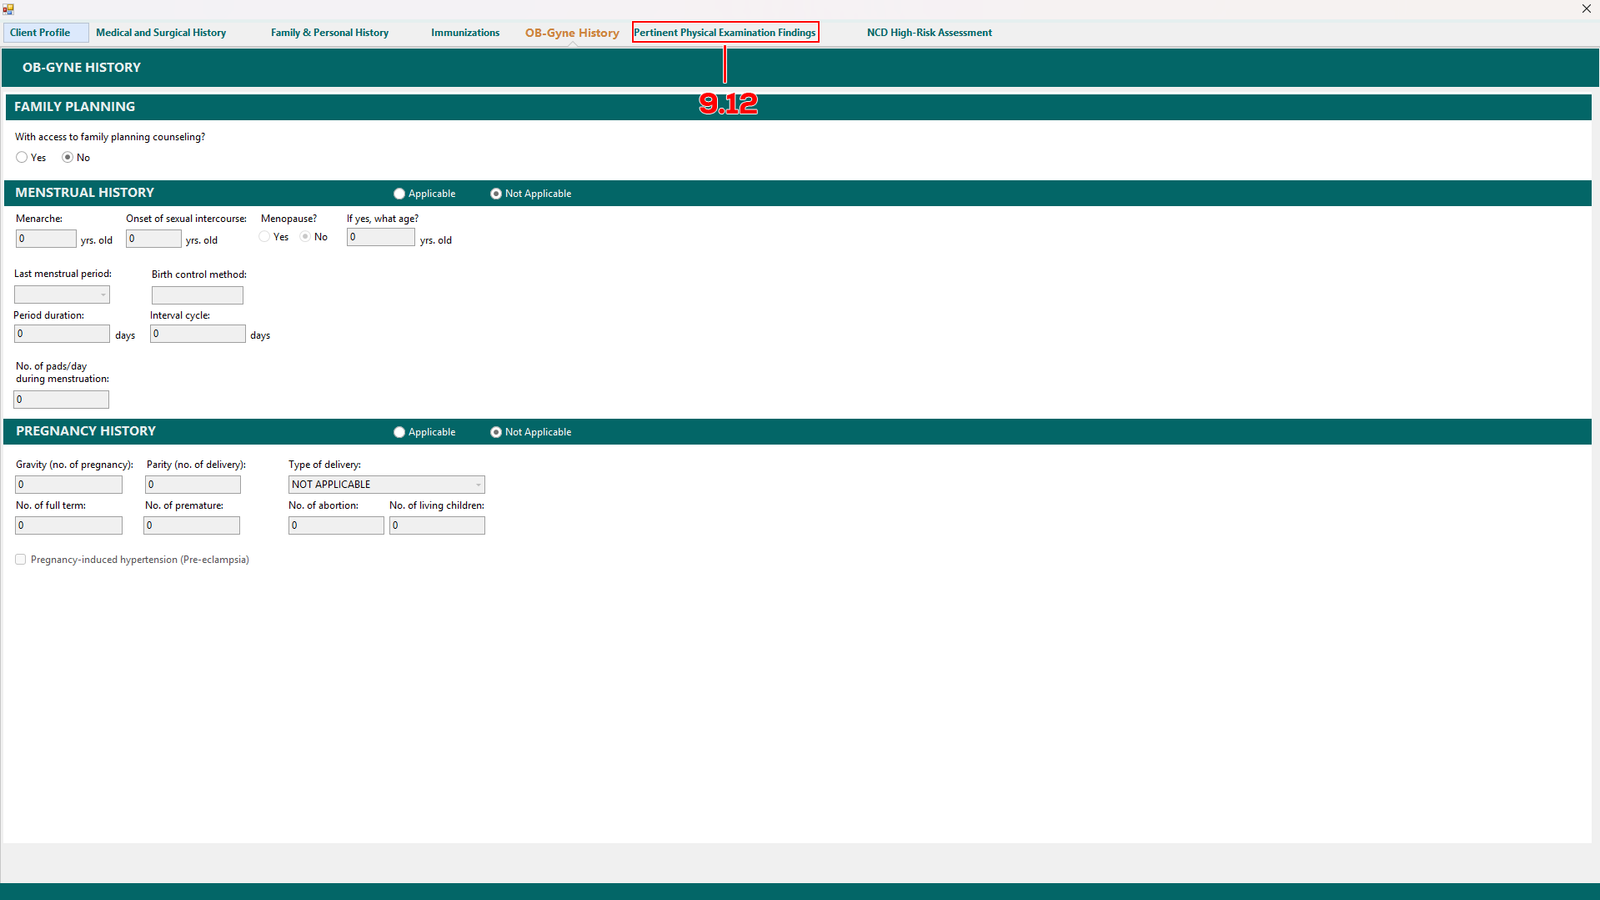
(E-Konsulta-Image 9.1.11 Create Claims)
In OB-Gyne History tab, complete all required fields in this tab.
Then proceed to Pertinent Physical Examination Findings (see 9.12).

(E-Konsulta-Image 9.1.12 Create Claims)
In Pertinent Physical Examination Findings tab.
Complete all required fields in this tab and proceed to NCD High-Risk Assessment (see 9.13).
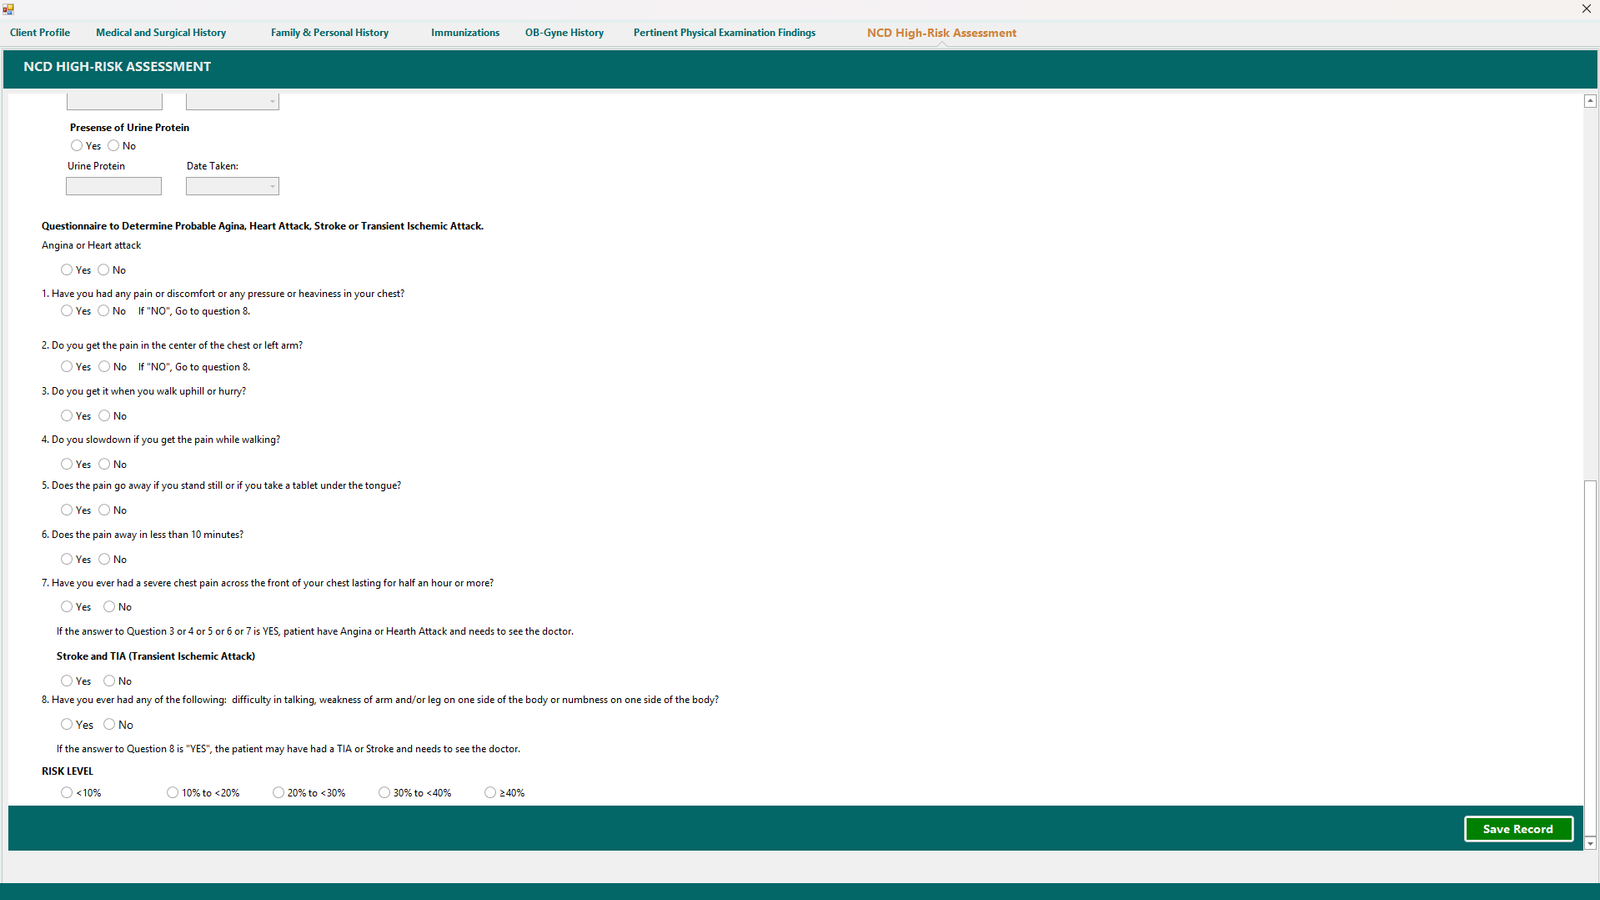
(E-Konsulta-Image 9.1.13 Create Claims)
In the NCD High-Risk Assessment tab, complete all required fields.
Scroll down and click Save Record. A confirmation window will appear for final review—click Yes to confirm and proceed.
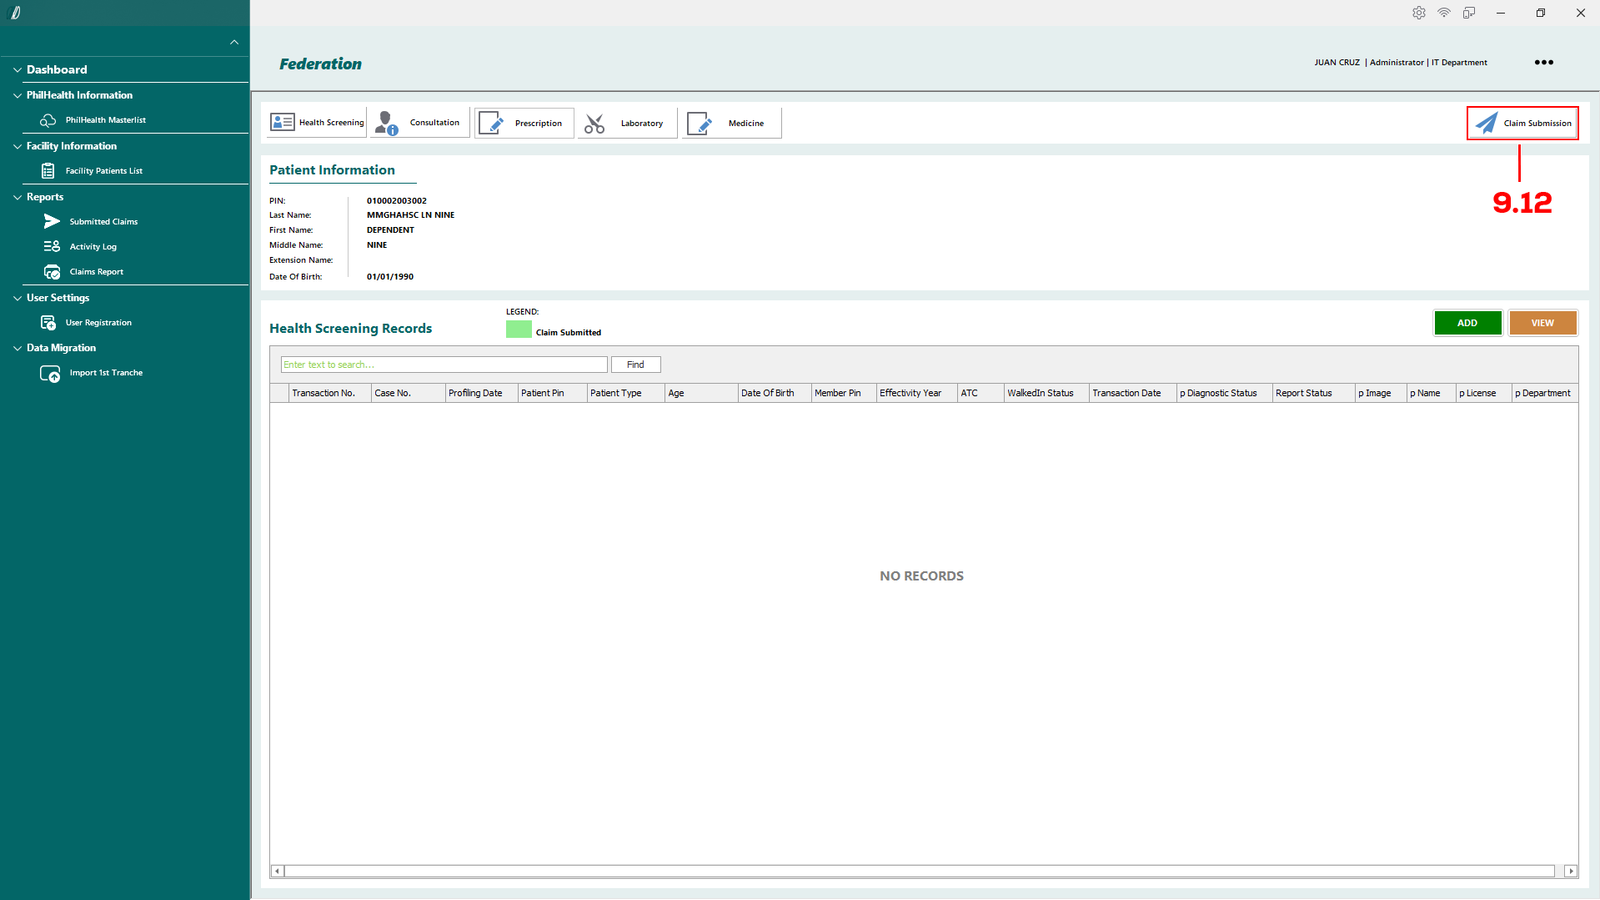
(E-Konsulta-Image 9.1.14 Create Claims)
You will be redirect back to this module after complete filling up all the tabs. To submit the claim, just simply click Claim Submission (see 9.14).
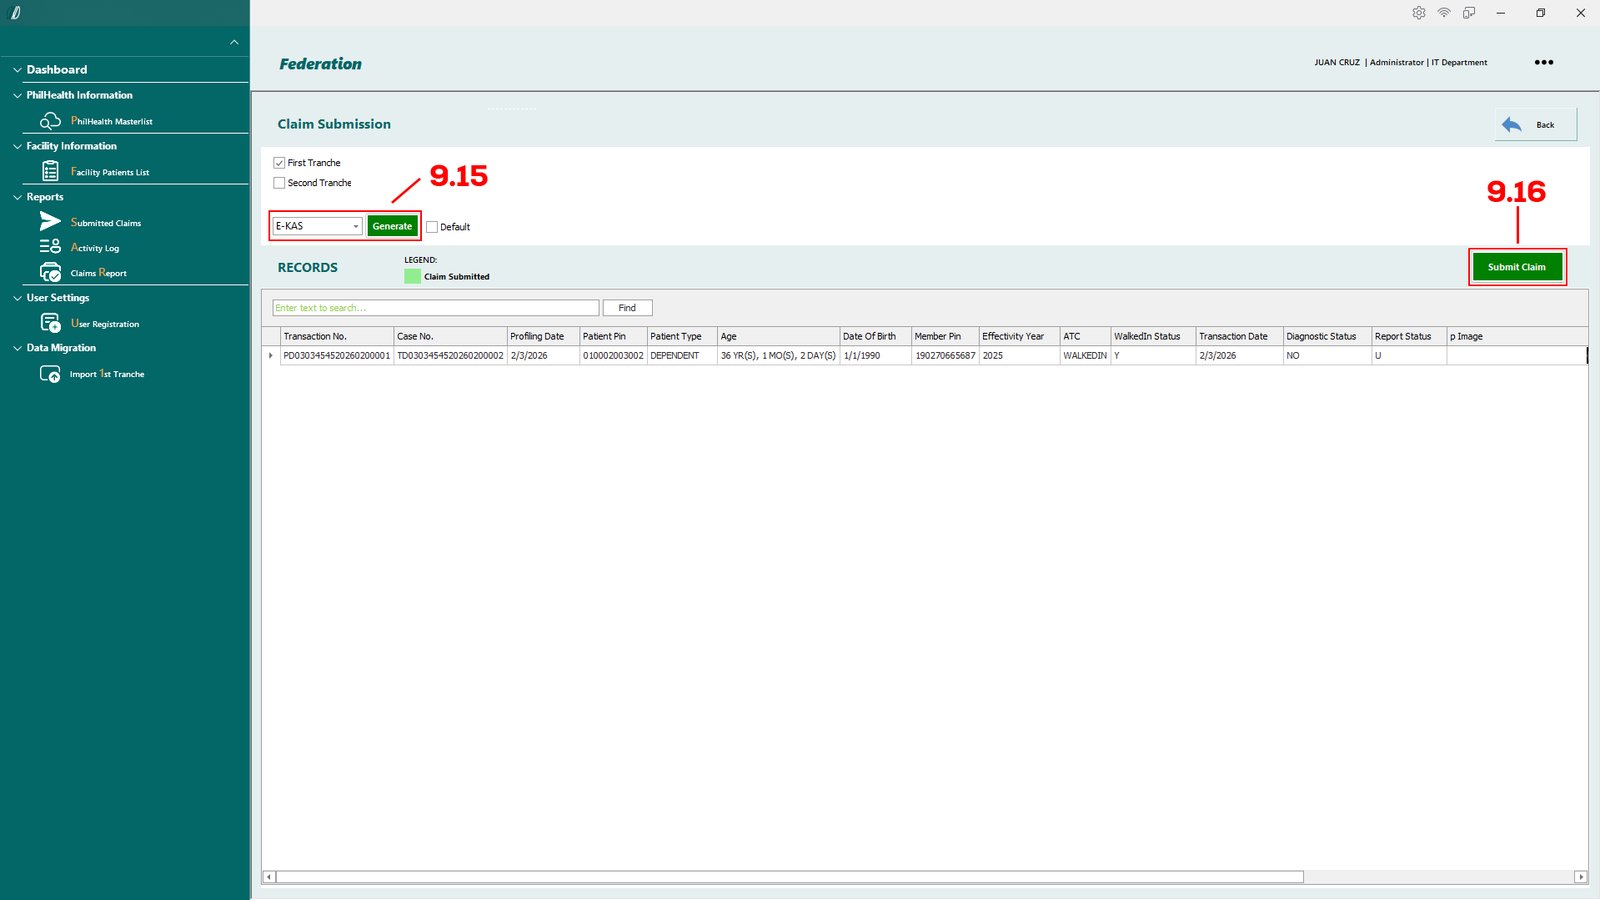
(E-Konsulta-Image 9.1.15 Create Claims)
This module displays the patient’s previous claims records in a table.
You may print the E-KAS or E-PRES by selecting the form from the drop-down menu and clicking Generate (see 9.15).
To submit the claim, click the Submit Claims button (see 9.16).
Created with the Personal Edition of HelpNDoc: Single source CHM, PDF, DOC and HTML Help creation
Process Second Tranche
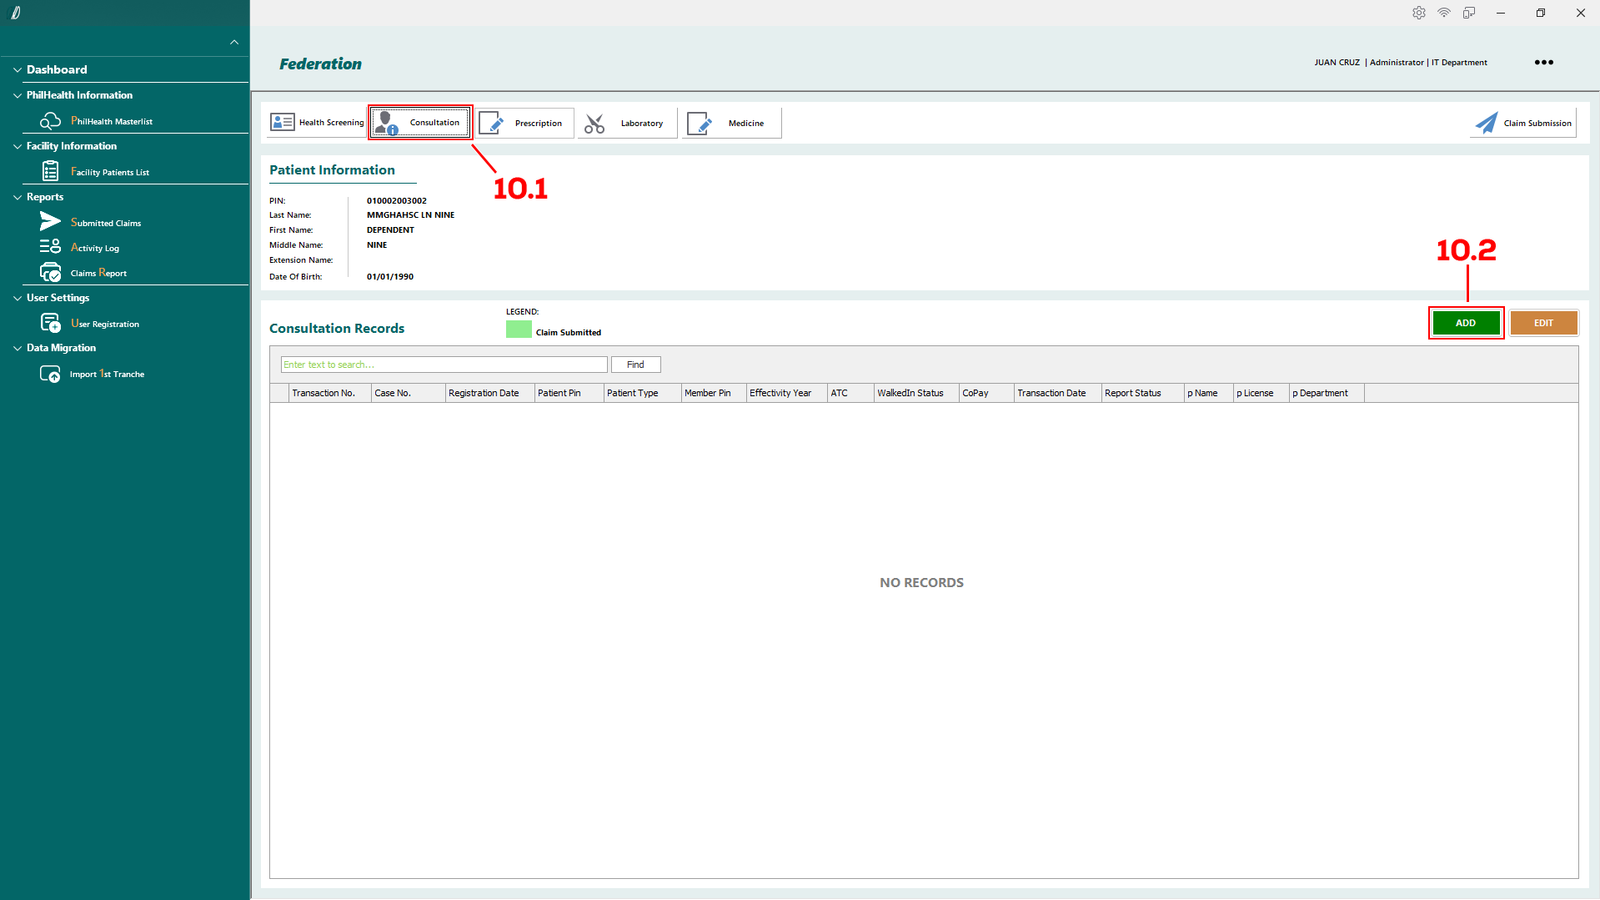
(E-Konsulta-Image 10.1.1 2nd Tranche)
To create second tranche, you first have to complete the Health Screening process for 1st Tranche. Then proceed and click Consultation tab (see 10.1), and click ADD button (see 10.2).
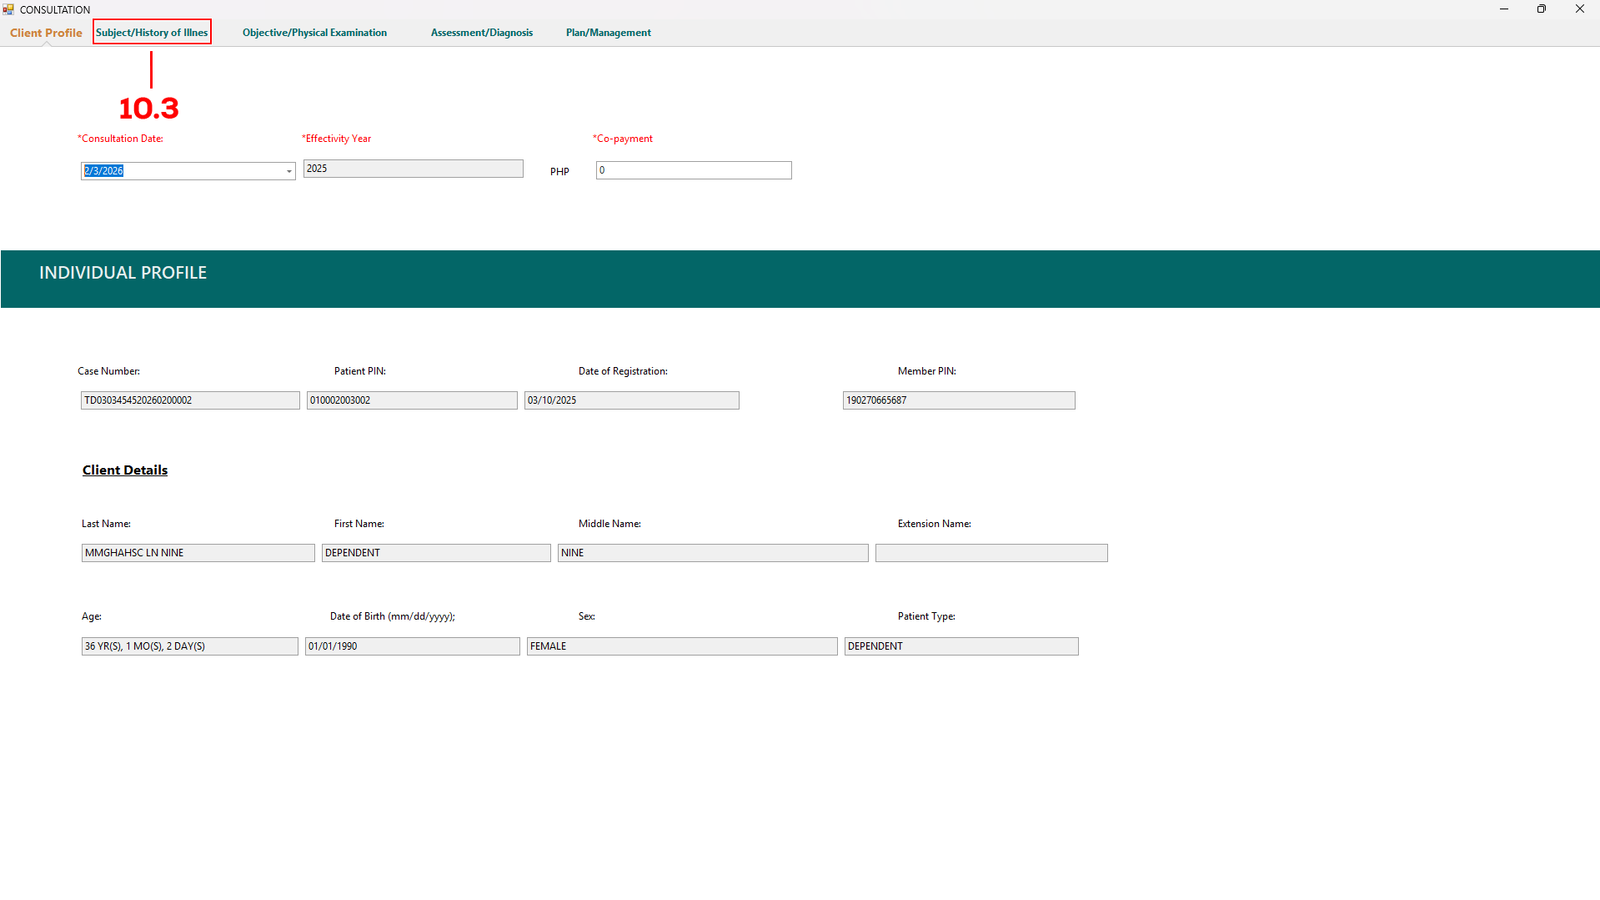
(E-Konsulta-Image 10.1.2 2nd Tranche)
You will be redirect to the Consultation tab, check for everything necessary in this tab then click Subject/History of Illness tab (see 10.3).
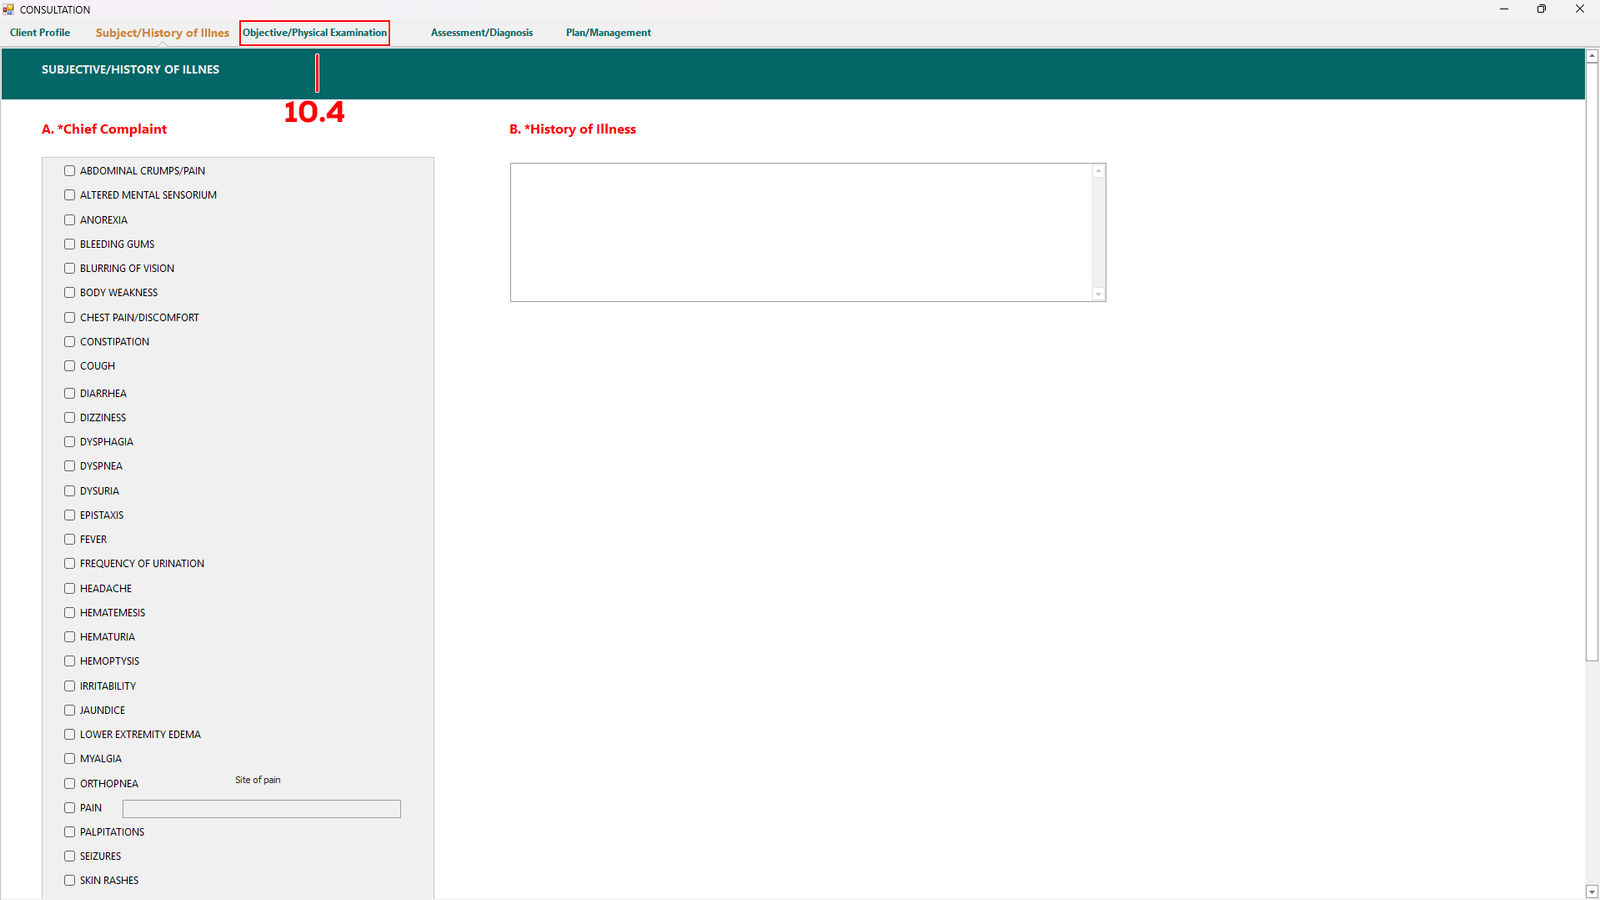
(E-Konsulta-Image 10.1.3 2nd Tranche)
In this tab, choose one from the A. *Chief Complaint column and fill the text box of B. *History of Illness. Proceed to Objective/Physical Exam (see 10.4) tab to continue.
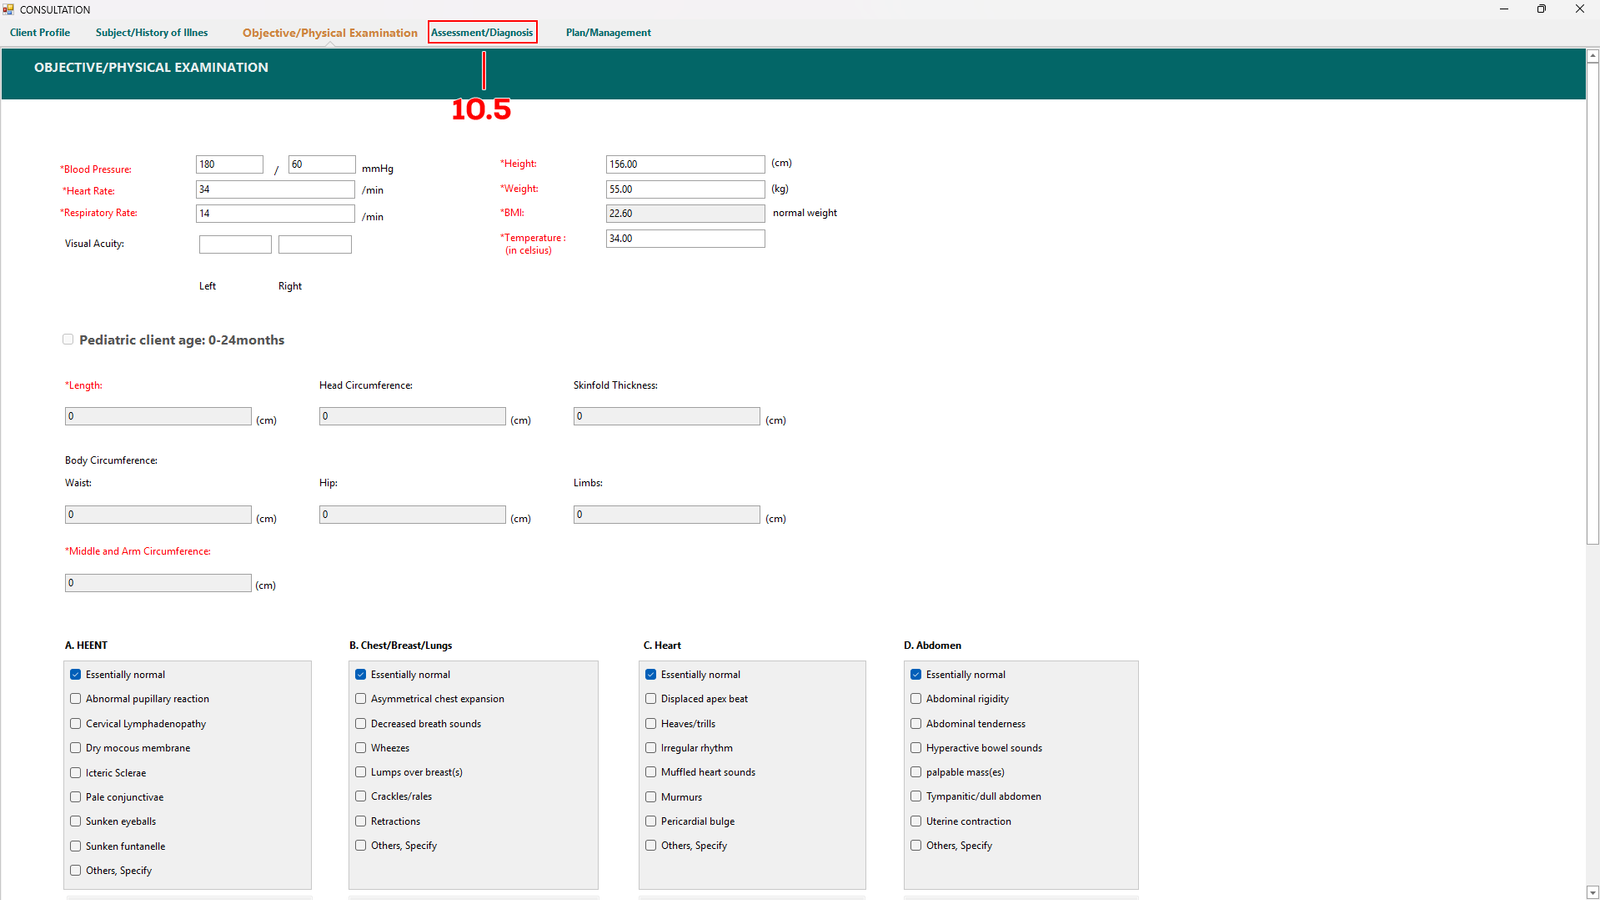
(E-Konsulta-Image 10.1.4 2nd Tranche)
Fill up all the necessary in this tab and proceed to Assesment/Diagnosis (see 10.5) tab once completed.
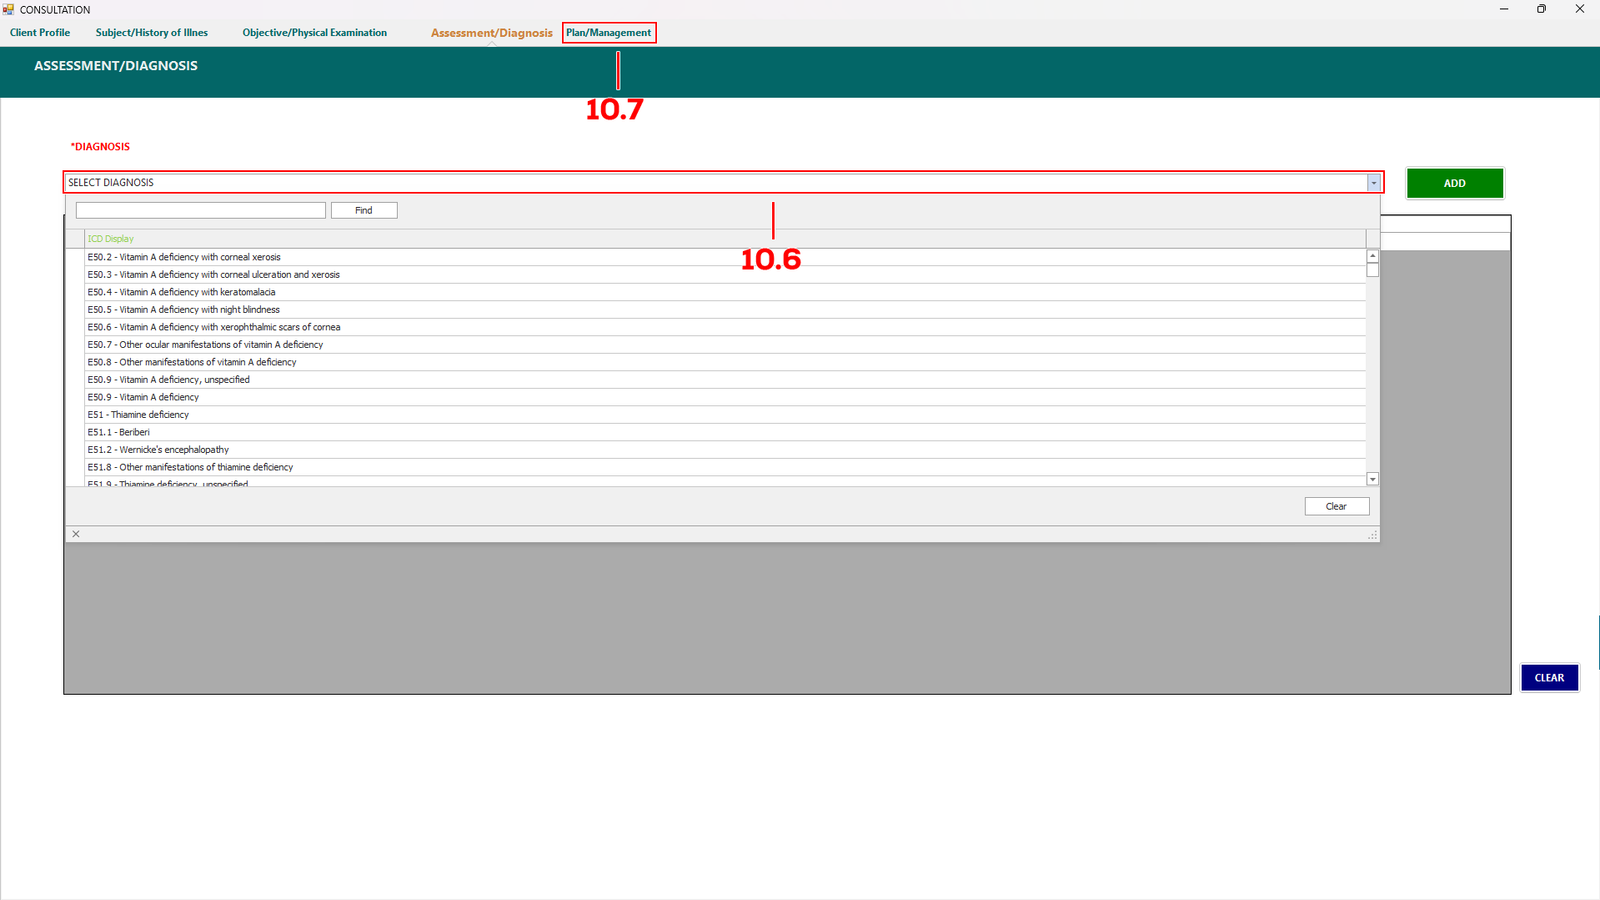
(E-Konsulta-Image 10.1.5 2nd Tranche)
In this tab, select the drop down menu (see 10.6) to choose any diagnosis the patient needed, if not just proceed to Plan/Management tab.
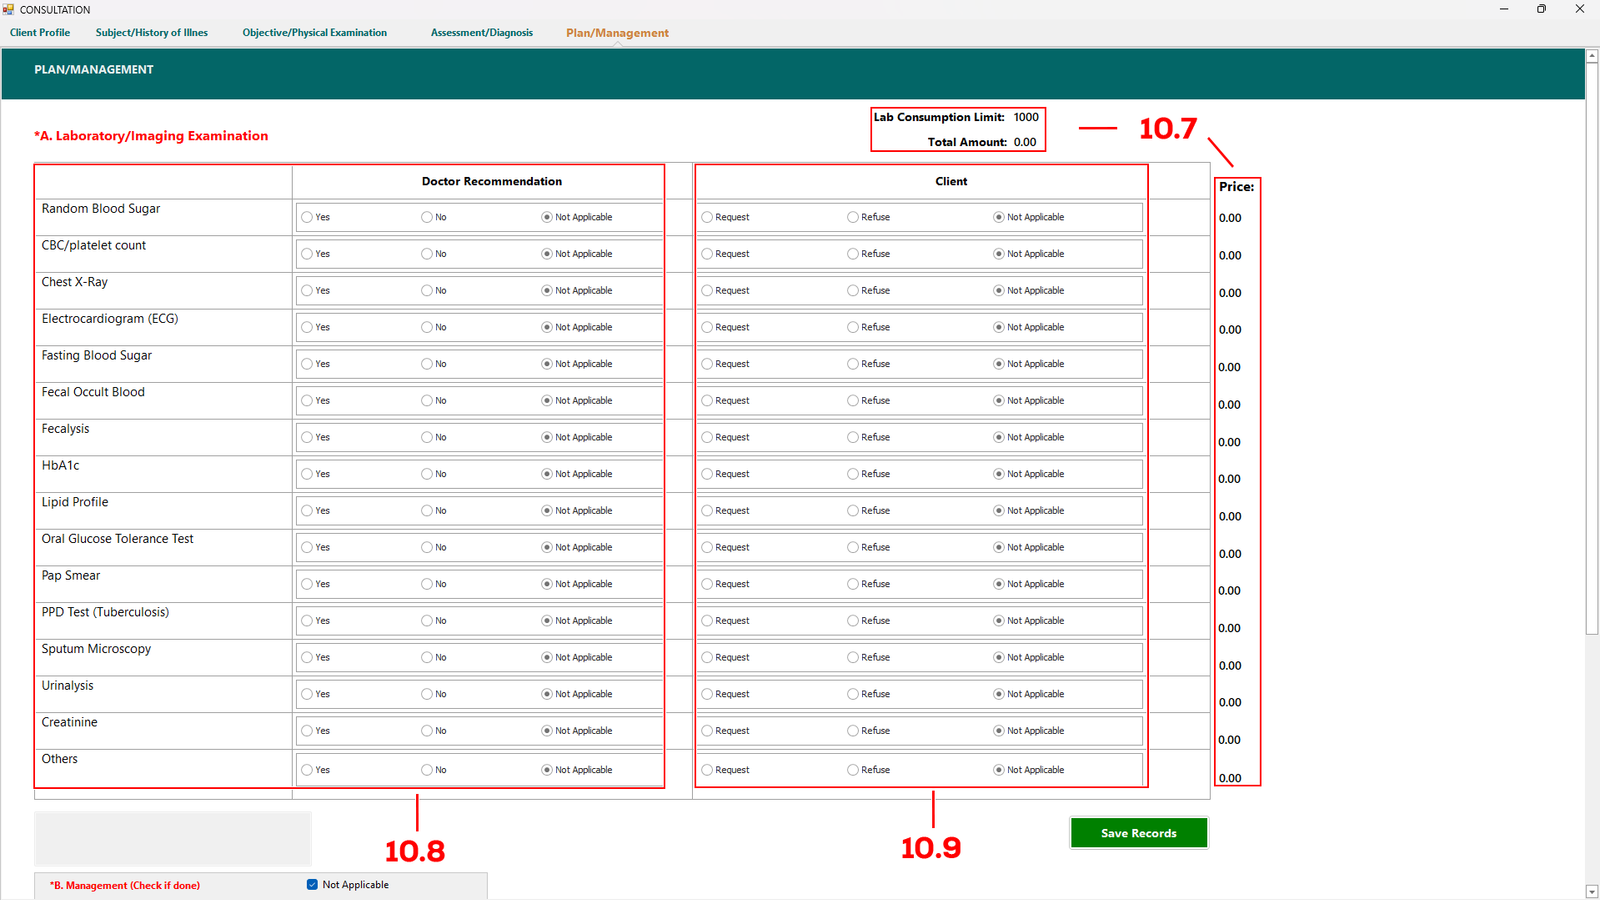
(E-Konsulta-Image 10.1.6 2nd Tranche)
In this tab, select the examination recommended by the doctor (see 10.8) and indicate whether the client accepts or declines the examination (see 10.9).
The price of the selected examination will be displayed (see 10.7). At the top of the page, you can also view the Lab Consumption Limit and the Total Amount for the selected examination. Click Save Records if done.
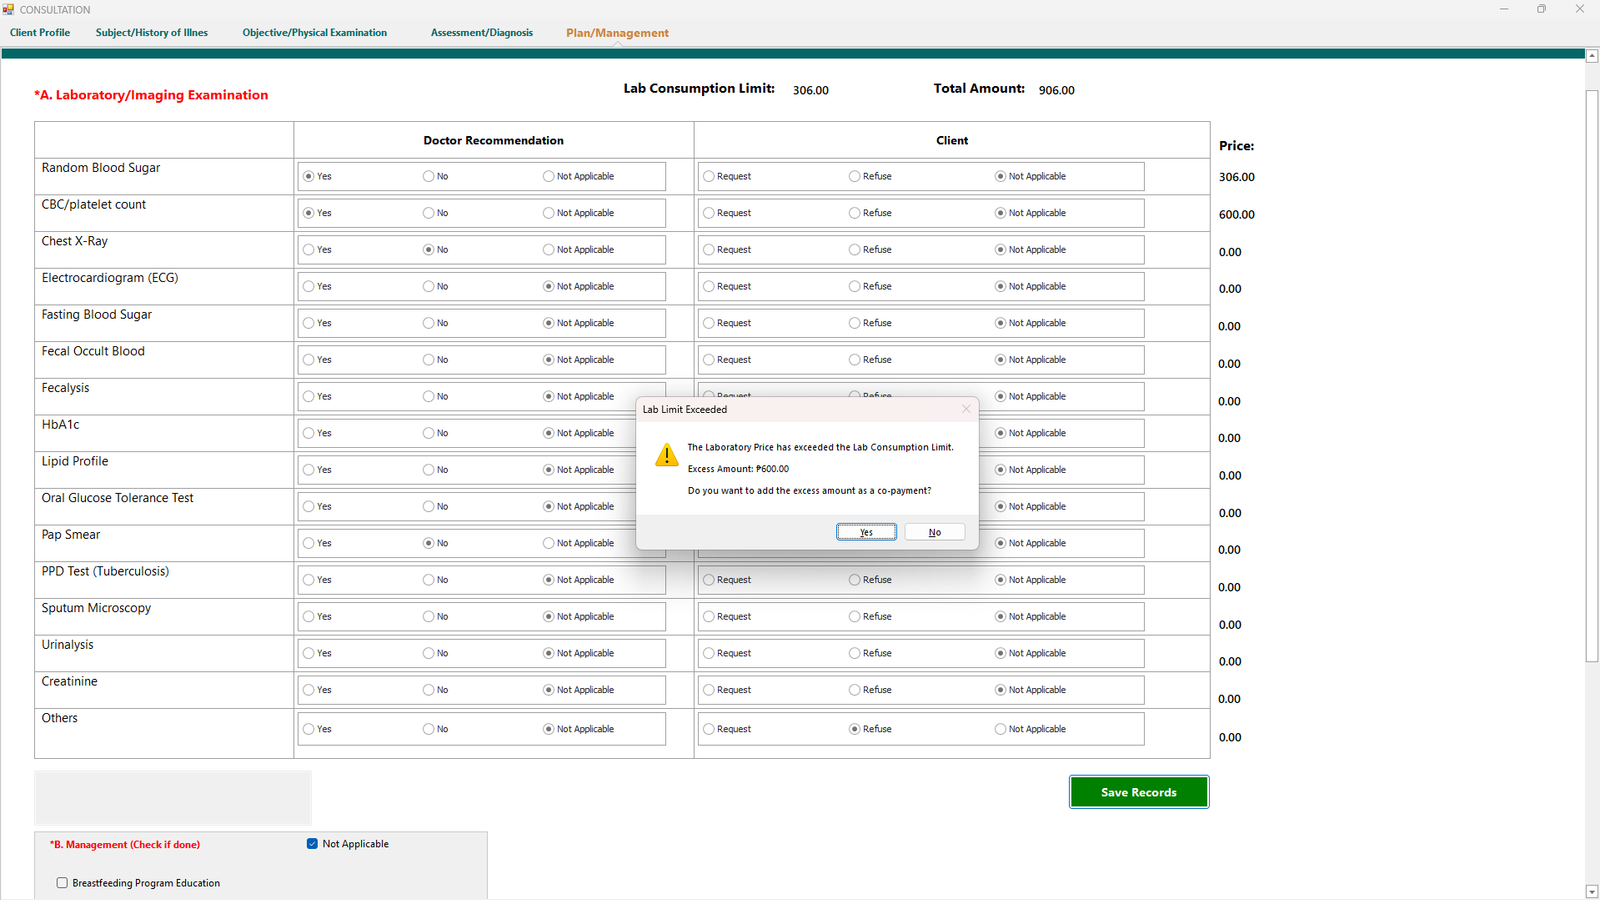
(E-Konsulta-Image 10.1.7 2nd Tranche)
Incase you have exceed the limit of Lab Consumption that were given, a warning will appear.
You can still proceed and let the patient know that they have to pay the excess amount as a co-payment. Proceed to Payment Reconciliation on how to process co-payment.
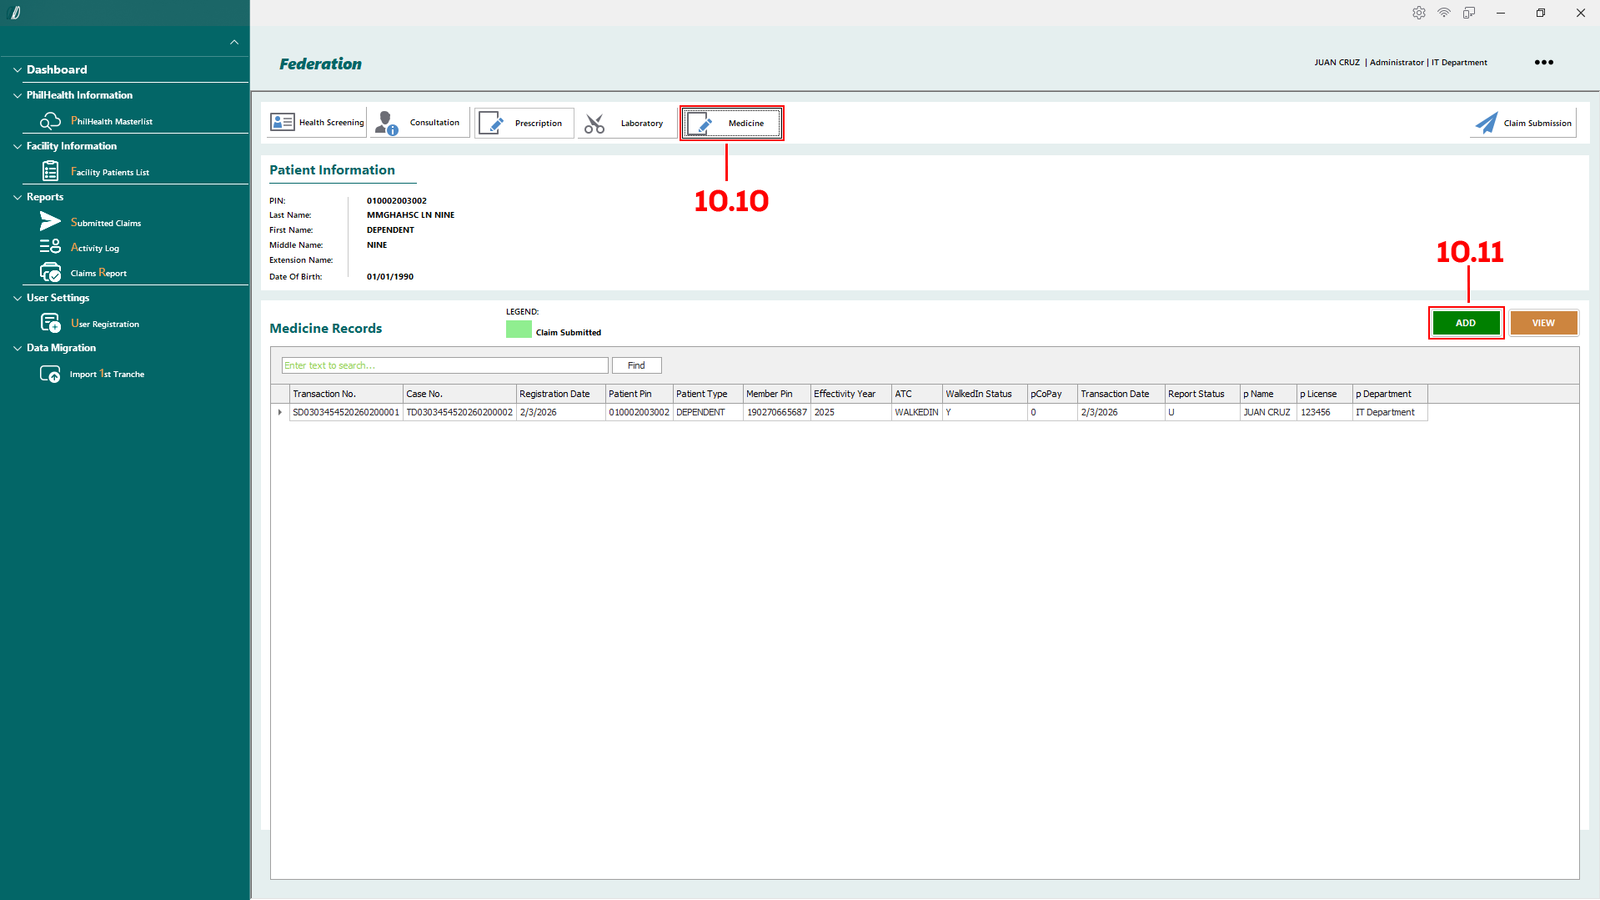
(E-Konsulta-Image 10.1.8 2nd Tranche)
Lastly if the patient required some medicines, go to the Medicine tab (see 10.10) and click the Add button (see 10.11).
This allows you to add the medicines required by the patient.
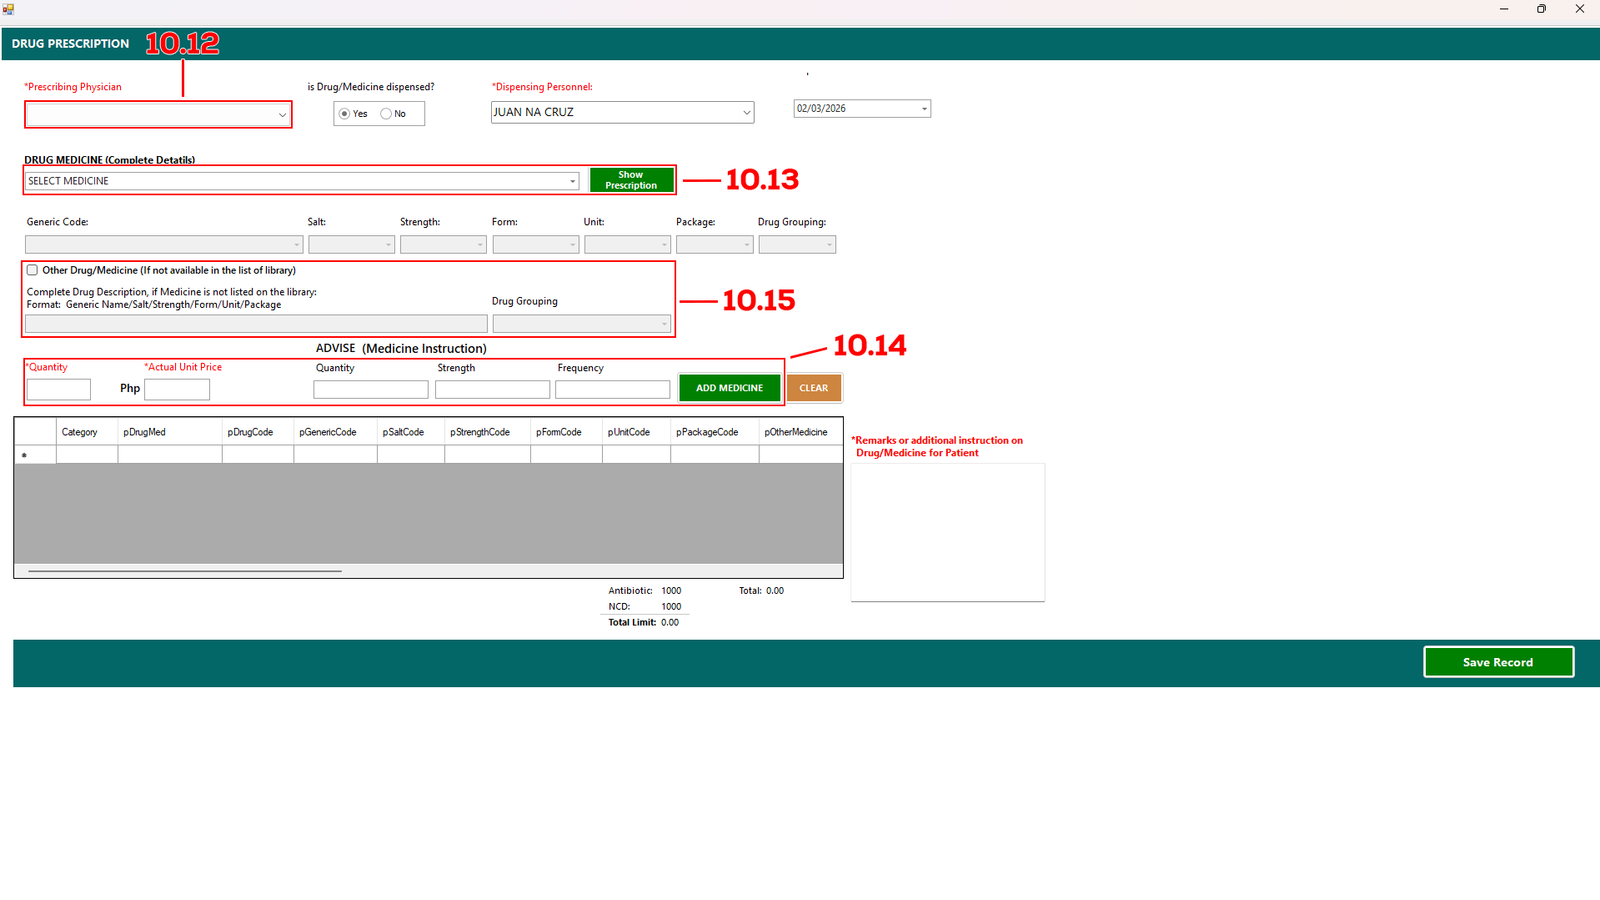
(E-Konsulta-Image 10.1.9 2nd Tranche)
To add a medicine, first select the Prescribing Physician from the drop-down menu (see 10.12).
On the right side, indicate whether the Drug/Medicine was dispensed by selecting Yes or No. The Dispensing Personnel field will automatically display the logged-in user.
Next, go to Drug Medicine (see 10.13), choose the medicine from the drop-down menu, and click Show Prescription.
Enter the required details such as Quantity, Actual Unit Price, and Advice (Quantity, Strength, and Frequency) (see 10.14), then click Add Medicine.
The added medicine will appear in the table at the bottom of the page. Click Save Records if done.
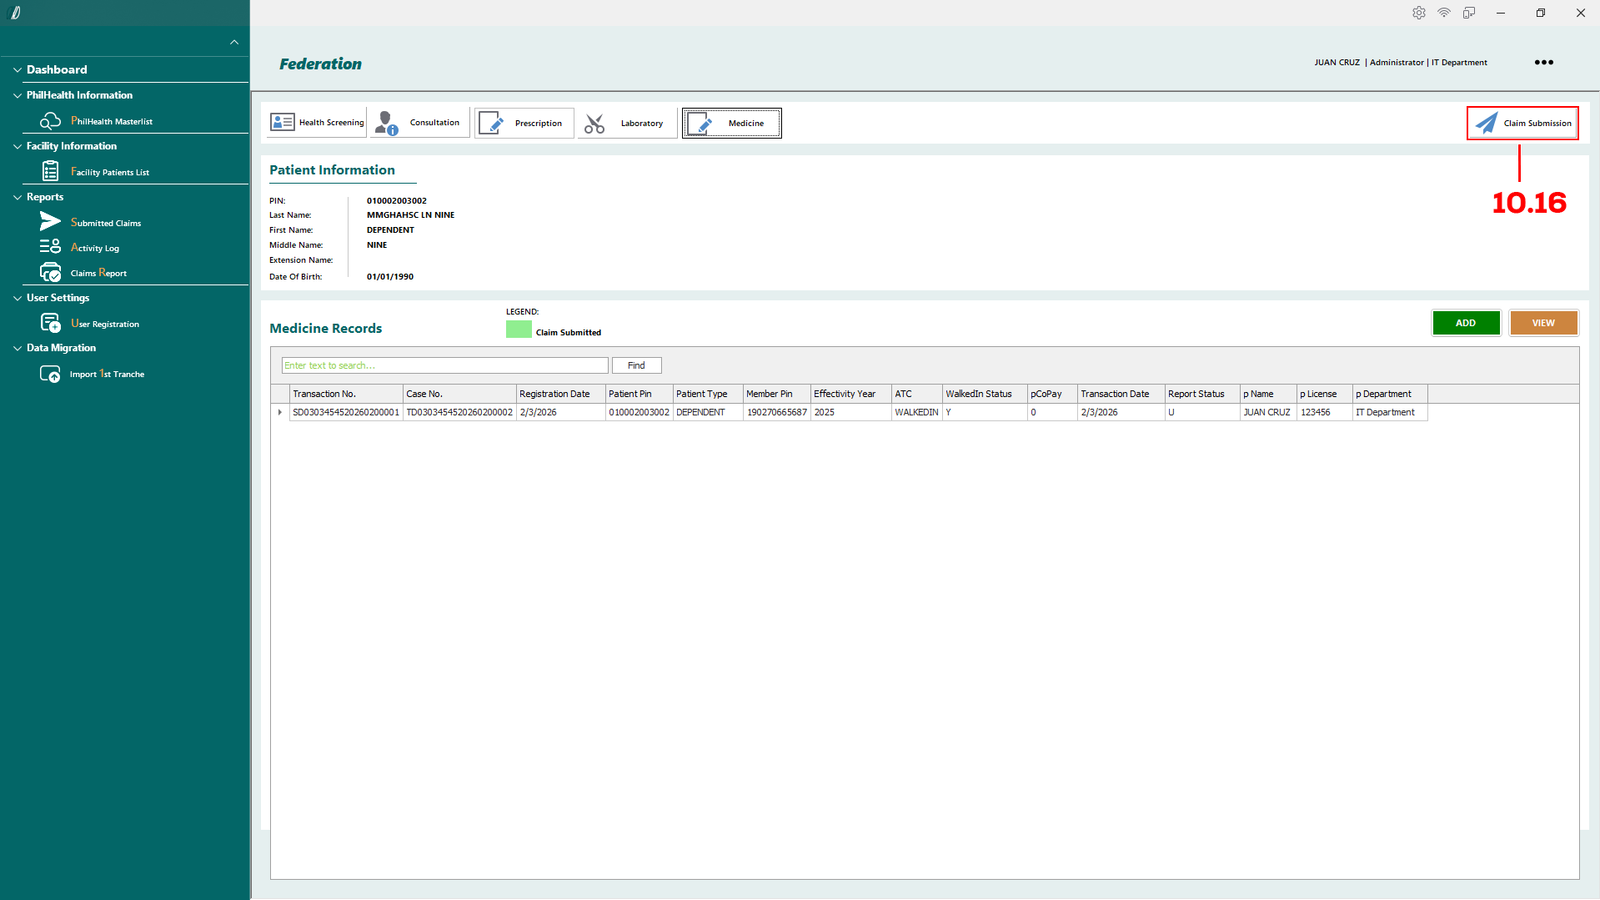
(E-Konsulta-Image 10.1.10 2nd Tranche)
Finally, after completing the Medicine module, select Claim Submission to proceed.
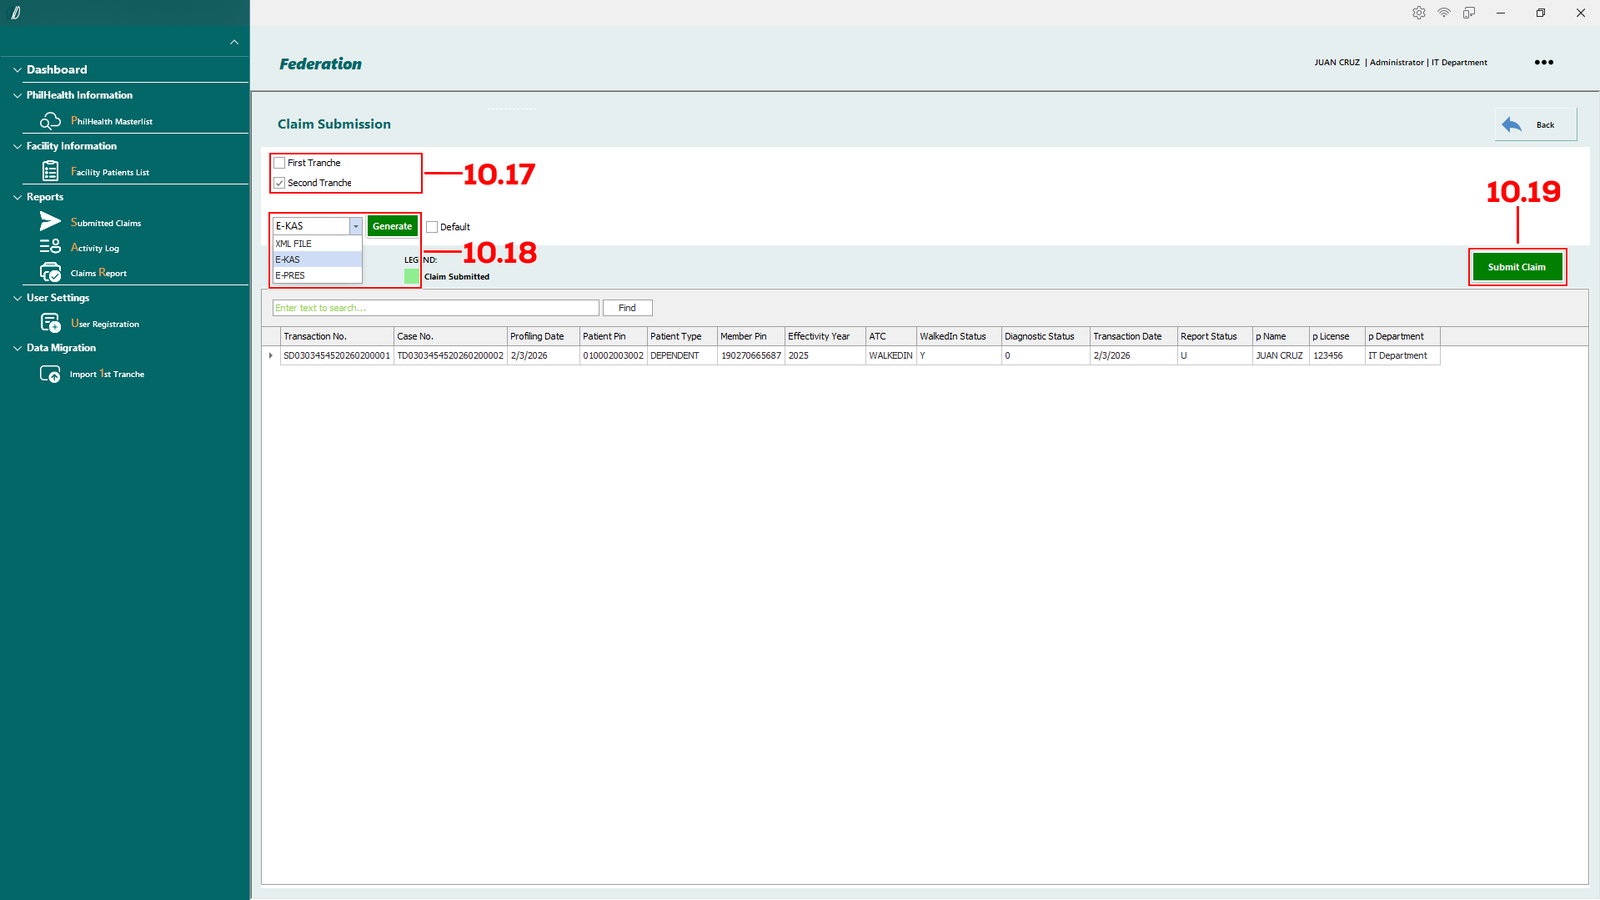
(E-Konsulta-Image 10.1.11 2nd Tranche)
In the Claim Submission form, ensure that Second Tranche is selected (see 10.17).
You may print the E-KAS and E-PRES by selecting the form and clicking Generate (see 10.18).
After reviewing all information, click Submit Claim (see 10.19).
Created with the Personal Edition of HelpNDoc: Streamline your documentation process with HelpNDoc's WinHelp HLP to CHM conversion feature
Prescribe medicine by Doctor
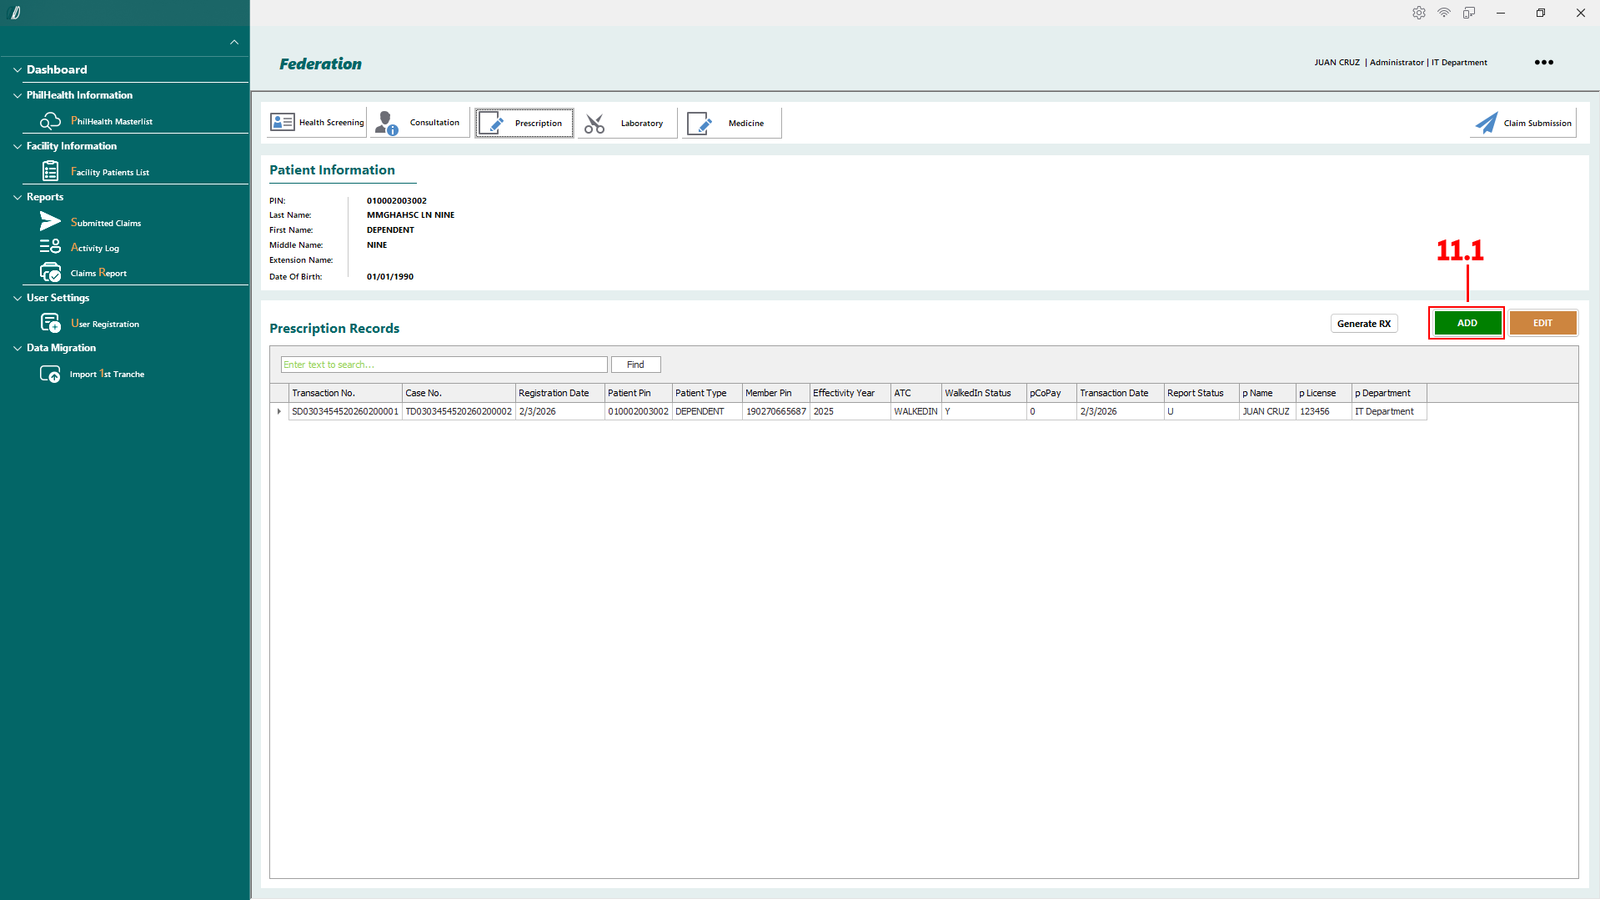
(E-Konsulta-Image 11.1.1 Prescribe Medicine)
To add medical prescription, go to the Prescription tab and click ADD (see 11.1).
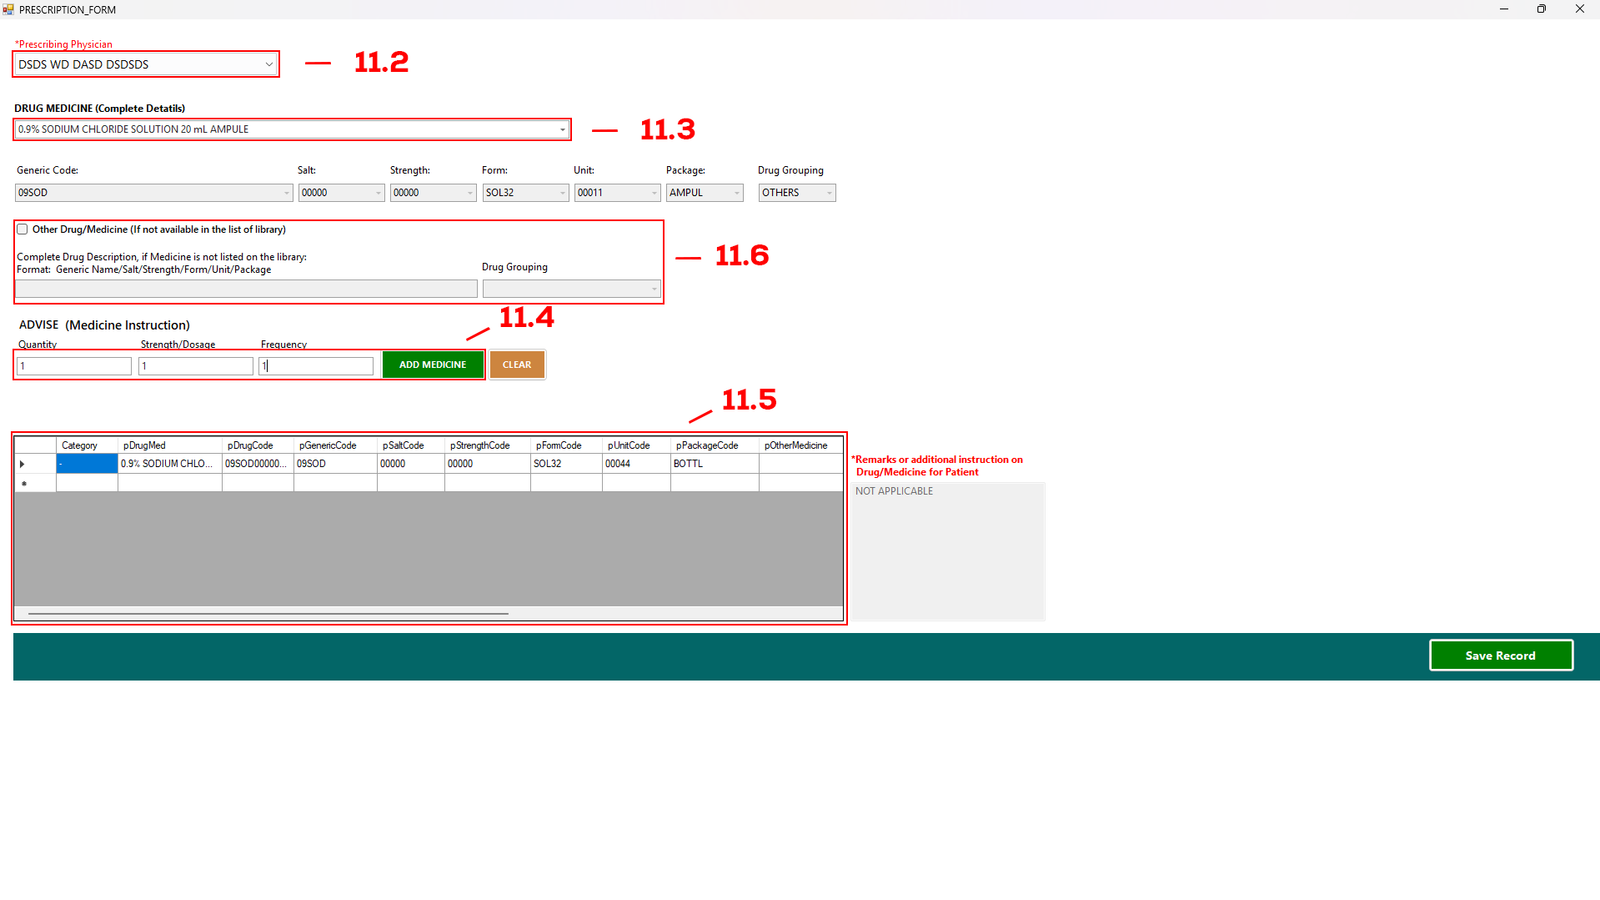
(E-Konsulta-Image 11.1.2 Prescribe Medicine)
The Prescription Form will appear, where you can select the medicines required for the patient.
Choose the Prescribing Physician from the drop-down menu (see 11.2). If the doctor is not listed, register the doctor first under Register Doctor.
Next, select the medicine from the Drug Medicine drop-down menu (see 11.3).
Enter the required Quantity, Strength/Dosage, and Frequency (see 11.4), then click Add. The medicine will appear in the table (see 11.5).
If the medicine is not available in the drop-down list, check the option provided (see 11.6) and enter the complete drug description.
Once all details are complete, click Save Record.
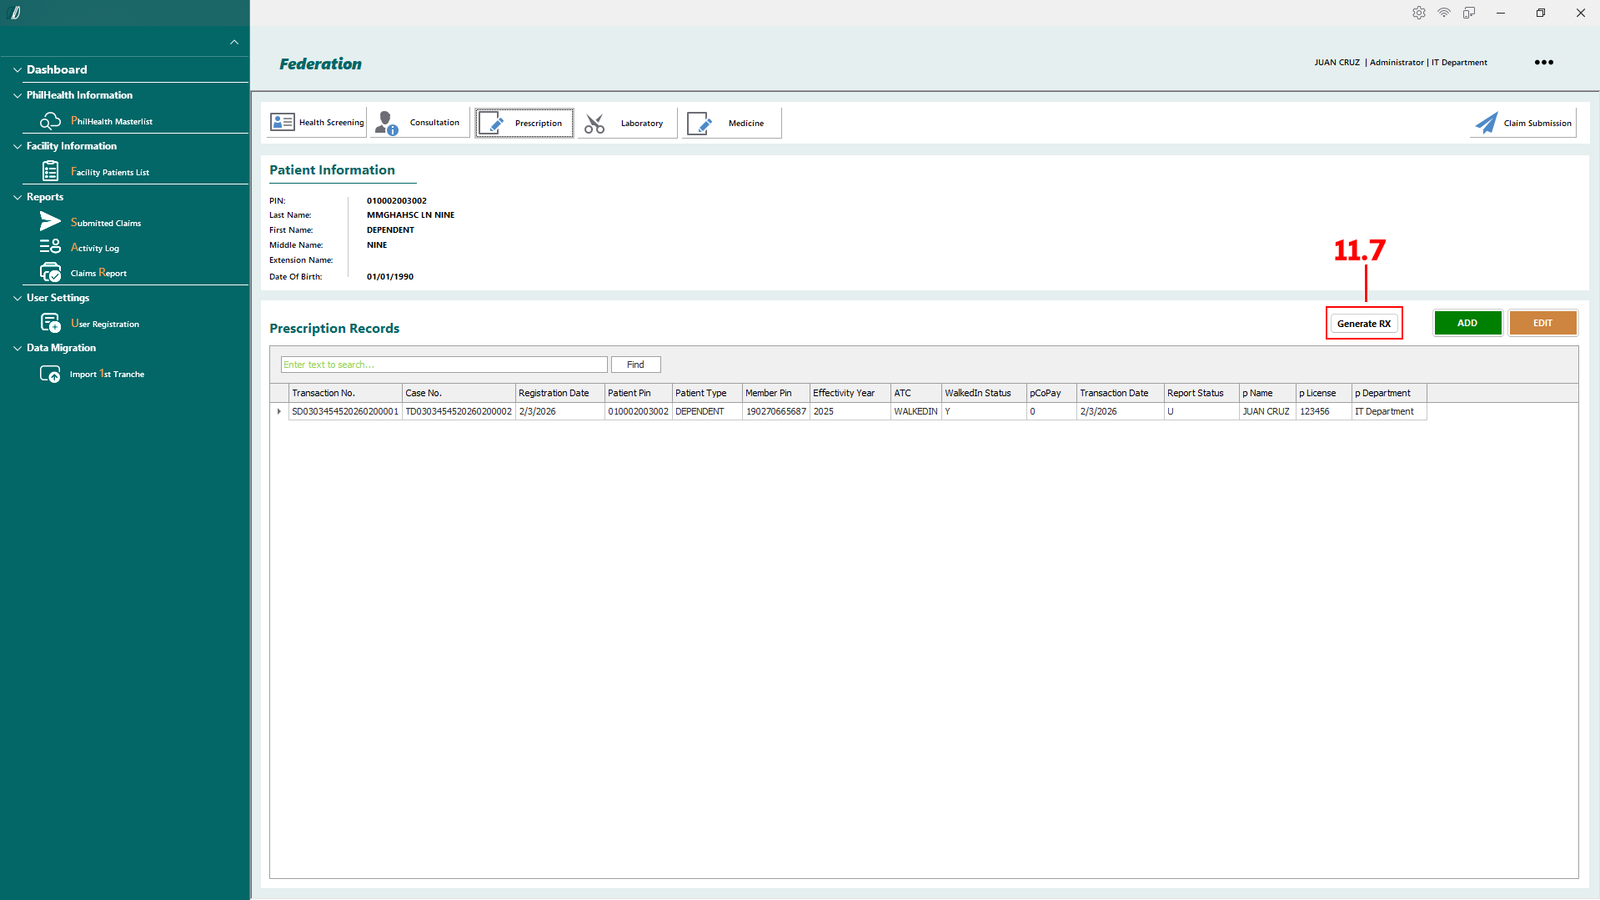
(E-Konsulta-Image 11.1.3 Prescribe Medicine)
Here you can Generate RX or Print RX by clicking the Generate RX (see 11.7).
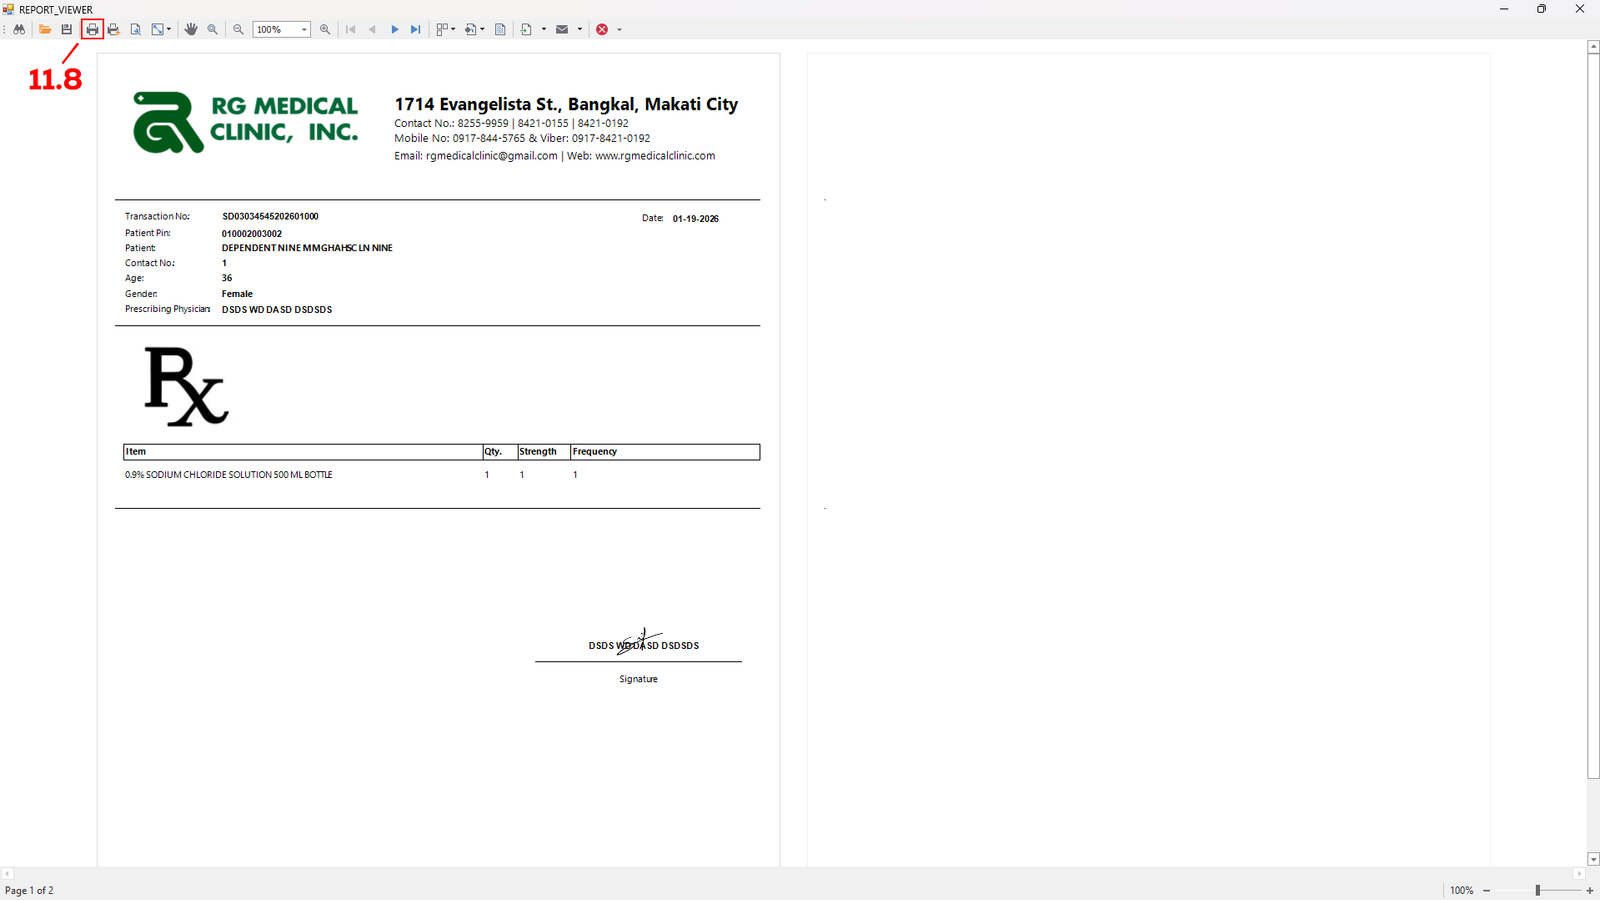
(E-Konsulta-Image 11.1.4Prescribe Medicine)
This module will appear and you can check everything before printing. When everything is done, click the print icon (see 11.8) to print.
Created with the Personal Edition of HelpNDoc: Maximize Your Productivity with HelpNDoc's CHM Help File Creation Features
Reports
Created with the Personal Edition of HelpNDoc: Easy EPub and documentation editor
View & Export Claim Reports
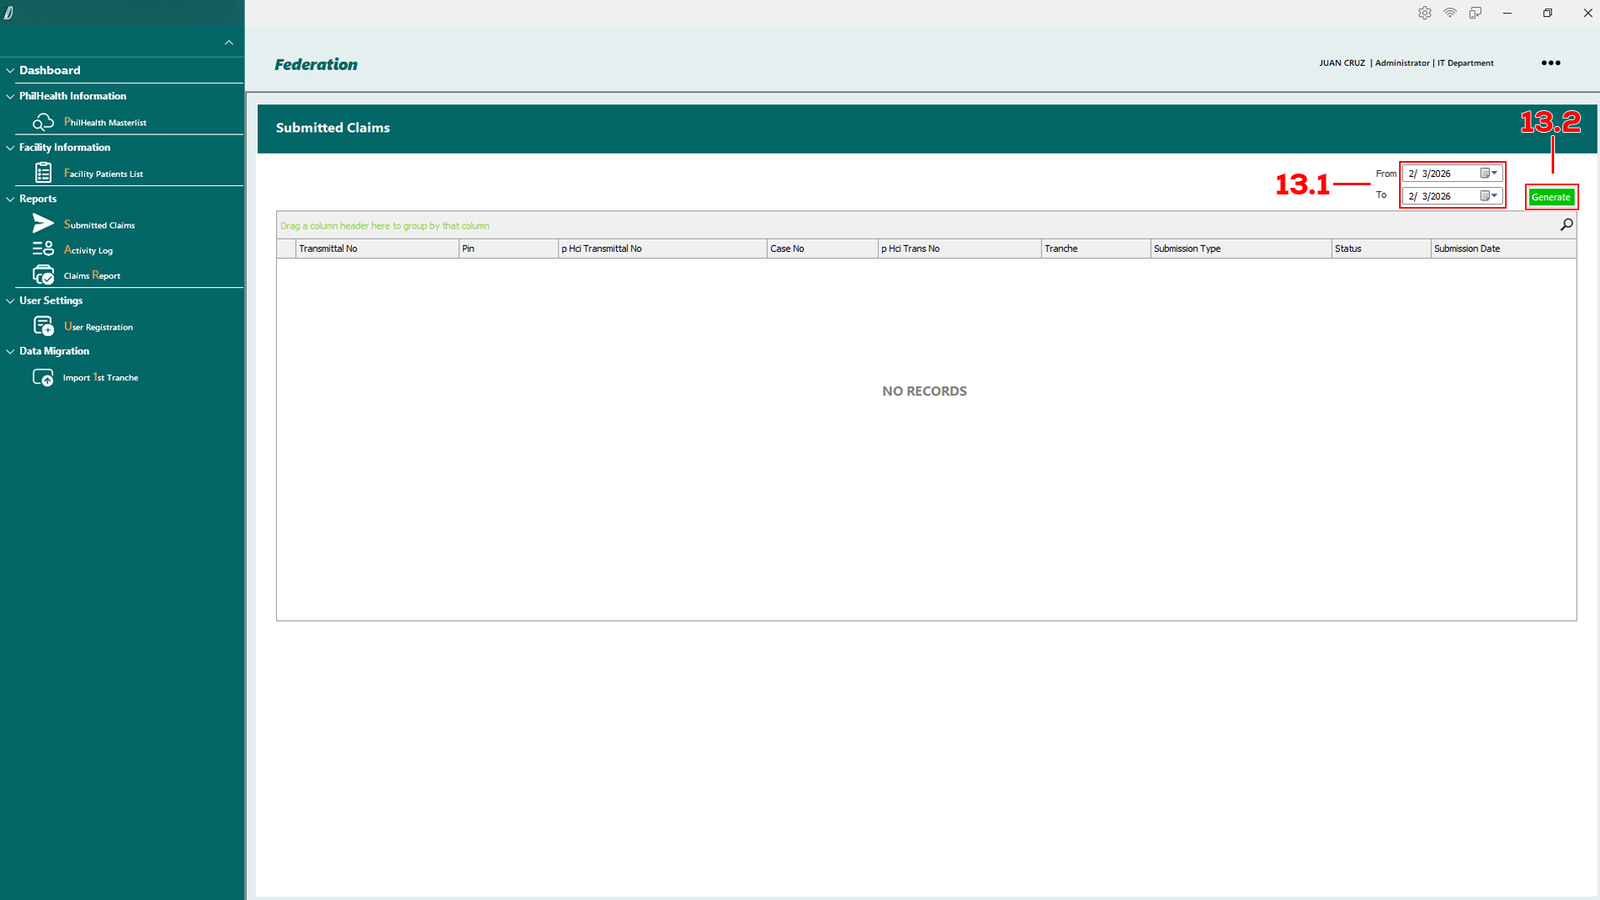
(E-Konsulta-Image 13.1 Report)
Change the date from and to (see 13.1) to view the report on the table. Click generate button to open another module to save report.
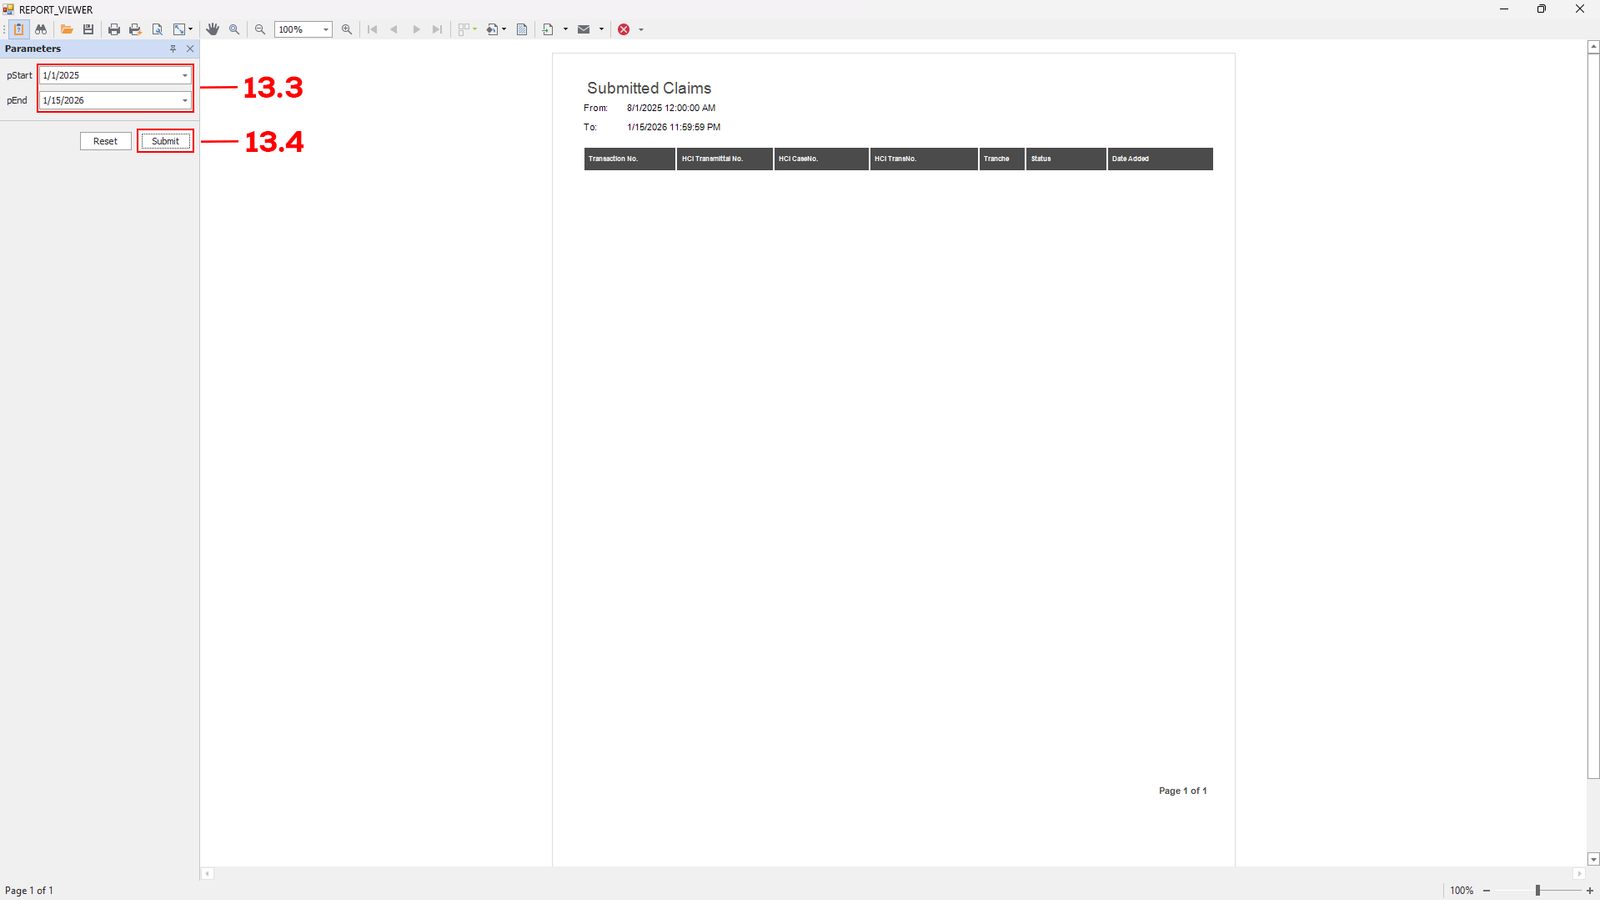
(E-Konsulta-Image 13.2 Report)
After clicking the Generate button, the Report Viewer Module will open. Adjust the date (see 13.3) to your desired date, then click Submit (see 13.4). The report for the selected date will be displayed on the report page.
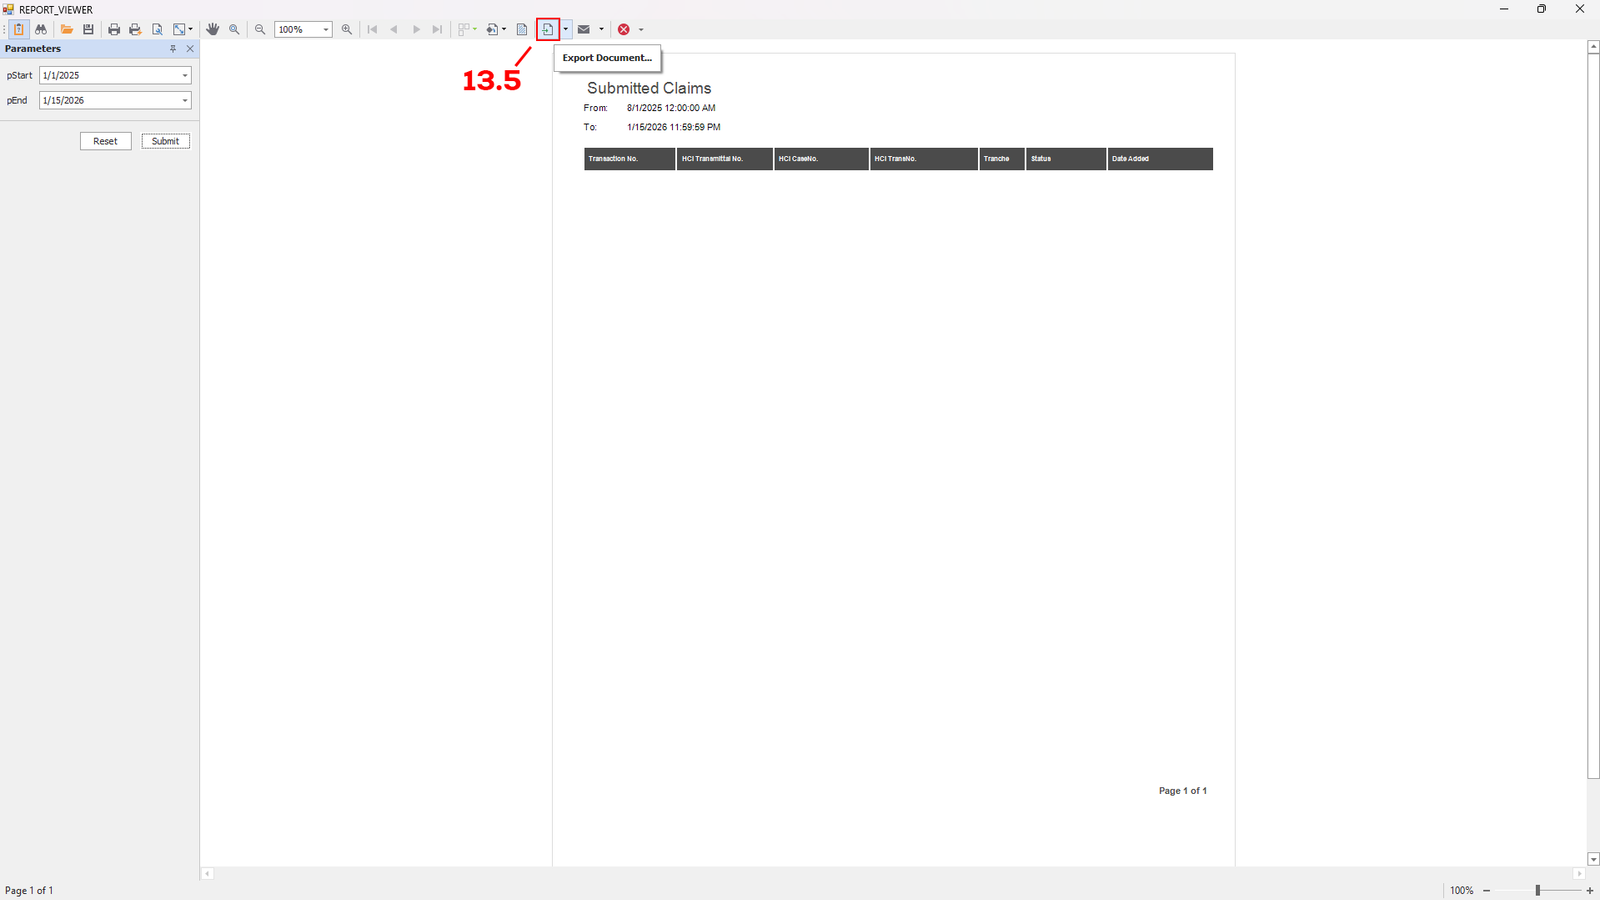
(E-Konsulta-Image 13.3 Report)
To save the report as pdf, click the Export document button (see 13.5).
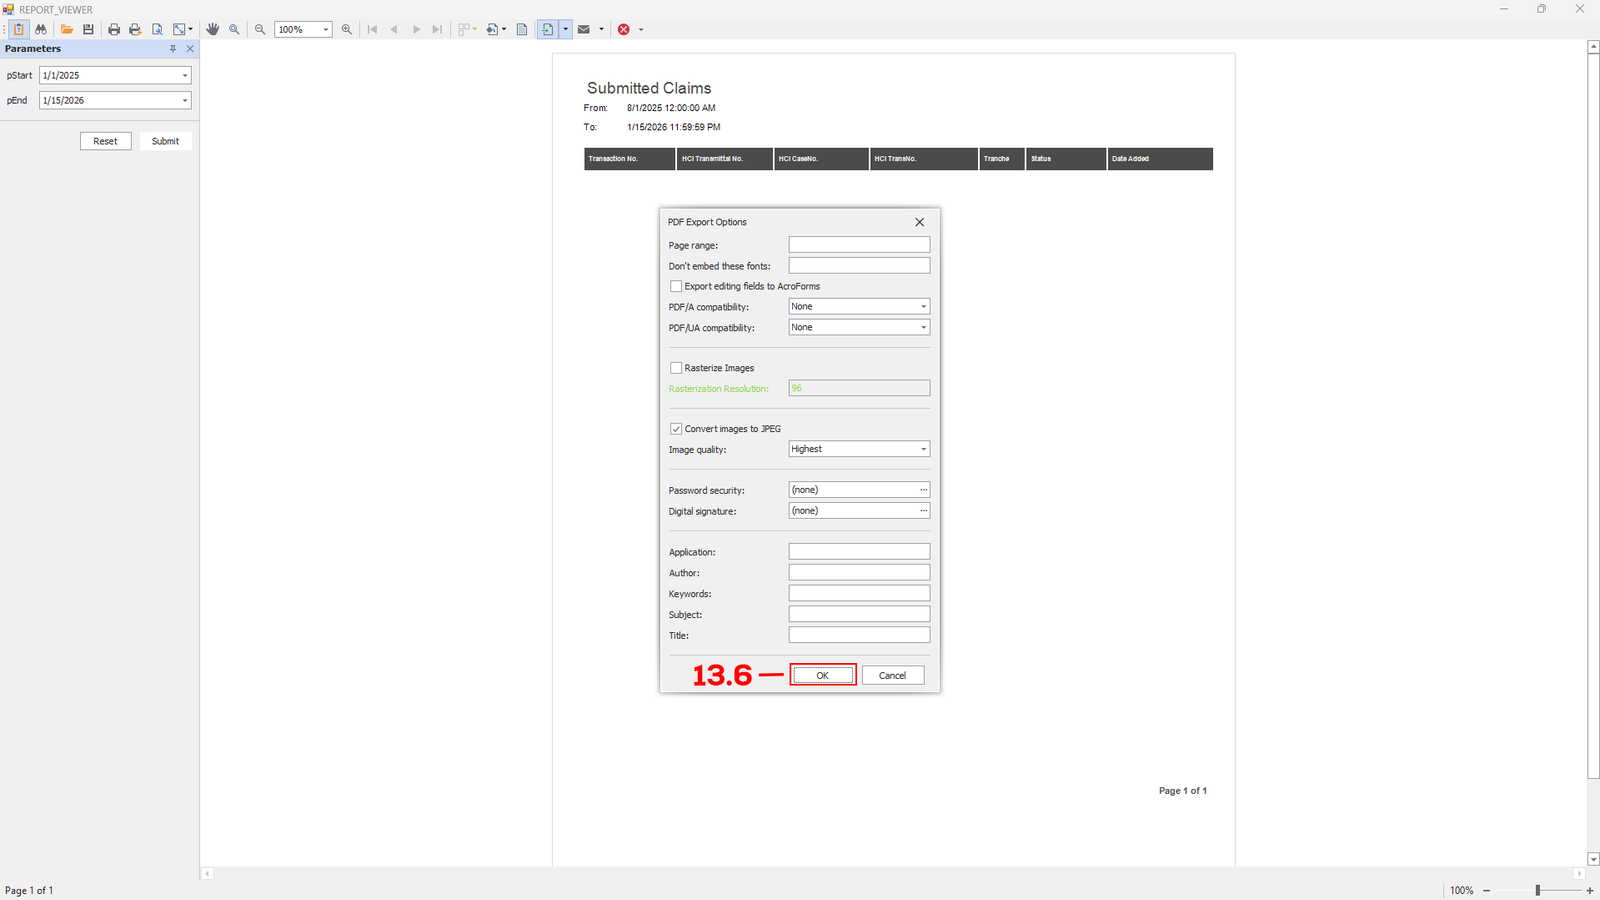
(E-Konsulta-Image 13.4 Report)
PDF Export Options module will appear, click ok (see 13.6) to save the file as PDF.
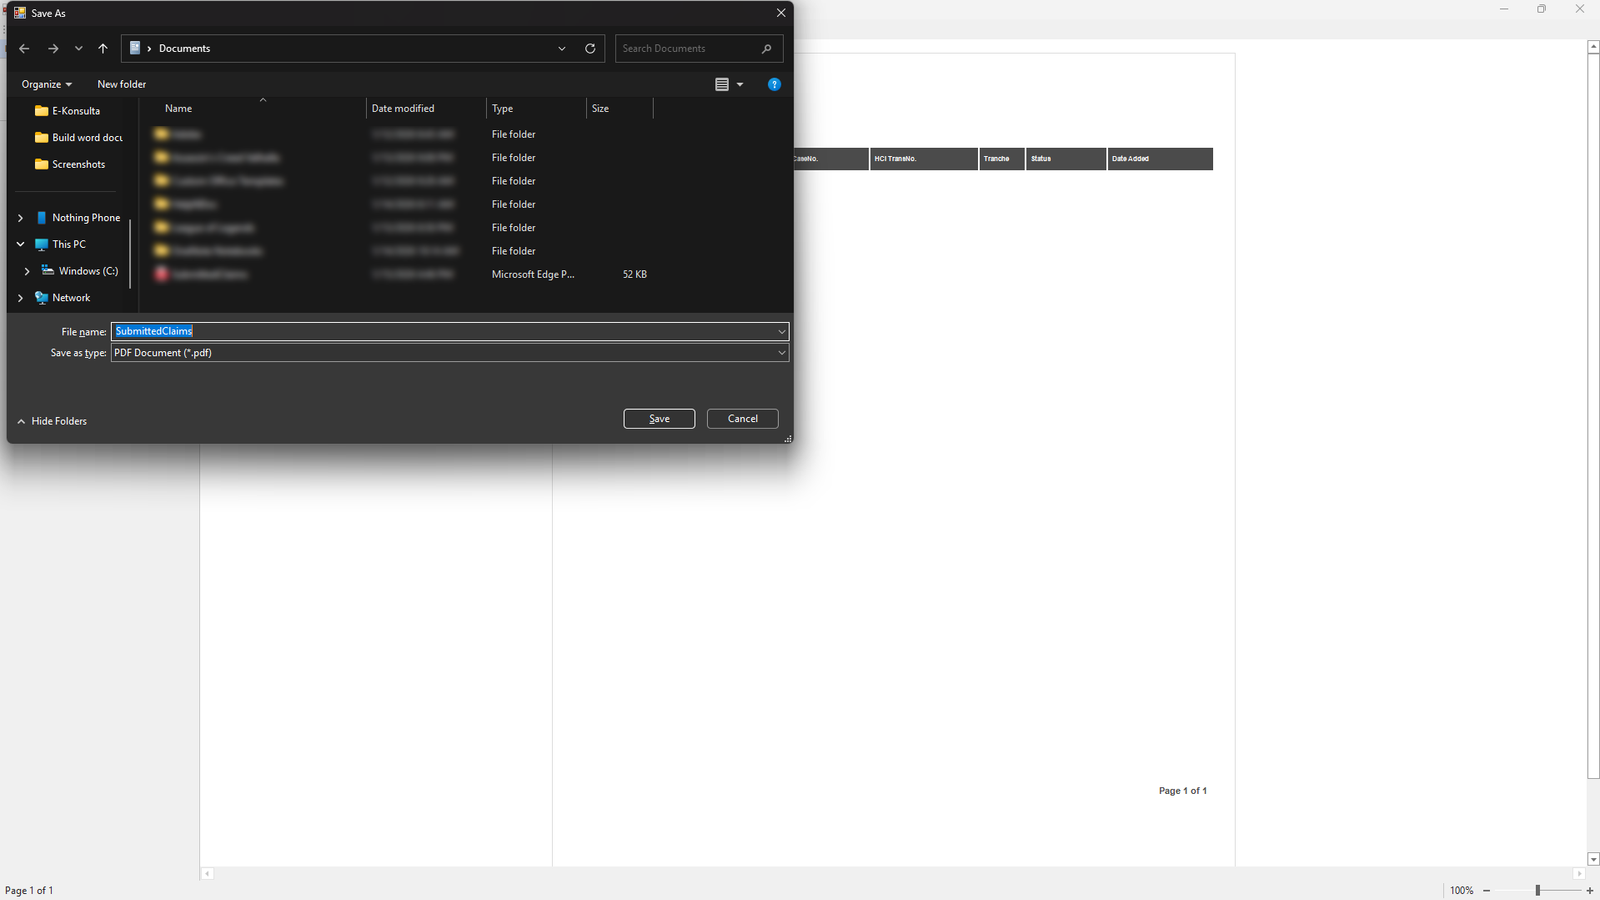
(E-Konsulta-Image 13.5 Report)
Enter the filename or you can change the save path if and click save.
Created with the Personal Edition of HelpNDoc: Full-featured Help generator
View activity log
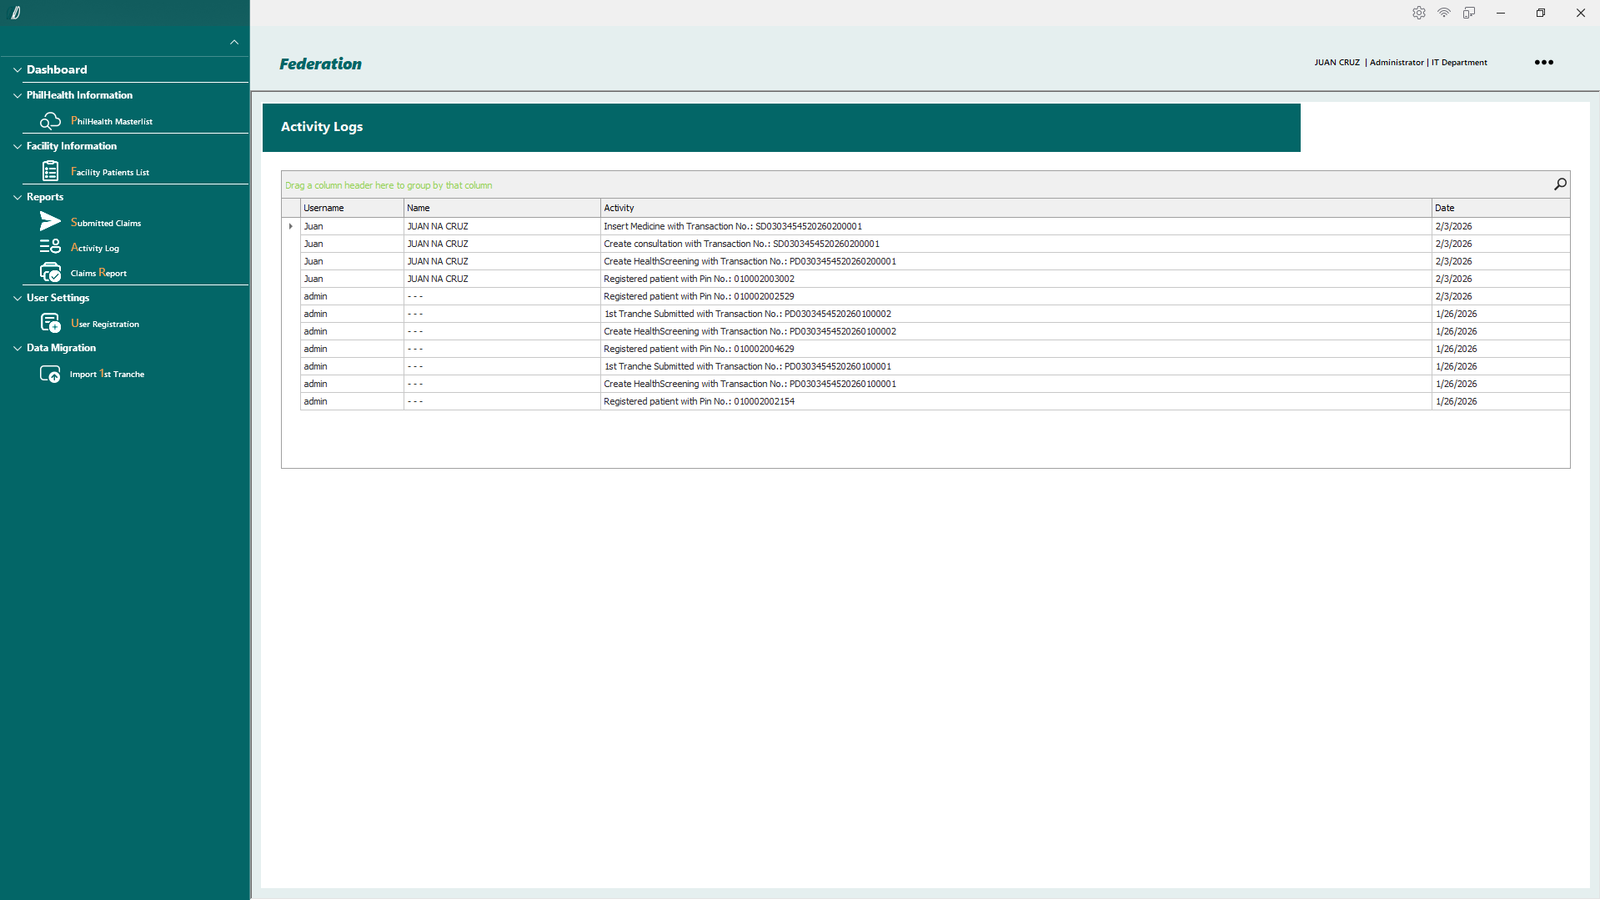
(E-Konsulta-Image 14 Activity Log)
Activity Logs Module:
This module displays all processed claims. It records the user who processed each claim, the action performed, and the date and time the activity occurred.
Created with the Personal Edition of HelpNDoc: Make your documentation accessible on any device with HelpNDoc
Medical Mission Group Hospitals and Health Services Cooperative of the Philippines Federation